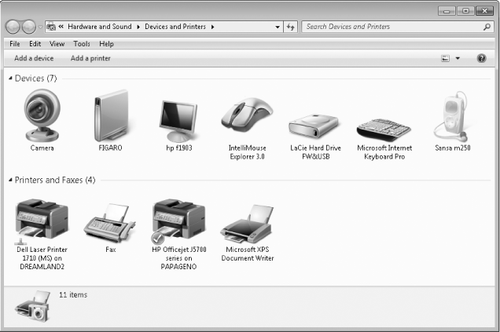
One of the significant usability improvements in Windows 7 is the Devices And Printers folder, shown in Figure 1.
Devices And Printers resides within Control Panel, but you don't have
to open Control Panel to get there. Instead, you can use the Devices And
Printers command on the right side of the Start menu.
If you're a Windows
veteran, you might be accustomed to digging through layers of Control
Panel to do such things as change the pointer speed of your mouse or the
repeat delay of your keyboard. You might also have made an occasional
visit to Device Manager to see why a device isn't working as expected.
You can still do all that in Windows 7, of course, but Devices And Printers might save you some of these trips.
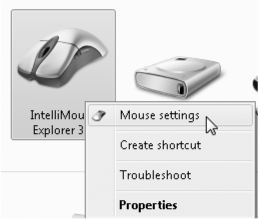
Most essential
configuration tasks for your printers and other hardware are now
available via context menus in Devices And Printers. For some devices,
such as monitors, keyboards, and mice, you'll find a settings command at the top of the menu:
For complex devices,
such as your computer itself, you'll find a rich assortment of options,
some of which (Mouse Settings and Keyboard Settings, for example)
duplicate commands found on individual peripherals:
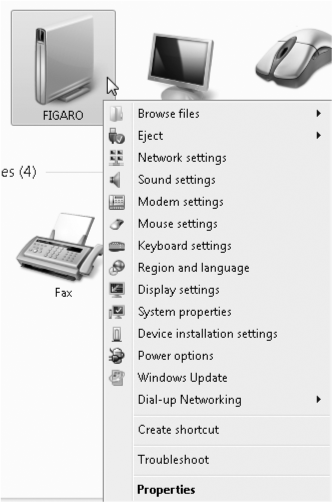
Three commands are
common to all of these context menus: Create Shortcut, Troubleshoot, and
Properties. Devices that aren't working properly are flagged with
yellow exclamation points; the same familiar symbol highlights their Troubleshoot commands:

The Create Shortcut command plants a shortcut on your desktop, which makes the device's context menu accessible outside of Devices
And Printers. If you create a shortcut to the entry for your computer,
for example, you can right-click that shortcut to go straight to such
places as Sound Settings or Power Options.
The Properties
command provides an alternative route to the dialog boxes that have
traditionally been provided by Device Manager.
1. Managing Printers and Print Queues
To configure a printer
or work with a print queue, click the printer in Devices And Printers.
Depending on the type of printer, you will see either a simple
printer-queue dialog box or something more elaborate like the one shown
in Figure 2.

The top part of this display provides status information. In Figure 24-2,
for example, we see that the HP Officejet is set to print in portrait
mode on letter-size paper and currently has nothing to do. The options
below let you inspect and manipulate the print queue, change print
settings (switch from portrait to landscape, for example), and work with
the printer's Properties dialog box.
2. Installing a Printer
To install a local printer that plugs into a USB port, you don't need to do anything in the Printers And Devices folder. Simply connect the device, and Plug and Play will do the rest . For information about installing a local printer that doesn't meet these standards, see the following section.
To make a networked printer available locally, click Add A Printer on the Devices
And Printers toolbar. Then, in the Add Printer wizard, select the
second option, Add A Network, Wireless Or Bluetooth Printer, and click
Next. The wizard will scan the network for available printers:

Select the printer you
want to install, and click Next. Because Windows requires a local copy
of the network printer's driver, you are likely to see a dialog box
similar to the following:
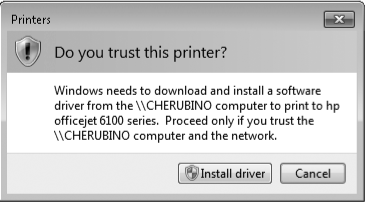
Click Install Driver. In a moment, you'll receive a success message and be given the opportunity to make the new printer your default.
3. Installing a Non–Plug and Play Printer
Printers
that physically attach through a non–Plug and Play connection, such as a
parallel port, might require some extra setup work. If the printer
driver package includes a setup program, run it first. Then open Devices And Printers and click Add A Printer. In the Add Printer wizard, click Add A Local Printer.
To complete the setup process, you need to first specify the port to which the printer is attached. For most older printers that attach to a parallel port, the correct choice is LPT1.
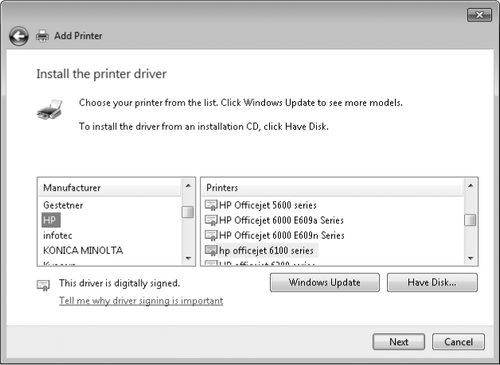
Click Next to select the correct driver. You can choose from a list of drivers available in the Windows 7 driver store (shown in Figure 3).
This list should include any drivers you installed by running a setup
program. If you have downloaded a printer driver that doesn't include a
setup program, click Have Disk and browse to the correct location. If
you don't have a driver, or if you suspect a more recent version might
be available, click Windows Update to check Microsoft's collection of
updated, signed drivers; after the update is complete, check the list
again to see if your printer model is available.
|
If you can't find a
driver that's specifically designed for your printer, you might be able
to get away with another driver. Check the hardware documentation to
find out whether the printer emulates a more popular model, such as a
Hewlett-Packard LaserJet. If so, choose that printer driver, and then
print some test documents after completing setup. You might lose access
to some advanced features available with your model of printer, but this
strategy should allow you to perform basic printing tasks.
|
The final step in the
printer setup process is giving the printer a name. The default name
typically includes the manufacturer's name and printer model; you can
change this value to a more descriptive name now or later.