ScreenTips on Shapes
Visio
ScreenTips offer a simple and clandestine way to add comments to your
shapes. ScreenTips are just like ToolTips that you see everywhere in
Windows when your mouse stops moving over some bit of the user
interface.
If you hover over a Visio shape
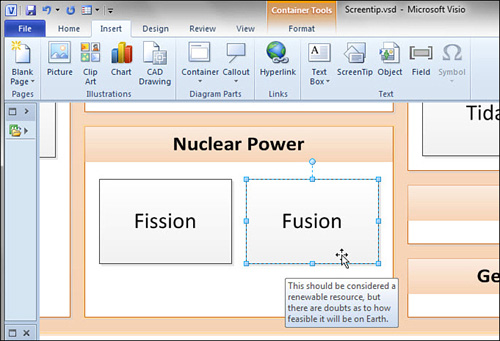
that has a ScreenTip, a little window pops up, displaying informational
text for your enlightenment. Figure 1 shows one of these exciting ScreenTips in action.

ScreenTips are intended as a
shape designer feature—a vehicle for communicating to users how to use
the shape, or what it is for. The theory is that a forlorn user will
pause in confusion over a shape, and your ScreenTip will pop up and
enlighten him or her!
However, there’s no
reason they can’t be used to enhance your diagrams creatively in a
nondistracting way. The only drawback is that there is no visual clue
that a shape has a ScreenTip in the first place—you have to pause over a
shape to find out whether it has one.
Adding ScreenTips to Shapes
Adding a ScreenTip to a shape
couldn’t be easier. Just select a shape and then go to the Insert tab.
In the Text group, click ScreenTip; then enter your message in the
dialog that appears.
Adding a ScreenTip to a Shape
1. | Select a shape in any drawing.
|
2. | In the Text group on the Insert tab, click ScreenTip. You can see this Ribbon and button in Figure 1.
|
3. | In the pop-up dialog that appears, type a message and then click OK.
|
4. | Hover
your mouse cursor over the shape. You should see your ScreenTip display
after a second or two. Note that the shape need not be selected to show
the tip.
|
Strategies for Using ScreenTips
ScreenTips are great
because they add value to your drawing without unnecessarily cluttering
it. However, they don’t print and there is no visual cue that a shape
even has a tip.
If you are thinking
about incorporating ScreenTips into your work, consider the following
suggestions to make them more discoverable and usable:
Get in the habit of hovering over every single shape (no, I’m not serious!).
Always append an asterisk (*) to the text of shapes that have ScreenTips.
Add
ScreenTips only to dedicated “ScreenTip shapes.” For example, you could
use small, brightly colored circles that have no text. Users easily see
these circles, but your drawing isn’t cluttered by the full text of the
tip.
Use a
Callout shape as a “ScreenTip Shape.” Give it no text and make the word
bubble as small as possible. The tip moves along with its target shape,
the user sees a small circle or square that indicates a tip, but the
tip’s full text doesn’t clutter the drawing.
Use dedicated ScreenTip shapes, but assign them to a nonprinting layer so that they don’t show up in printed output.
Use the Comment feature from the Review tab . Review comments are visible to the user in a collapsed form but don’t print.
ScreenTip
text wraps automatically, but you might want to force a new line
manually, say for a title or for some tabular information. The ScreenTip
editing box doesn’t accept the Return key by default, but if you hold
down the Ctrl key while pressing Return, you can insert new lines as you
like.
Headers and Footers
You’ve just seen that
ScreenTips are visible only when you are editing. But sometimes you need
information to appear only when printing. That’s where headers and
footers come in.
Word and Excel users already know that a header is a line of text that appears at the top of each printed page; a footer
appears at the bottom. They are typically used to hold information such
as filename, document title, or page number—information that is obvious
when you are working in Visio, but not when you are holding the hard
copy in your hand.
Visio provides three fixed information areas each for headers and footers. Providing a grand total of six possible fields.
You add headers and footers
from the Print Preview tab of the Ribbon, which you can get to via
File, Print, Print Preview. Clicking Header & Footer opens the
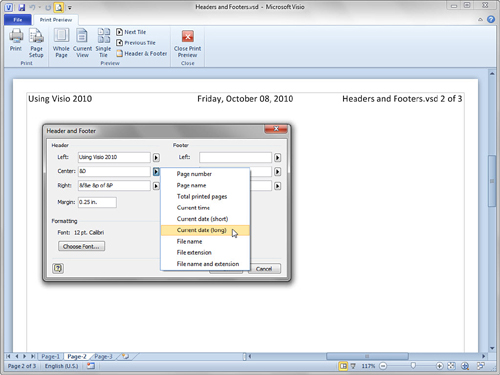
dialog shown in Figure 2. Note the two columns of three fields in which you can enter information.

You can enter any text you
want into each box, and you can also add field codes for dynamic
information. Field codes are used for information that might change,
such as the filename and date, or information that varies from page to
page, such as number or name. Visio has a small set of field codes, but
even so, you don’t have to memorize them. The arrows to the right of
each text box in the Header and Foorter dialog help you to insert them. Table 1 summarizes the available field codes for headers and footers.
Table 1. Field Codes for Headers and Footers
| Field Information | Field Code |
|---|
| Page number | &p |
| Page name | &n |
| Total printed pages | &P |
| Current time | &t |
| Current date (short) | &d |
| Current date (long) | &D |
| Filename | &f |
| File extension | &e |
| Filename and extension | &f&e |
|
Some users find the set of
field codes too limiting. For example, there is no code for the
document’s directory. The workaround is to insert fields into shapes,
where the choices are much more varied and numerous. You effectively
create headers and footers by using shapes placed on background pages.
This is described in the next section.
|
You can mix text and field
codes to make more readable headers. One of the most common combinations
is &p plus &P which shows which page you are on, out of the
number of pages in the document. Here are a few ways you might mix codes
with text:
| → | pg 2 of 3 pages |
| → | 2/3 |
| → | Page 2 (3 total) |
Remember that headers
and footers appear on every page in a document, but they don’t show on
the drawing page when you are working on your diagram. You only see them
in Print Preview, on printed documents, and documents exported as PDF
or XPS files.
Headers
and footers print over drawing page content. For this reason, if you
have graphics close to the top or bottom of the page, be aware that
headers and footers might obscure them when you print.