3. Personalizing the Start Menu
Although Windows 7 does not offer a "classic"
Start menu as found in Windows XP and Windows Vista, it offers plenty
of other personalization options. Begin your fine-tuning on the Start
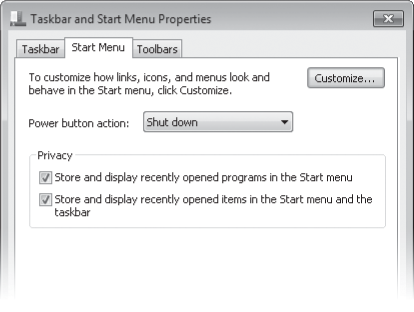
Menu tab of the Taskbar And Start Menu Properties dialog box (shown in Figure 4), which you reach by right-clicking the Start button and choosing Properties.

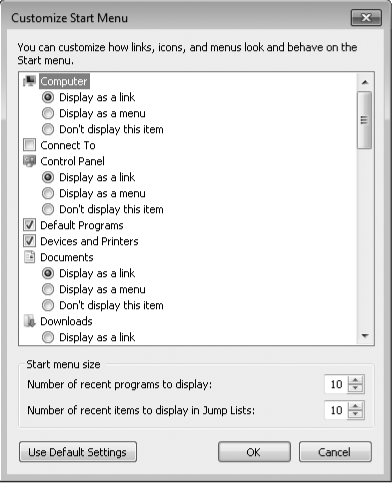
Many more options become available when you click Customize to display the Customize Start Menu dialog box, shown in Figure 5.

3.1. Customizing the Left Side of the Start Menu
Quite apart from which programs appear in the pinned programs section at the top of the left side of the Start menu , you have several choices that control the menu's left side.
For starters, your choices under Privacy on the Start Menu tab of Taskbar And Start Menu Properties (shown earlier in Figure 4-9) determine whether Windows keeps track of recently
used programs and displays them below the pinned programs, and whether
Windows keeps track of recently opened documents and displays them as a
Jump List associated with a pinned or recently used program. If you
choose to keep those options enabled, you can proceed to the Customize Start Menu dialog box (shown in Figure 4-10) and, using the settings under Start Menu Size,
specify the maximum number of recent programs to include on the Start
menu (the allowable range is 0 through 30) and the maximum number of
recent items to include on each Jump List (0 through 60).
|
The list of recently
used programs—the items that appear below the pinned programs on the
left side of the Start menu—is controlled by Windows. The list includes
only shortcuts to executable files you open, such as .exe files and .msc
files. The following items are excluded by default (for more
information, see Knowledge Base article 282066, "Frequently Used
Programs Not Automatically Added to the Start Menu," at w7io.com/0401):
Programs
listed in the AddRemoveApps value of the registry key
HKLM\Software\Microsoft\Windows\CurrentVersion\Explorer\FileAssociation.
By default, the following items are excluded: Setup.exe, Install.exe,
Isuninst.exe, Unwise.exe, Unwise32.exe, St5unst.exe, Msoobe.exe,
Lnkstub.exe, Control.exe, Werfault.exe, Wlrmdr.exe, Guestmodemsg.exe,
Msiexec.exe, Dfsvc.exe, and Wuapp.exe. By modifying this registry value,
you can tailor the exclusion list to suit your needs. Items
whose shortcut names include any of the following text: Documentation,
Help, Install, More Info, Readme, Read Me, Read First, Setup, Support,
What's New, or Remove. This list of exclusion strings is specified in
the AddRemove-Names value of
HKLM\Software\Microsoft\Windows\CurrentVersion\Explorer\
FileAssociation. Items
in the Games folder (Professional, Ultimate, and Enterprise editions
only). Apparently to prevent workers who goof off from getting in
trouble, business editions of Windows 7 exclude games from the list of
recently used programs.
|
Other options
scattered about the Customize Start Menu dialog box (all selected by
default) determine the appearance and behavior of the left side of the
Start menu:
Sort All Programs Menu By Name
When selected, Windows always sorts the All Programs menu
alphabetically. Clear this option to display the menu in the order that
items were added to it, or in the order you create by moving items
around the menu.
Use Large Icons Clear this option if you want to fit more items on the left side.
Enable Context Menus And Dragging And Dropping
When this option is selected, you can move items on the left side of
the menu and on the All Programs menu by dragging. In addition, context
menus (the menu that appears when you right-click an item on the left
side of the menu or on the All Programs menu) are enabled. Clearing this
option disables both capabilities.
Highlight Newly Installed Programs
When this option is selected, new programs are highlighted with a
colored background so that they're easy to find; if you find that
distracting, clear the option.
Open Submenus When I Pause On Them With The Mouse Pointer When this option is selected, Jump Lists and cascading menus on the right side of the Start menu appear when you hover the mouse; when this option is cleared, you must click the arrow to display these items.
3.2. Customizing the Right Side of the Start Menu
The right side of the Start menu has an assortment of buttons that open various data folders and system folders. Options in Customize Start Menu (shown in Figure 4-10) let you add to or subtract from this collection, and they let you control the behavior of certain items.
|
The picture that
appears at the top of the right side of the Start menu is the one
associated with your user account (the one that also appears on the
Welcome screen). If you're not happy with it, click it. That will take
you to the User Accounts section of Control Panel, where you can specify
a different picture.
|
Choosing Link, Menu, or No Show
Several of the items in the Customize Start Menu list offer you the
choice of Display As A Link, Display As A Menu, and Don't Display This
Item. The first option displays a button that opens the folder in
Windows Explorer, whereas the second option displays a button that opens
the folder's contents as a submenu sprouting from the side of the Start
menu. Following is a list of folders you can customize in this manner:
|
You can have it both
ways. If you opt for submenus, you can still open items in Windows
Explorer. Just right-click and choose Open.
|
Displaying Other Folders Other folders don't offer
the link vs. submenu option, but your Start-menu customization is not
complete until you decide whether to include any of these folders for
single-click access:
Favorites Menu (displays your Favorites menu as a cascading submenu)
Homegroup (displays shared resources on your home network)
Network (displays computers and devices on your network)
Recent Items (displays your 15 most recently opened documents, from all applications)
Default Programs (opens the Control Panel tool for specifying which program opens each document type)
Devices And Printers (opens the Control Panel tool for managing your computer hardware)
System Administrative Tools (displays a menu of advanced system-management programs)
Connect To (displays a list of available network connections)
Help (opens Help And Support)
Displaying the Run Command The Run command, a perennial favorite of computer enthusiasts, is no longer a standard Start menu feature. You can make sure it's still part of your Start menu by selecting Run Command in the Customize Start Menu dialog box.
You might find you can
live comfortably without the Run command. When you're tempted to type a
program name in the Run dialog box, try typing it in the Start menu
search box instead. The Search feature won't always get you where you
want to go (it's no good when you need a command-line switch, for
example), but it's more versatile than you might expect. Typically, you
can run an executable by simply typing its name in the search box and
pressing Enter, just as you would in the Run dialog box. On the other
hand, the Run dialog box remembers command strings that you have entered
before, and the search box has nothing to replace that.
|
Whether or not your Start menu includes it, you can always get to the Run dialog box by pressing Windows logo key+R.
|
3.3. Controlling Where the Search Box Searches
Two options in the Customize Start Menu dialog box let you customize the behavior of the Start menu search box:
Search Other Files And Libraries
The default setting, Search With Public Folders, includes in a
Start-menu search the same document files and folders that are included
in other searches.
With the other settings, you can limit the scope of a search to exclude
public folders, or you can completely disable the search of documents
and folders.
Search Programs And Control Panel
With this option selected (the default setting), searches look for
program names and Control Panel tools or tasks that match your search
text.