Using a file type that the content pipeline already
imports is one thing; there are times when you have a completely new
type of file to import (for example, a level in your game). So let’s
create an example that shows off a concept such as that. First, create a
new Game project. You’re actually going to create quite a few projects here, so add a new Content Pipeline Extension project to the solution as well that will hold your importer. Lastly, add another project to your solution, but this time a Game Library project. This is used to hold the data types that both your game and the content pipeline extension will need.
Set up your
project references correctly as well. Add a reference to the game
library project you just created to both the content pipeline extension
project as well as the game project. Add a reference to the content
pipeline extension project to your game’s content project as in the
previous example.
Now, let’s create the shared
data type that will represent your game’s level. In your game library
project, replace the class and namespace that it auto-generated with the
following:
namespace ContentImporter
{
    public class Level
    {
        public List<Vector3> PositionList;
        public List<Vector3> RotationList;
    }
}
You don’t need anything fancy for this example. Simply hold a couple lists of Vector3,
one of which holds the position of each model in your world, and the
other holds the rotation portion. Before the content pipeline extension
portion, let’s implement the game portion. Add the following variables
to your game project:
Level mylevel;
Model model;
Matrix view;
Matrix proj;
Add a model to your content project. The downloadable example uses the depthmodel.fbx model. In your LoadContent method, create the following objects:
view = Matrix.CreateLookAt(new Vector3(0, 10, 150), Vector3.Zero, Vector3.Up);
proj = Matrix.CreatePerspectiveFieldOfView(MathHelper.PiOver4,
    GraphicsDevice.Viewport.AspectRatio,
    1.0f, 1000.0f);
model = Content.Load<Model>("depthmodel");
mylevel = Content.Load<Level>("mylevel");
Finally, replace your Draw method with the following:
protected override void Draw(GameTime gameTime)
{
    GraphicsDevice.Clear(Color.CornflowerBlue);
    foreach (ModelMesh mesh in model.Meshes)
    {
        foreach (BasicEffect effect in mesh.Effects)
        {
            effect.EnableDefaultLighting();
        }
    }
    for(int i = 0; i < mylevel.PositionList.Count; i++)
    {
        model.Draw(Matrix.CreateTranslation(
            mylevel.PositionList[i]) * Matrix.CreateFromYawPitchRoll(
            mylevel.RotationList[i].X, mylevel.RotationList[i].Y,
            mylevel.RotationList[i].Z), view, proj);
    }
}
Here, you use the data from
your level to render the model wherever it says after enabling the
default lighting model. With that out of the way though, you are almost
ready to create your content pipeline extension. First, add a new file
to your content project called mylevel.mylevel, and include the following data in it:
10 10 10 0.3 0.2 0.1
20 20 20 0.1 0.2 0.3
30 30 30 0.2 0.3 0.1
1.5 2.3 1.7 0.4 0.5 0.6
40.2 70.1 -10.2 0.6 0.5 0.4
-10 10 -10 0.7 0.8 0.9
20 -20 20 0.9 0.8 0.7
-30 30 -30 0.8 0.9 0.7
This is the data you are going
to import that represents your level. Each line is six different numeric
values. The first three represents the position in the world, and the
next three represents the yaw, pitch, and roll angles of rotation for
the model. Now, go to your content pipeline extension project and remove
the default ContentProcessor class it auto-generated, and replace it with the following:
[ContentImporter(".mylevel", DisplayName="My Level Importer")]
public class MyContentImporter : ContentImporter<ContentImporter.Level>
{
}
Much like your processor,
use an attribute to describe your importer. The first parameter is the
extension of the file the class will import; in this case, we picked .mylevel. You also need to derive from the ContentImporter
class using the type you will fill with the imported data. This object
has a single abstract method (again much like the processor) called
Import. You can use this implementation of the method:
public override ContentImporter.Level Import(string filename,
    ContentImporterContext context)
{
    ContentImporter.Level level = new ContentImporter.Level();
    level.PositionList = new List<Vector3>();
    level.RotationList = new List<Vector3>();
    using (StreamReader reader = new StreamReader(File.OpenRead(filename)))
    {
        while (!reader.EndOfStream)
        {
            string current = reader.ReadLine();
            string[] floats = current.Split(' ');
            level.PositionList.Add(new Vector3(float.Parse(floats[0]),
                float.Parse(floats[1]), float.Parse(floats[2])));
            level.RotationList.Add(new Vector3(float.Parse(floats[3]),
                float.Parse(floats[4]), float.Parse(floats[5])));
        }
    }
    return level;
}
Note
If you have compilation errors with the StreamReader class, add a using clause at the top of the code file for System.IO.
Notice that the method is quite simple. You create your level
object that you’ll return after importing the data. You create the two
lists that will store the data. You then use the standard runtimes StreamReader
class to read through the file (which is passed in as a parameter to
the import method). You split each line of the file into the individual
numbers they contain and drop those into your two lists, and you are
done.
Now, this code doesn’t
check errors, so if something goes wrong, it won’t work. We discuss ways
to handle this in a few moments. Build the content pipeline extension
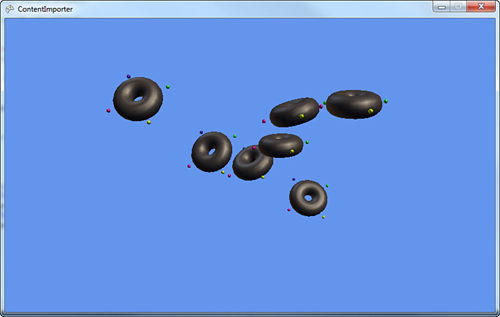
project, go back to your content project, and notice that your mylevel.mylevel file uses the My Level Importer importer. If it is not, select the content importer, and make sure that the Build Action is set to Compile. If you run your application now, you see your level in action, as in Figure 1.
So as you see, this works,
but who would want to build a level that way? You still have to create a
model in your game, and you use only a single model in the level. It
would be better to make your importer work, and import models and
textures and everything all in one go to make a much better level.
