Microsoft Excel isn’t the
only Office product that SmartLists can be exported to. They can also be
exported to Microsoft Word. This can be useful for exporting records
for inclusion into a report, financial statement footnotes, or any other
type of Word document.
Like the export to Excel
feature, export to Word is very easy to do. In this recipe, we’ll take a
look at how and why you would want to export SmartLists to Word. For
our example, we’ll use a very small set of records showing retained
earnings beginning balances for several years from the sample company.
This type of data could be useful for inclusion in financial statement footnotes for example.
How to do it...
To send a SmartList to Microsoft Word:
1. Select the SmartList icon from the toolbar at the top or select Microsoft Dynamics GP from the top and click on SmartList.
2. Select Financial | Account Summary from the left pane of the SmartList window.
3. Click on Search. For Search Definition 1 set the column name to Period ID, the Filter field to is equal to, and the Value field to 0 (zero):

4. For Search Definition 2 set the column name to Account Number, the Filter field to contains, and the Value field to 3030 and click on OK.
5.
Period 0 contains the beginning balances for each year and account 3030
is the retained earnings account in the sample company.
6. Click on the Word button to send this data to Microsoft Word.
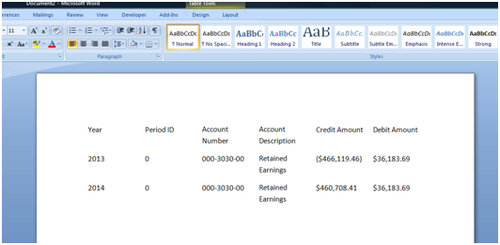
7. Microsoft Word will open a new document with the SmartList data included in a Word table format:

How it works...
The nature of Microsoft Word
makes this feature less useful than Excel for processing large amounts
of tabular data. However, if users need to insert small amounts of data
into a much larger document then exporting the data to Word is an easy
way to get tabular data into a report. Typically, once exported to Word,
the data would be cut and pasted into the larger report document,
keeping the table intact.
Saving the related SmartList as a Favorite makes this process easily repeatable and provides a consistent data set.