To begin using Resource Governor for managing the resources of your workloads, follow these steps:
1. | Enable Resource Governor.
|
2. | Create your user-defined resource pools.
|
3. | Define your workload groups and assign them to pools.
|
4. | Create the classifier function.
|
5. | Register the classifier function with the Resource Governor.
|
Note
Resource Governor can be set up
and managed using either SQL Server Management Studio (SSMS) or via
T-SQL commands. In the following sections, we first show you how to
perform the tasks in SSMS and how the same actions can be implemented
using T-SQL.
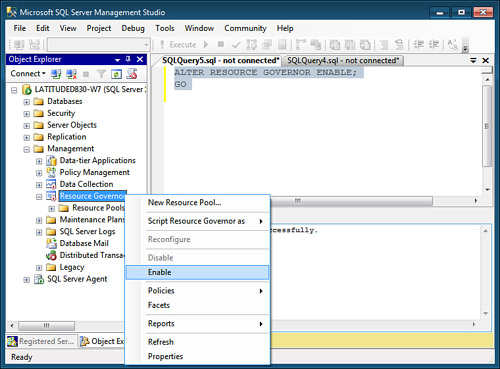
Enabling Resource Governor
Before
you can begin creating your resource pools, you need to enable the
Resource Governor first. To enable Resource Governor in SSMS, in Object
Explorer, expand the Management node, right-click on the Resource Governor node, and select Enable (see Figure 1).
Alternatively, you can also enable Resource Governor by using the ALTER RESOURCE GOVERNOR command in T-SQL:
ALTER RESOURCE GOVERNOR RECONFIGURE
When Resource Governor is not enabled, the RECONFIGURE option enables Resource Governor. Enabling Resource Governor has the following results:
The classifier function, if defined, is executed for new connections so that their workload can be assigned to workload groups.
The resource limits specified in the Resource Governor configuration are honored and enforced.
Any
connections that existed before Resource Governor was enabled are now
affected by any configuration changes made when Resource Governor was
disabled.
When Resource Governor is already enabled, the RECONFIGURE option must be executed to apply any configuration changes made using the CREATE|ALTER|DROP WORKLOAD GROUP or CREATE|ALTER|DROP RESOURCE POOL statements.
To determine whether Resource Governor is currently enabled, you can run a SELECT statement against the sys.resource_governor_configuration system catalog table to view the is_enabled column:
select is_enabled from sys.resource_governor_configuration
go

is_enabled
----------
1
To determine whether any RESOURCE GOVERNOR configuration changes are pending, you can use the sys.dm_resource_governor_configuration dynamic management view (DMV):
select is_reconfiguration_pending
from sys.dm_resource_governor_configuration
go

is_reconfiguration_pending
-----------------------------
0
To disable Resource Governor, right-click on the Resource Governor node and select Disable or execute the following command in T-SQL:
ALTER RESOURCE GOVERNOR DISABLE
Defining Resource Pools
When setting up a Resource
Pool, you have to specify a name for the pool and set its properties.
The properties available for a resource pool are
Name— The name used to refer to the resource pool
Minimum CPU %— The guaranteed average CPU bandwidth for all requests to the resource pool when there is CPU contention
Maximum CPU %— The maximum average CPU bandwidth for all requests to the resource pool when there is CPU contention
Min Memory %— The guaranteed minimum amount of memory reserved for the resource pool that cannot be shared with other resource pools
Max Memory %— The total server memory that can be used by requests to the resource pool
Creating a Resource Pool in SSMS
The following steps walk you through using SSMS to create a resource pool named ReportPool that you’ll configure for handling report query workloads:
1. | In Object Explorer, expand the Management node for a SQL Server Instance and expand the Resource Governor node.
|
2. | Right-click on Resource Pools and select New Resource Pool to open the Resource Governor Properties page (see Figure 2).
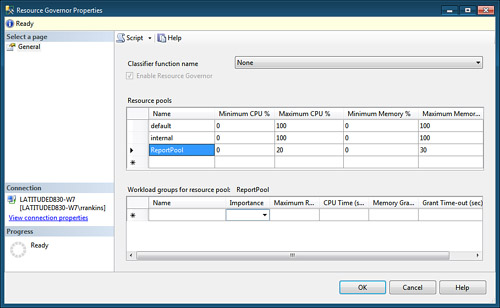
|
3. | In the Resource Pools grid, click the first column in the empty row. This row is labeled with an asterisk (*).
Note
If the Resource Pools grid does
not have a row labeled with an asterisk, Resource Governor has not been
enabled yet. You can enable Resource Governor without leaving the
Resource Governor Properties page by putting a check mark in the Enable
Resource Governor check box.
|
4. | Double-click the empty cell in the Name column. Type in the name that you want to use for the resource pool. For this example, use the name ReportPool.
|
5. | Set the CPU and Memory resource values. In this example, leave the Min CPU % and Min Memory % values at 0 and configure the Max CPU % and Max Memory % values at 20 and 30, respectively.
|
6. | To create the pool and exit the dialog, click OK.
|
To verify that the new pool was created, you expand the Resource Pools folder under the Resource Governor node and look for a node named ReportPool. Alternatively, you can run a query against the sys.resource_governor_resource_pools dynamic management view, similar to the following, which also displays the resource pool configuration:
select name,
       min_cpu_percent as MinCPU,
       max_cpu_percent as MaxCPU,
       min_memory_percent as 'MinMEM%' ,
       max_memory_percent as 'MaxMEM%'
from sys.resource_governor_resource_pools
go

name       MinCPU MaxCPU MinMEM% MaxMEM%
---------- ------ ------ ------- -------
internal   0      100    0       100
default    0      100    0       100
ReportPool 0      20     0       30
Creating a Resource Pool in T-SQL
Now that you’ve set up the ReportPool resource pool in SSMS, you are able to set up a second resource pool, OLTPPool, using T-SQL. The command to create a resource pool, CREATE RESOURCE POOL, takes four arguments: MIN_CPU_PERCENT, MAX_CPU_PERCENT, MIN_MEMORY_PERCENT, and MAX_MEMORY_PERCENT. After creating the resource pool, you need to run ALTER RESOURCE GOVERNOR RECONFIGURE to apply the new resource pool:
CREATE RESOURCE POOL OLTPPool
   WITH
        (min_cpu_percent=80,
         max_cpu_percent=100,
         min_memory_percent=75,
         max_memory_percent=100)
GO
ALTER RESOURCE GOVERNOR RECONFIGURE;
GO
Now
that you’ve defined the resource pools needed, the next step is to
define your workload groups and associate them with a resource pool.
