Defining Workload Groups
After you define your
resource pools, the next step is to create the workload groups and
associate them with the appropriate resource pools. Multiple workgroups
can be assigned to that same pool, but a workgroup cannot be assigned to
multiple resource pools.
Creating Workload Groups in SSMS
To create a workload group in SSMS, perform the following steps:.
1. | In Object Explorer, expand the Management node, right-click the Resource Governor node, and then click Properties to bring up the Resource Governor Properties page.
|
2. | In the Resource Pools grid, click the row for the resource pool you want to create a workload group for (in this example, the ReportPool resource pool). This creates a new empty row in the Workload Groups for Resource Pool grid for that pool.
|
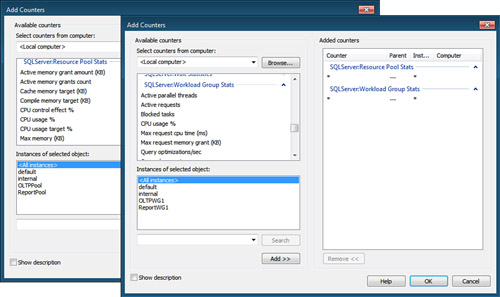
3. | Double-click the empty cell in the Name column for the empty workload group row and type in the name you want to use for the workload group (for this example, ReportWG1) and any other properties you want to specify (see Figure 3)
|
4. | Click OK to exit the Properties page and create the workload group.
|
The additional, optional
properties available for workload groups let you set a finer level of
control over the execution of queries within a workload group. The
options available are
Importance— Specifies the relative importance (LOW, MEDIUM, or HIGH)
of the workload group within the resource pool. If you define multiple
workload groups in a resource pool, this setting determines whether
requests within one workload group run at a higher or lower priority
than other workload groups within the same resource pool. MEDIUM is the default setting. Currently, the weighting factors for each setting is LOW=1, MEDIUM=3, and HIGH=9. This means that the scheduler will attempt to execute sessions in workgroups with importance of HIGH three times more often than workgroups with MEDIUM importance, and nine times more often workgroups with LOW importance.
Note
Try to avoid having too
many sessions in groups with high importance or assigning high
importance to too many groups because the sessions will likely end up
getting only equal time on the scheduler as your medium and low priority
sessions.
Maximum Requests— Specifies the maximum number of simultaneous requests allowed to execute in the workload group. The default setting, 0, allows unlimited requests.
CPU Time— Specifies the maximum amount of CPU time, in seconds, that a request within the workload group can use. The default setting is 0, which means unlimited.
Memory Grant %—
Specifies, as a percentage, the maximum amount of execution grant
memory that a single request can take from the resource pool. This
percentage is relative to the amount of memory allocated to the resource
pool. The allowed range of values is from 0 through 100. The default setting is 25. Execution grant memory
is the amount of memory used for query execution, not for data buffers
or cached plans, which can be shared by many sessions, regardless of
resource pool or workload group. Note that setting this value to 0 prevents queries with SORT and HASH JOIN operations in user-defined workload groups from running. It is also not recommended that this value be set greater than 70 because the server may be unable to set aside enough free memory if other concurrent queries are running.
Grant Time-out—
Specifies the maximum time, in seconds, that a query waits for a
resource to become available. If the resource does not become available,
the process may fail with a time-out error. Note that a query does not
always fail when the grant time-out is reached. A query fails only if
there are too many concurrent queries running. Otherwise, the query may
run with reduced resources, resulting in reduced query performance. The
default setting is 0, which means
the server calculates the time-out using an internal calculation based
on query cost to determine the maximum time.
Degree of Parallelism—
Specifies the maximum degree of parallelism (DOP) for parallel queries.
This values takes precedence over the global max degree of parallelism
configuration setting, as well as any query hints. The allowed range of
values is from 0 through 64. The default setting is 0, which means that processes use the global setting. Be aware that MAX_DOP specifies an upper limit only. The actual degree of
parallelism is determined by the server based on the actual number of
schedulers and available number of parallel threads, which may be less
than the specified MAX_DOP. To better understand how the MAX_DOP setting is handled, consider the following:
MAX_DOP as a query hint is considered only if it does not exceed the workload group MAX_DOP setting.
MAX_DOP as a query hint always overrides the max degree of parallelism server configuration option.
Workload group MAX_DOP always overrides the max degree of parallelism server configuration option
If
a query is marked as serial at compile time, it cannot be changed back
to parallel at runtime regardless of the workload group or server
configuration setting.
When
the degree of parallelism is decided, it can be lowered only when
memory pressure occurs. Workload group reconfiguration is not seen for
tasks already waiting in the grant memory queue.
To verify that the new workload group was created, in SSMS Object Explorer, expand the Resource Governor node, expand the Resource Pools folder, expand the ReportPool node, and finally, expand the Workload Groups folder. You should then see a folder named ReportWG1.
Creating Workload Groups in T-SQL
Now that you’ve set up the ReportWG1 workload group in SSMS, you are able to set up a second workload group, OLTPWG1, using T-SQL. The command to create a resource pool, CREATE RESOURCE POOL, takes five optional arguments: REQUEST_MAX_MEMORY_GRANT_PERCENT, REQUEST_MAX_CPU_TIME_SEC, GROUP_MAX_REQUESTS, REQUEST_MEMORY_GRANT_TIMEOUT_SEC, and MAX_DOP, which were described in the preceding section.
CREATE WORKLOAD GROUP OLTPWG1
    WITH ( IMPORTANCE  = HIGH )
    USING OLTPPool
ALTER RESOURCE GOVERNOR RECONFIGURE
GO
To view the workload groups in T-SQL, you can run a query against the sys.resource_governor_workload_groups system catalog view, similar to the following, which also displays the workload group settings:
select wg.name,
       p.name as 'pool',
       group_max_requests as max_req,
       request_max_cpu_time_sec as max_cpu,
       request_max_memory_grant_percent as max_mem,
       request_memory_grant_timeout_sec as grant_timeout,
       max_dop
from sys.resource_governor_workload_groups wg
       inner join
     sys.resource_governor_resource_pools p
       on wg.pool_id = p.pool_id
go

name      pool       max_req max_cpu max_mem grant_timeout max_dop
--------- ---------- ------- ------- ------- ------------- -------
internal  internal   0       0       25      0             0
default   default    0       0       25      0             0
ReportWG1 ReportPool 0       0       25      0             0
OLTPWG1   OLTPPool   0       0       25      0             0
Creating a Classification Function
After
you define your resource pools and workload groups, you need to create a
classification function that contains the logic to evaluate the
connections and assign them to the appropriate workload group. The
classification function applies to each new session connection to SQL
Server. Each session stays in the assigned workload group until it
terminates, unless is it reassigned explicitly to a different group.
There can be only one classification function active at any given time.
If no classifier function is defined or active, all connections are
assigned to the default workload group.
The classification function is a scalar function created with the CREATE FUNCTION statement, which must return a workgroup name as value of type SYSNAME (SYSNAME is a data type alias for nvarchar(128)). If the user-defined function returns NULL, 'default',
or the name of nonexistent group, the session is assigned to the
default workload group. The session is also assigned to the default
context if the function fails for any reason.
The logic of the classification function is typically based on connection properties and often determines the workload_group the connection should be assigned to based on values returned by system functions such as SUSER_NAME(), SUSER_SNAME(), IS_SRVROLEMEMBER(), IS_MEMBER(), HOST_NAME(), or APP_NAME().In addition to these functions, you can use other available property functions when making classification decisions. The LOGINPROPERTY() function now includes two properties (DefaultDatabase and DefaultLanguage) that can be used in classification functions. In addition, the CONNECTIONPROPERTY()
function provides access to the network transport and protocol being
used for the connection, as well as details of the authentication
scheme, the local IP address and TCP port, and the client’s IP address.
For example, you could assign a connection to a workload group based on
which subnet a connection is coming in from.
Tip
If you decide to use either HOST_NAME() or APP_NAME()
in your classifier function, be aware that it’s possible for the values
returned by these functions to be altered by users. In general,
however, the APP_NAME() function tends to work very well for classifying connections.
Tip
A client session may time out
if the classification function does not complete within the specified
time-out for the login. Login time-out is a client property, and as
such, the server is unaware of a time-out. A long-running classifier
function can leave the server with orphaned connections for long
periods. It is important that you create efficient classifier functions
that finish execution before a connection time-out.
If you are using the
Resource Governor, it is recommended that you enable the dedicated
administrator connection (DAC) on the server. The DAC is not subject to
Resource Governor classification and can be used to monitor and
troubleshoot a classification function.
Listing 1 first creates a couple of SQL Server logins (report_user and oltp_user),
which will be used within the classification function to identify which
workload group session connections should be assigned to. After adding
the logins as users in the AdventureWorks2008R2 database, it then creates the classification function in the master database.
Listing 1. Classification Function Example
use master;
create login report_user with password='Rep0rter1'
create login oltp_user with password='01tPus3r1'
go
use AdventureWorks2008R2;
create user report_user
create user oltp_user
EXEC sp_addrolemember N'db_datawriter', N'report_user'
EXEC sp_addrolemember N'db_datareader', N'report_user'
EXEC sp_addrolemember N'db_datawriter', N'oltp_user'
EXEC sp_addrolemember N'db_datareader', N'oltp_user'
go
use master
go
CREATE FUNCTION dbo.WorkgroupClassifier ()
RETURNS SYSNAME WITH SCHEMABINDING
AS
BEGIN
DECLARE @WorkloadGroup SYSNAME = N'Unidentified';
SET @WorkloadGroup = CASE suser_name()
WHEN N'report_user' THEN
N'ReportWG1'
WHEN N'oltp_user' THEN
N'OLTPWG1'
ELSE N'Unidentified'
END;
RETURN @WorkloadGroup;
END;
Go
GRANT EXECUTE on dbo.WorkgroupClassifier to public
go
|
Before
you put the classification function into use, it’s a good idea to test
it. A poorly written classification function could cause your system to
become unresponsive. For example, you can test the WorkgroupClassifier() function in SSMS by executing the following commands under different login IDs:
-- Executed logged in as report_user
select dbo.WorkgroupClassifier()
go
---------
ReportWG1
-- Executed logged in as report_user
select dbo.WorkgroupClassifier()
go
---------
OLTPWG1
-- Executed Logged in as another user
select dbo.WorkgroupClassifier()
go
------------------------
Unidentified
After you
verify the classification function works as expected, you can then
configure it as the classification function using the ALTER RESOURCE GOVERNOR command:
ALTER RESOURCE GOVERNOR
  WITH (CLASSIFIER_FUNCTION = dbo.WorkgroupClassifier);
ALTER RESOURCE GOVERNOR RECONFIGURE;
After
you create the function and apply the configuration changes, the
Resource Governor classifier will use the workload group name returned
by the function to send new requests to the appropriate workload group.
Note
You can also set the classification function for Resource Governor on the Resource Governor Properties page, as shown in Figure 3.
Click the Classifier Function Name drop-down list and choose from the
list of available functions presented. Click OK to save the changes and
reconfigure Resource Governor.
You can verify which classification function Resource Governor is currently using by running the following query against the sys.resource_governor_configuration system catalog view:
select object_name(classifier_function_id) AS 'Classifier UDF name',
    is_enabled
from sys.resource_governor_configuration
go

Classifier UDF name  is_enabled
-------------------- ----------
WorkgroupClassifier 1
At this point,
your Resource Governor configuration is complete. You then should
monitor the system to make sure it’s working as it should.
Tip
To
help make setting up and configuring Resource Governor easy and make
sure you get all the pieces together in the right sequence, you can
configure Resource Governor by using a template provided in SQL Server
Management Studio. From the View menu in SSMS, select Template Explorer
to display the Template Explorer. In the Template Explorer, expand
Resource Governor and then double-click Configure Resource Governor.
Provide the connection information, and the template Configure Resource Governor.sql
opens in a query editor window. This template contains template code to
create and configure a resource pool, workload group, and classifier
function.
