After your network has been set up, you can start
using it immediately to share resources, including files, folders,
programs, and peripherals. Your starting point for all of this is the
Network window.
Begin by double-clicking a resource to see what
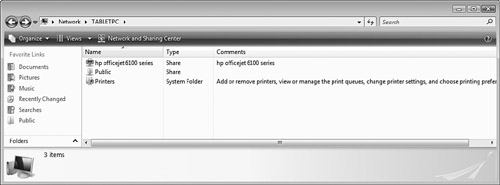
it contains. For example, if you double-click a workgroup computer, you
see its shared items, as shown in Figure 1.

Notice that Vista computers automatically share two folders:
Public— This folder is open to everyone on the network and provides users with full read/write access.
Printers— This
folder contains the computer’s installed printers. Vista usually places
an icon for each shared printer in the computer’s main folder, as well.
Note
Whether you see the Public and Printers folders depends on the remote computer’s sharing settings.
Double-click a shared folder to see its contents.
If you have an account on the remote computer, you should see the
folder’s contents right away. Otherwise, you might have to enter the
username and password of an account on that computer.
Understanding the Universal Naming Convention
If you click inside the Address bar with a remote computer or share open, you see an address that uses the following format:
Here, ComputerName is the name of the computer, and ShareName is the name given to the shared resource. This is the universal naming convention (UNC). For example, the following UNC path refers to a shared resource named Public on a computer named TABLETPC:
If the UNC refers to a drive or folder, you can
use the regular path conventions to access subfolders on that resource.
For example, if the resource Public on TABLETPC has a Downloads subfolder, you can refer to that subfolder as follows:
\\TABLETPC\Public\Downloads
Tip
The UNC offers you several alternative methods of accessing shared network resources:
In the Network explorer, click inside the Address bar, type the UNC for a shared resource, and then press the Enter key.
Press
Windows Logo+R (or select Start, All Programs, Accessories, Run) to
open the Run dialog box. Type the UNC for a shared resource and then
click OK to open the resource in a folder window.
In a 32-bit application’s Open or Save As dialog box, you can use a UNC name in the File Name text box.
At the command prompt, type START followed by the UNC path. Here’s an example:
At the command prompt, you can use a UNC name as part of a command. For example, to copy a file named archive.zip from \\TABLETPC\Public\Downloads\ to the current folder, you’d use the following command:
COPY "\\TABLETPC\Public\Downloads\archive.zip"
Mapping a Network Folder to a Local Drive Letter
One networking conundrum that comes up
repeatedly is the problem of referencing network resources (in, say, a
script or command). You can reference UNC paths, but they’re a bit
unwieldy to use. To avoid the hassle, you can map a shared network drive
or folder to your own computer. Mapping assigns a drive letter to the resource so that it appears to be just another disk drive on your machine.
Note
Another good reason to map a network folder to a
local drive letter is to give certain programs access to the network
folder. Some older programs aren’t network-aware, so if you try to save
files to a network folder, the program might display an error or tell
you that the location is out of disk space. In most cases, you can solve
this problem by mapping the folder to a drive letter, which fools the
program into thinking it’s dealing with a local folder.
To map a shared drive or folder, follow these steps:
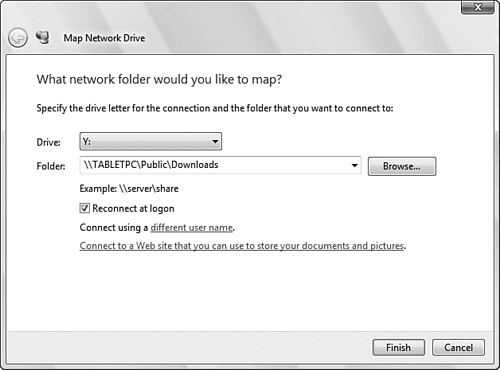
1. | Select
Start, right-click Network, and then click Map Network Drive. (In any
folder window, you can also press Alt to display the menu bar, and then
select Tools, Map Network Drive.) Windows Vista displays the Map Network
Drive dialog box, shown in Figure 2.

|
2. | The
Drive drop-down list displays the last available drive letter on your
system, but you can pull down the list and select any available letter.
Caution
If you use a removable drive, such as a
memory card or Flash drive, Windows Vista assigns the first available
drive letter to that drive. This can cause problems if you have a mapped
network drive that uses a lower drive letter. Therefore, it’s good
practice to use higher drive letters (such as X, Y, and Z) for your
mapped resources.
|
3. | Use
the Folder text box to type the UNC path to the shared folder.
(Alternatively, click Browse, select the shared folder in the Browse For
Folder dialog box, and then click OK.)
|
4. | If
you want Windows Vista to map the resource each time you log on to the
system, leave the Reconnect at Logon check box activated.
|
5. | If
you prefer to log on to the resource using a different account, click
the Different User Name link, type the User Name and Password, and click
OK.
|
6. | Click Finish. Windows Vista adds the new drive letter to your system and opens the shared resource in a new folder window.
|
To open the mapped network folder later, select Start, Computer and then double-click the drive in the Network Location group.
Mapping Folders at the Command Prompt
You can also map a shared network folder to a
local drive letter by using a Command Prompt session and the NET USE
command. Here’s the basic syntax:
NET USE [drive] [share] [password] [/USER:user]
→[/PERSISTENT:[YES | NO]] | /DELETE]
|
|
|---|
| drive | The drive letter (following by a colon) of the local drive to which you want the shared folder mapped |
| share | The UNC path of the shared folder |
| password | The password required to connect to the shared folder (that is, the password associated with the username, specified next) |
| /USER:user | The username you want to use to connect to the shared folder |
| /PERSISTENT: | Add YES to reconnect the mapped network drive the next time you log on |
| /DELETE | Deletes the existing shared mapped to drive
|
For example, the following command maps the shared folder \\TABLETPC\Public to drive Z:
net use z: \\tabletpc\public \persistent:yes
Disconnecting a Mapped Network Folder
If you no longer need to map a network resource, you should disconnect it by following these steps:
1. | Select Start, Computer to open the Computer window.
|
2. | Right-click the mapped drive and then click Disconnect.
|
3. | If
there are files open from the resource, Windows Vista displays a
warning to let you know that it’s unsafe to disconnect the resource. You
have two choices:
Click No, close all open files from the mapped resource, and then repeat steps 1 and 2. If you’re sure there are no open files, click Yes to disconnect the resource.
|
Creating a Network Location
When you map a shared network folder to a drive on your computer, Vista
creates an icon for the mapped drive in the Computer folder’s Network
Locations group. You can also add your own icons to this group. These
are similar to the network places you could create in Windows XP. That
is, once you create a network location, you can access that location by
double-clicking the icon. This is usually a lot faster than drilling
down through several layers of folders on the network client, so create
network locations for those network folders you access most often.
Follow these steps to create a network location:
1. | Select Start, Computer to open the Computer folder.
|
2. | Right-click
an empty section of the Computer folder and then click Add a Network
Location. Vista launches the Add Network Location Wizard.
|
3. | Click Next in the initial wizard dialog box.
|
4. | Select Choose a Custom Network Location and then click Next.
|
5. | Type
the UNC address of the shared network folder (or click Browse to use
the Browse for Folder dialog box to select it), and then click Next.
|
6. | Type a name for the network location and click Next.
|
7. | Click Finish.
|
Printing over the Network
After you connect to a network printer, you can
use it just like any local printer on your system. Windows Vista offers a
couple of methods for connecting to a network printer. The easiest way
is to use the Network window to open the computer that has the shared
printer, open its Printers folder, right-click the printer, and then
select Connect. When Vista asks you to confirm the connection, click
Yes. Vista installs the printer using the remote machine’s printer
driver files.
If you like using a wizard for these kinds of things, you can do so using the Add Printer Wizard:
1. | Select Start, Control Panel and then click the Printer link under the Hardware and Sound icon.
|
2. | Click the Add a Printer link to open the Add Printer Wizard.
|
3. | Click Add a Network, Wireless or Bluetooth Printer. Vista searches for shared printers on the network.
|
4. | Select the network printer you want to use. (To see a computer’s shared printers, double-click the computer name.) Click Next.
|
5. | Complete the wizard normally. |