You simply share a folder with the network, and other
users can use their Network folder to open the shared folder and work
with the files.
However,
this benefit is lost when you disconnect from the network. For example,
suppose that you use a notebook computer to connect to the network
while you are at the office. When you take the notebook on the road, you
must disconnect from the network. Fortunately, you can still get
network access of a sort when you disconnect from the network (or are offline).
Windows Vista (Business, Enterprise, or Ultimate) has an Offline Files
feature that enables you to preserve copies of network files on your
computer. You can then view and work with these files as though you were
connected to the network.
1. Enabling Offline Files
Vista has offline files enabled by default. Follow these steps to make sure that your system has them enabled:
1. | Select Start, Control Panel, Network and Internet, Offline Files. Vista opens the Offline Files dialog box.
|
2. | If
you see the Enable Offline Files button, select it. (If you see the
Disable Offline Files button instead, offline files are enabled, so skip
to step 4.)
|
3. | Enter your UAC credentials.
|
4. | Click OK. Vista prompts you to restart your computer to put the new setting into effect.
|
5. | Click Yes.
|
Tip
If you’re an administrator, the Group Policy
editor offers a large number of policies related to offline files. For
example, you can prohibit users from configuring the Offline Files
feature, set default synchronization options, prevent certain files and
folders from being made available offline, and disable offline files
altogether. In the Group Policy editor, open the User Configuration,
Administrative Templates, Network, Offline Files branch.
Caution
If you want to work with sensitive data offline
on a notebook computer, bear in mind that a thief could easily steal
your notebooks and might be able to access the sensitive data. To guard
against this scenario, you can encrypt your offline files if you have
the Encrypting File System, which is available with the Vista Business,
Enterprise, and Ultimate versions. Select Start, Control Panel, Network
and Internet, Offline Files, display the Encryption tab, and click
Encrypt.
2. Making Files Available Offline
With the Offline Files feature turned on, follow these steps to make network files available offline:
1. | Use Windows Explorer to open the folder that contains the shared network folder that you want to use offline.
|
2. | Select the folders you want to use offline.
|
3. | Right-click any selected folder, and click Always Available Offline.
|
Windows Vista synchronizes the folders for
offline use. While the initial synchronization occurs, Vista displays
the Always Available Offline dialog box. If you’re using quite a few
files offline, the synchronization might take a long time. If so, click
Close to hide the Always Available Offline dialog box. (You can
redisplay it by clicking the Sync Center icon in the taskbar’s
notification area.)
When the initial synchronization finishes, you can disconnect from the network and work with the files offline.
Tip
A quick way to disconnect is to open a folder set up for offline use and then click Work Offline in the task pane.
3. Working with Network Files Offline
Windows XP handled offline files by creating a special Offline Files
folder that contained all the shared network files that you chose to
work with offline. Vista handles offline files a bit differently.
Specifically, you now have two ways to work with offline files:
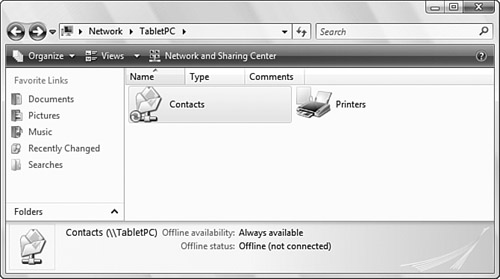
Work with the files “in place” using the remote computer’s folder window—
The objects available offline display the Offline Files icon
superimposed on their regular icon and, when you select an offline
object, the Details pane shows Offline (not connected) as the Offline Status (see Figure 1).

Tip
You can’t navigate to a remote computer’s
folder via Start, Network because Vista will tell you that you aren’t
connected to a network. Either leave the remote computer’s folder window
open when you disconnect or type the remote computer’s UNC path into
the Run dialog box or Explorer Address bar.
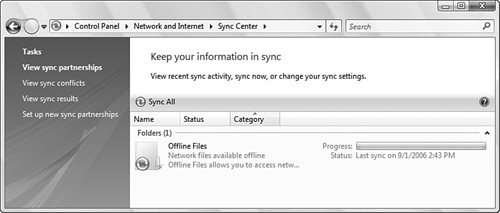
Work with the files using Sync Center— Select
Start, Control Panel, Network and Internet, Sync Center.
(Alternatively, double-click the Sync Center icon in the notification
area.) Click View Sync Partnerships (although this is selected by
default), and then double-click Offline Files, shown in Figure 2.

You can open and edit the files just as though you were connected to the network.