4. Sharing a Resource
Windows Vista gives you two ways to share a resource:
If you have Public Folder Sharing turned on, make a copy of the folder or file in the Public folder or one of its subfolders: Public Documents, Public Downloads, Public Music, Public Pictures, Public Videos, or Recorded TV. This is the way to go if you want to share individual files, or if you worry about permissions for the Public folder only (the subfolders inherit the Public folder’s permissions). Tip
To get to the Public folder, open
any folder window, display the Folders list, and then click Desktop. The
default Desktop folder contains seven items: your user account folder, Computer, Network, Internet Explorer, Control Panel, Recycle Bin, and Public.
Activate sharing and set
permissions on the folder you want to share. This is the way to go if
you don’t want to deal with copies of your files and folders or if you
want to set separate permissions for different folders.
For the latter technique (and assuming that you have the Sharing Wizard turned off), follow these steps:
1. | In
Windows Explorer, select the drive or folder and then click Share in
the taskbar (you can also right-click the drive or folder and then click
Share). Windows Vista displays the object’s properties sheet with the
Sharing tab selected.
| 2. | Click Advanced Sharing and enter your UAC credentials to open the Advanced Sharing dialog box.
| 3. | Activate the Share This Folder option.
| 4. | In
a small network, it’s unlikely you’ll need to restrict the number of
users who can access this resource, so you’re probably safe to leave the
Limit the Number of Simultaneous Users To spin box value at 10.
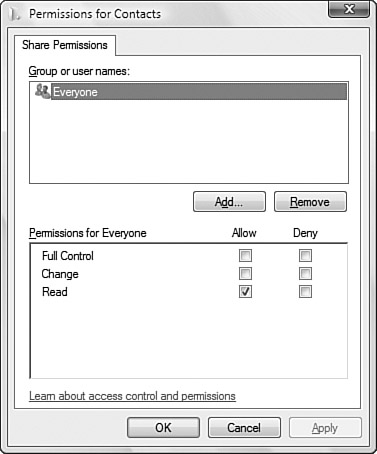
| 5. | Click Permissions to display the Permissions dialog box (see Figure 2).

| 6. | Select the Everyone group in the Group or User Names list and then click Remove.
| 7. | Click Add to display the Select Users or Groups dialog box.
| 8. | In
the Enter the Object Names to Select text box, type the name of the
user or users you want to give permission to access the shared resource
(separate multiple usernames with semicolons). Click OK when you’re
done.
| 9. | Select a user in the Group or User Names list.
| 10. | Using the Permissions list, you can allow or deny the following permissions:
|
|
|---|
| Read | Gives
the group or user the ability only to read the contents of a folder or
file. The user can’t modify those contents in any way. | | Change | Gives the group or user Read permission and allows the group or user to modify the contents of the shared resource. | | Full Control | Gives the group or user Change permission and allows the group or user to take ownership of the shared resource. |
| 11. | Repeat steps 7–10 to add and configure other users.
| 12. | Click OK to return to the Advanced Sharing dialog box.
| 13. | Click OK to return to the Sharing tab.
| 14. | Click Close to share the resource with the network.
|
NTFS Security Permissions
If you want even more control over the use of
your shared resources across the network, you should also set NTFS
security permissions on the folder. (Ideally, you should do this before
sharing the resource.) To do this, right-click the folder, click Sharing
and Security, and then display the Security tab. This tab is similar to
the Permissions dialog box shown in Figure 2, except that you get a longer list of permissions for each group or user:
Full Control— Users can perform any of the actions listed. Users can also change permissions. Modify— Users can view the folder contents, open files, edit files, create new files and subfolders, delete files, and run programs. Read and Execute— Users can view the folder contents, open files, and run programs. List Folder Contents— Users can view the folder contents. Read— Users can open files, but cannot edit them. Write— Users can create new files and subfolders, and open and edit existing files. Special Permissions— Advanced settings for permissions, auditing, ownership, and effective permissions.
|