Whereas a distribution share contains the files necessary to install and configure a build on a destination computer, a deployment point
defines a subset of those files and how to connect to them. For
example, the distribution share might contain multiple operating systems
and hundreds of applications. A deployment point defines which of those
files to distribute and how to access them through a network connection
or removable media.
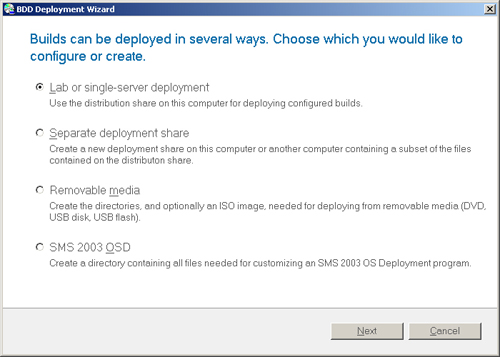
BDD 2007 supports four types of deployment points:
Lab
This is a basic, single-server deployment point. This deployment point
references all the content in the distribution share. When building
custom images, you will usually use a lab deployment point.
Network
This is a subset of the distribution share that you can replicate to
many servers based on your organization’s requirements. You can choose
the builds, images, device drivers, updates, and applications that are
replicated to a network deployment point.
Media
This is a subset of the distribution share that you can put on a DVD,
USB flash disk, and so on to perform stand-alone, potentially
network-disconnected deployments.
OSD
This is a copy of all the scripts, tools, and other files necessary to
properly configure custom actions in the SMS 2003 OSD for performing a
ZTI deployment. The images, applications, and device drivers are part of
this replica.
For each deployment point, you can create .wim
and .iso Windows PE boot image files that automatically connect to the
deployment point and begin the installation. During the LTI process, the
Windows Deployment Wizard allows the user to choose which build to
install from the deployment point.
1. To create a lab deployment point for image capture
1. | In
the Deployment Workbench console tree, right-click Deployment Points
under Deploy and click New to start the BDD Deployment Wizard.
|
2. | On the Choose Which You Would Like To Configure Or Create page, select Lab Or Single-Server Deployment, and then click Next.
|
3. | On
the Specify A Descriptive Name page, type a name for the deployment
point, and then click Next. For the lab deployment point, Lab is a good name.
|
4. | On
the Allow Application Selection During Upgrade page, verify that the
Allow Users To Select Additional Applications On Upgrade check box is
selected if you want to select applications to install when the Windows
Deployment Wizard begins. Click Next.
|
5. | On
the Specify Whether To Prompt For Image Capture page, verify that the
Ask If An Image Should Be Captured check box is selected, and then click
Next. During the deployment interview, the Windows Deployment Wizard
will ask whether to create an image of the destination computer after it
installs the build on it.
|
6. | On
the Allow User To Set Administrator Password page, verify that the Ask
User To Set The Local Administrator Password check box is cleared to
prevent the Windows Deployment Wizard from prompting for a local
Administrator password. Click Next.
|
7. | On
the Allow User To Specify A Product Key page, verify that the Ask User
For A Product Key check box is cleared to prevent the Windows Deployment
Wizard from prompting for a product key during installation, and then
click Next—if you specified a product key when you created the build.
|
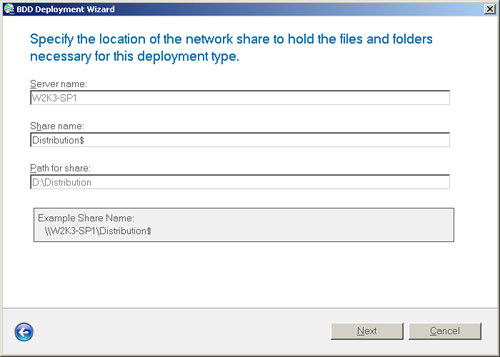
8. | On
the Specify The Location Of The Network Share To Hold The Files And
Folders Necessary For This Deployment Type page, type a name for the
share, and then click Next. The default share name is folder$, where folder is the name of the folder containing the distribution share. The dollar sign ($) hides the share in the network browser list.
|
9. | On
the Specify User Data Defaults page, click the Do Not Save Data And
Settings option, and then click Create. Imaging is by its nature a New
Computer scenario , so you have no reason to capture and restore user state.
|
2. To remove a deployment point
1. | In the Deployment Workbench console tree, click Deployment Points. Deployment Points is located under Deploy.
|
2. | In the details pane, right-click the deployment point you want to remove, and then click Delete.
|
Note
Removing
a deployment point from Deployment Workbench does not remove the share
from the computer. You must manually remove any shares you created. |
3. Configuring the Deployment Point
The Windows AIK comes with Windows PE. No
additional files are necessary to create Windows PE boot images for BDD
2007. Deployment Workbench automatically customizes Windows PE .wim
files when a deployment point is updated. Optionally, you can configure
the deployment point to generate the following Windows PE images:
LTI flat bootable ISO image
LTI bootable RAM disk ISO image
Generic flat bootable ISO image
Generic bootable RAM disk ISO image
You don’t need to manually customize Windows PE
to add network interface card (NIC) device drivers to it. Deployment
Workbench automatically adds the NIC device drivers that you add to the
distribution share to the Windows PE boot images. You have the
additional option of automatically adding video and system device
drivers from the distribution share to the Windows PE boot images.
Updating a deployment point causes Deployment
Workbench to update its configuration files, source files, and Windows
PE images. Deployment Workbench updates the deployment point’s files and
generates the Windows PE boot images when you update the deployment
point, not when you create it. Deployment Workbench stores these boot
images in the distribution share’s Boot folder. After you have updated
the deployment point and generated Windows PE images, you can add the
.wim image file to Windows DS. Optionally, you can burn the Windows PE
.iso images to DVDs by using most commercial CD-burning software.
Windows DS is the best way to start the Windows PE boot images on lab
computers. Updating the boot images is faster than burning new DVDs, and
booting destination computers is quicker.
Note
You must use the same
platform edition of Windows PE to start computers for installing each
platform edition of Windows. In other words, you must start destination
computers using the x86 edition of Windows PE to install the x86 edition
of Windows Vista. Likewise, you must use the x64 edition of Windows PE
to install the x64 edition of Windows Vista. If you use mismatched
editions, you might see errors indicating that the image is for a
different type of computer. Deployment Workbench automatically chooses
the correct platform edition of Windows PE to match the operating system
you’re deploying. |
More Info
To learn more about customizing Windows PE, see the Windows Preinstallation Environment User’s Guide in the Windows AIK.
To configure a deployment point for imaging in the lab
1. | In the Deployment Workbench console tree, click Deployment Points under Deploy.
|
2. | In the details pane, right-click the deployment point you want to configure, and then click Properties.
|
3. | Click
the General tab, and then choose the platforms that the deployment
point supports. To indicate that the deployment point supports the x86
platform, select the x86 check box. To indicate that the deployment
point supports the x64 platform, select the x64 check box. This option
determines the platforms for which Deployment Workbench generates
Windows PE boot images.
|
4. | Click
the Rules tab, and then edit the deployment point’s settings. These
settings are located in CustomSettings.ini, which is located in the
deployment point’s Control folder. For more information about the
settings that you can configure on this tab, see the Configuration Reference in BDD 2007.
|
5. | Click the Windows PE tab, edit the settings described in Table 6-6, and then click OK.
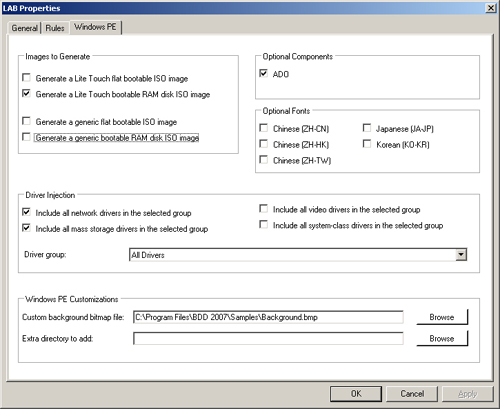
Table 1. Windows PE Settings| Area | Settings |
|---|
| Images to Generate | Generate A Lite Touch Flat Bootable ISO Image. Select this option to generate flat bootable ISO images.
Generate A Lite Touch Bootable RAM Disk ISO Image. Select this option to generate ISO images that start from RAM disk.
Generate A Generic Flat Bootable ISO Image. Select this option to generate a generic Windows PE flat bootable image that does not contain BDD 2007.
Generate A Generic Bootable RAM Disk ISO Image. Select this option to generate a generic Windows PE bootable image that starts from RAM disk and does not contain BDD 2007. | | Driver Injection | Include All Network Drivers in the Selected Group. Select this option to inject all network drivers found in the distribution share into the Windows PE boot images.
Include All Mass Storage Drivers in the Selected Group. Select this option to inject all mass storage drivers found in the distribution share into the Windows PE boot images.
Include All Video Drivers in the Selected Group. Select this option to inject all video drivers found in the distribution share into the Windows PE boot images.
Include All System-Class Drivers in the Selected Group.
Select this option to inject all system drivers (such as motherboard
drivers) in the distribution share into the Windows PE boot images.
You can limit the device drivers that Deployment Workbench
includes in the Windows PE image by selecting a driver group from the
Driver Group list. | | Optional Components | ADO. Select this option to add the Microsoft ActiveX Data Objects (ADO) optional component to the Windows PE bootable images. | | Optional Fonts | Select
the font support to add to the Windows PE boot images that Deployment
Workbench generates. You must add these fonts when performing a lite
touch deployment of Windows Vista images when the setup files are
Japanese, Korean, or Chinese. The Optional Fonts area provides the
following options:
Chinese (ZH-CN) Chinese (ZH-HK) Chinese (ZH-TW) Japanese (JA-JP) Korean (KO-KR)
Adding additional fonts to Windows PE boot images increases
the size of the images. Add additional fonts only if necessary. | | Windows PE Customizations | Custom Background Bitmap File. Type the path and file name of a bitmap file to use as the Windows PE background.
Extra Directory To Add. Type the path of a folder containing extra files and subfolders to add to the Windows PE bootable images. |
|
Deployment Workbench always generates .wim
image files, which you can use to start destination computers using
Windows DS. Choose to generate only the Windows PE bootable ISO images
that are actually required. If you limit the number of images generated,
the updating process is faster.
Updating the Deployment Point
After
creating and configuring a deployment point in Deployment Workbench,
update it to create it on the file system. Updating a deployment point
creates the folder structure, shares the folder structure, configures
settings, and generates Windows PE boot images.
Note
You must update the
deployment point if you make any changes to the General, Rules, or
Windows PE tabs. The Windows PE boot images will not contain your
updated settings until you update the deployment point. |
To update the lab deployment point
1. | In the Deployment Points details pane, right-click the deployment point to update, and then click Update. |
