7. Using the Problem Reports And Solutions Control Panel
This section describes the Problem Reports And
Solutions Control Panel. When you open the Problem Reports And Solutions
Control Panel, the solutions overview page is displayed as shown in Figure 2.

The main pane of the solutions overview shows
responses that have been received for previously reported problems. The
Solutions To Install section will list any updates that can be installed
to address an issue. The Information About Other Problems section will
list any information, such as Knowledge Base articles, that may help
resolve an issue. Use the items in the Tasks pane on the left to further
explore the errors that have been reported, as explained in the
following sections.
Check For New Solutions
Clicking the Check for new solutions link will
force WER to check for solutions to previously reported issues that had
no solution at that time as well as unsent issues. If a new solution is
received from the Watson servers, it will appear in the main pane of the
solutions overview. If a new solution is received at the time the
problem event occurs, the response dialog that is displayed will depend
upon the priority of the response. There are three levels of response
priority that are set by the developers working with the Watson back-end
servers:
Low-Priority Response
Low-priority responses do not present a
dialog. The response will be displayed in either the Solutions To
Install section or the Information About Other Problems section on the
main page of Problem Reports And Solutions.
Medium-Priority Response
Medium-priority responses display a System
Tray icon and balloon notification. If you click the notification or the
System Tray icon, a formatted response will be opened in Problem
Reports And Solutions.
High-Priority Response
High-priority responses immediately open the formatted response in Problem Reports And Solutions.
Response Notification
For medium- and high-priority responses, a
notification is displayed in Problem Reports And Solutions that
describes the problem and provides more information.
No New Solution Found
If a previously checked problem is checked
again for a solution, but a new solution is not found, a dialog saying
“No new solutions found: Please check for solutions again later” will be
displayed.
See Problems To Check
The See Problems To Check link on the Problems
And Solutions Task pane opens the Check For Solutions To These Problems
window that displays a list of problems that have not been checked for a
solution (see Figure 3).
In this window, you can select which problems to check for a solution
and which to omit. Users can also select Check Again For Solutions To
Other Problems to cause WER to check previously checked problems where a
solution was not found.
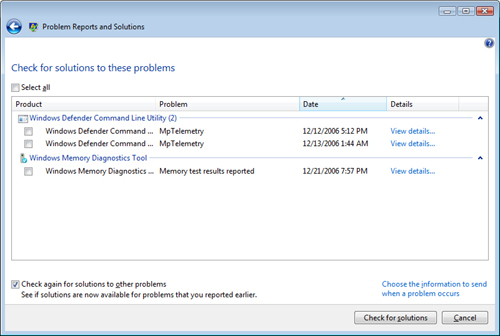
Each listed problem has a shortcut menu that
you can use to delete the problem, view problem details, or group the
problem among other listed problems.
The Choose The Information To Send When A
Problem Occurs link in the Problems and Solutions menu opens a dialog
saying “Do you want to automatically send more information about
unsolved problems?” that allows you to either automatically send safe
additional information requested by the Watson back-end servers or to be
asked each time the additional data is requested. If you choose to
automatically send safe data, you will still be prompted when other data
is requested.
View Problem History
The View problem history link in the Problems
and Solutions menu switches to a window that lists a history of problems
that have occurred on the computer (Figure 4).
By default, a user will see their own history of problems. If the user
is an administrator, they will also be able to see system-level
problems.
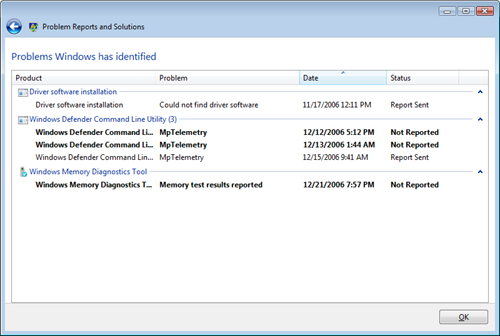
Each listed problem has a shortcut menu that
you can use to check for a solution, delete the problem, view the
solution, view the problem details, or group the problem among other
listed problems.
Change Settings
The Change Settings link in the Problems And
Solutions Tasks pane switches to the Choose How To Check For Solutions
To Computer Problems window shown in Figure 5.
From this window, you can select the desired Opt In option, either to
check for solutions automatically (Opted In) or prompt for consent to
check for a solution (Not Opted In).
The WER dialogs that a user sees when a
failure occurs depend upon the Opt In option selected in the Choose How
To Check For Solutions To Computer Problems window.
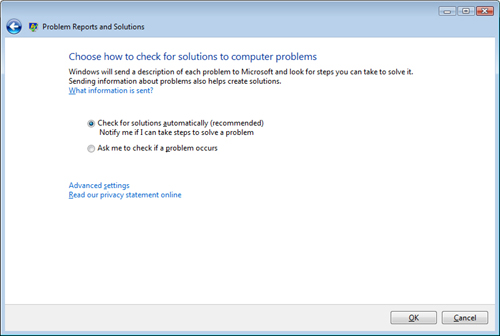
If you chose to automatically check for
solutions during installation, then the Check For Solutions utomatically
(Recommended) option is selected.
Advanced Settings
Advanced Settings (which you can open by
opening Problem Reports And Solutions, clicking Change Settings, and
then clicking Advanced Settings) switches to the Advanced Settings For
Problem Reporting window, where you can configure more advanced WER
options. You can configure the options shown in Table 2 from the Advanced Settings For Problem Reporting window.
Table 2. Advanced Problem Reporting Settings
| Setting | Possible values |
|---|
| For My Programs, Problem Reporting Is | On (default)
Off |
| For All Users And Programs, Problem Reporting Is Set To | Allow Each User To Choose Settings (default)
On
Off |
| For All Users, Windows Is Set To | Allow Each User To Choose Reporting Settings (default)
Ask Each Time A Problem Occurs
Automatically Check For Solutions (recommended)
Automatically Check For Solutions And Send Additional Information, If Needed |
| Automatically Send More Information If It Is Needed To Help Solve Problems | Enabled
Disabled (default) |
| Don’t Send Information About The Following Programs | Specify a block list of programs (none specified by default) |
