4. Managing licensing and activation
As you can well expect, Microsoft provides
various tools, technologies, and scripts with which you may manage
licenses. This section introduces some tools, including the following:
Windows Software License Management Tool
All of the current license information for each
workstation can be accessed using Windows Management Instrumentation, or
WMI. In addition to querying information, you may also make changes and
perform activations using WMI objects. Using WMI allows you to write
scripts and applications tailored to the needs of your organization.
However, Microsoft has also included with Vista a VBScript for basic
management tasks. The script is referred to as the Windows Software
License Management Tool and named slmgr.vbs.
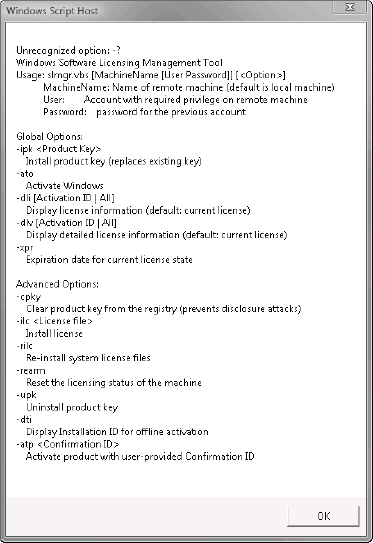
When run without options, slmgr.vbs will provide you with a list of its available options (as shown in Figure 5).
As you can see, the tool can both query the existing license and
activation status as well as make changes, such as changing the product
key. Although this script is very useful for individual machines and
automation, it lacks the ability to report or act on multiple machines
without further customizations of the script.

Volume Activation Management Tool
For managing activations of multiple machines,
use the Volume Activation Management Tool (VAMT). Although the tool is
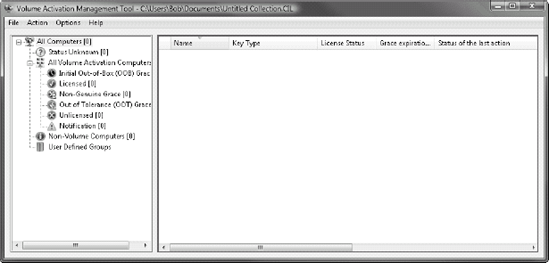
not included with Windows, it is a free download from Microsoft at www.microsoft.com/downloads/details.aspx?FamilyID=12044DD8-1B2C-4DA4-A530-80F26F0F9A99&displaylang=en. As shown in Figure 6,
the VAMT allows you to see the activation status of many computers at
once. It can also be used to initiate online activation or perform MAK
proxy activation. Not only does the VAMT allow you to view volume
license status, it also shows you the license and activation information
for retail and OEM licensed computers.
To use the VAMT, you begin by adding computers.
As you may have a large number of computers to manage, the VAMT requires
that at least one group be created to organize these computers. This
group is not related or associated with any security groups and is only
used inside VAMT. With an initial group created, computers can be
discovered by searching the Active Directory Domain Services or a
Workgroup. You may also add individual computers by name or IP address,
although in larger organizations it would not be practical to add all
computers manually.

As computers are found and added to the tool,
their licensing and activation status is queried and displayed. The list
of computers and all of their information are stored locally as an XML
file called the Computer Information List. Therefore, if you want to see
this information from another computer, you can either re-create the
groups and rediscover all of the workstations, or you may export the
Computer Information List using VAMT, which can be imported on the other
workstation.
After the Computer Information List is built or
imported, the VAMT can be used to view licensing information, perform
MAK proxy activation, initiate MAK independent activation, or manage
MAKs. Importantly, the VAMT can query the MAK activation pool and report
on the number of activations remaining on your MAK, a good thing to
know before you actually run out!
NOTE
If the Windows Firewall is used, no
configuration is required on the client computer because bidirectional
TCP sessions that originate from the client computer are automatically
allowed. You can configure the TCP port on the client computer or KMS
host by using the slmgr.vbs script or setting registry values.
An exception has been added to the Windows Firewall to facilitate
opening the default port 1688.
5. Implementing KMS activation
Before attempting to deploy KMS activation, be
sure to plan your layout ahead of time. One item to consider is the
number of KMS servers to deploy. The load placed on a KMS server is very
light when you consider that computers only communicate with the KMS
servers every seven days during normal operating conditions.
Additionally, the amount of information stored about activations is
minimal. Lastly, the two network packets required for activation are
very small, around 250 bytes, which should not overburden even the most
modest of networks. In practice, a single KMS server should be able to
handle well over 100,000 clients. In reality, you may want more than one
server for redundancy reasons.
Fault tolerance is a strong reason to have
multiple KMS servers. In most environments, we recommend that you
implement at least two KMS servers. The only time this is not
recommended is if your client count is not sufficient to keep both KMS
servers at their 25-client minimum. In an environment with over 200
clients, for example, keeping both servers above their minimums should
not pose a problem.
After you have properly planned your
environment, implementing KMS activation is relatively straightforward
process consisting of two primary steps. The first step is to deploy
your KMS server or servers. If you plan to use Windows Server 2003 as a
KMS server, you will first need to download and install the KMS Server
component, the Software Licensing service. Windows Server 2008 and Vista
include the necessary services, but for Windows Server 2003, an update
for KMS 1.1 is online at support.microsoft.com/kb/948003.
NOTE
KMS for Windows Server 2003 v1.0 will
activate only Vista RTM and Vista SP1 KMS clients. If hosting KMS on
Windows Server 2003, make sure to install v1.1 of KMS to support
activation of Windows Server 2008 KMS clients. You'll then need to
install a new KMS key and then activate the KMS host before use.
As mentioned earlier, KMS hosted on a Windows
Vista machine can activate only Windows Vista KMS clients; it cannot
activate any editions of Windows Server 2008 as KMS clients. The Windows
Server 2008 editions that can be activated by the KMS host depend on
the KMS key that you install on the KMS host. It is also important to
note that you will need to activate this KMS host before the host can
begin accepting activation requests from KMS clients. The first step to
configuring a KMS server is to install the KMS server activation key,
which is obtained from Microsoft after purchasing Windows Server 2008 or
Vista volume licenses. Although the Software Licensing service has WMI
interfaces and an API you can leverage, the recommended method of
configuring the activation key is by using the built-in VBScript, slmgr.vbs.
The following steps provide command line guidance for installing a VAK via VBScript:
Launch a command prompt as administrator.
Use the following command to install your VAK key with the built-in VBScript:
slmgr.vbs -ipk <Product Key>
Once
the VAK key has been installed, the server must be activated either via
the Internet or over the phone. If the server has Internet access,
activate it with the following command:
slmgr.vbs -ato
If Internet access is not available, run the following command and follow the prompts to activate by phone:
slui.exe 4
After the VAK key has been installed and the
server has been successfully activated, the KMS server should be ready
to begin accepting incoming client requests. If you are using dynamic
DNS, clients in the same domain as the KMS server may begin activating
immediately. For other domains, you need to configure the server to
register in additional domains, manually add DNS entries for the KMS
server in other domains, or manually configure the clients to use the
KMS server.
To configure the KMS server to register in additional domains, add and configure the following registry value using regedit:
Value: HKLM\Software\Microsoft\Windows NT\CurrentVersion \SL\
   DnsDomainPublishList
Type: REG_MULTI_SZ
   Value Data: <List of DNS domains to publish, each on a
   separate line>
Instead of using DNS auto-discovery, the clients
may also be manually configured for a specific KMS server and port.
Static KMS server configuration is generally performed with the slmgr.vbs
script. The most efficient way of implementing this would be though a
startup script or similar mechanism. To configure a client for a
specific KMS server manually, use the following command:
slmgr.vbs -skms <KMS Server>:<port>
Although using a fully qualified domain name for
the KMS server, IP addresses and NetBIOS names also work. The port
number is only required if using a nonstandard port number.
6. Implementing MAK independent activation
Implementing MAK independent activation is a
very simple process for most scenarios. The key step in deploying MAK
independent activation is configuring each client with the MAK. This is
generally performed through one of the following ways:
Manually during installation
Using an unattended answer file
With the System Control Panel applet
Using a script
Using the VAMT
If providing the MAK during installation
manually, the computer will activate automatically and no additional
administration is necessary. When using the System applet of the Control
Panel, a simple process of clicking a link and typing in the MAK is
required after installation. Although this requires minimal effort,
performing this action on hundreds or thousands of computers is very
inefficient. By providing the key in an unattended answer file or by
using the slmgr.vbs script to configure the MAK, deployment can
be automated so that no administrative effort is required during the
deployment process to configure MAK activation. Finally, the VAMT also
has the capability to install a MAK on any recognized workstations.
NOTE
Regardless of the method chosen to install
the MAK, the VAMT can both verify that the activation is successful and
monitor the number of activations remaining in the activation pool.
7. Implementing MAK proxy activation
When using MAK activation where a direct
Internet connection is not available to clients, MAK proxy activation
can be used. To activate a computer using MAK proxy activation, use of
the VAMT is required. The process begins by configuring clients to use a
MAK. The options for installing a MAK are the same as for independent
activation. The difference is that the workstations will not be able to
activate themselves after being configured for MAK activation.
Begin activation by first using the
VAMT to discover the necessary clients requiring proxy activation. If
necessary, this tool may be used to install a MAK as well. After the
necessary clients appear in the VAMT, you may use the tool to obtain the
Installation ID (IID) from the computer, send it to Microsoft, and
obtain a Confirmation ID (CID). After the Confirmation ID has been
obtained, the VAMT can be used to activate the client using the
Confirmation ID.