1. General Troubleshooting Tips
Figuring out the cause
of a problem is often the hardest part of troubleshooting, but by
itself it doesn’t do you much good. When you know the source, you need
to parlay that information into a fix for the problem. I discussed a few
solutions in the previous section, but here are a few other general
fixes you need to keep in mind:
Close all programs—
You can often fix flaky behavior by shutting down all your open
programs and starting again. This is a particularly useful fix for
problems caused by low memory or low system resources.
Log off Windows Vista— Logging off clears the RAM and so gives you a slightly cleaner slate than merely closing all your programs.
Reboot the computer—
If there are problems with some system files and devices, logging off
won’t help because these objects remain loaded. By rebooting the system,
you reload the entire system which is often enough to solve many
computer problems.
Turn off the computer and restart—
You can often solve a hardware problem by first shutting your machine
off. Wait for 30 seconds to give all devices time to spin down, and then
restart.
Check connections, power switches, and so on—
Some of the most common (and some of the most embarrassing) causes of
hardware problems are the simple physical things: making sure that a
device is turned on; checking that cable connections are secure; and
ensuring that insertable devices are properly inserted.
Use the Help and Support Center—
Microsoft has greatly improved the quality of the Help system in
Windows Vista. The Help and Support Center (select Start, Help and
Support) is awash in articles and advice on using Windows Vista.
However, the real strength of Help and Support is, in my opinion, the
Support side. In the Help and Support Center home page, click
Troubleshooting to see links for general troubleshooting and for fixing
specific problems related to hardware, email, networking, and more.
Note, too, that the Help and Support Center offers a number of Troubleshooters—guides that take you step-by-step through troubleshooting procedures.
2. More Troubleshooting Tools
Windows Vista comes with new diagnostic tools—together, they’re called the Windows Diagnostic Infrastructure (WDI)—that
not only do a better job of finding the source of many common disk,
memory, and network problems, but can detect impending failures and
alert you to take corrective or mitigating action (such as backing up
your files). The next few sections describe these new tools.
Understanding Disk Diagnostics
A hard disk can suddenly bite the dust thanks to a lightning
strike, an accidental drop from a decent height, or an electronic
component shorting out. However, most of the time hard disks die a slow
death. Along the way, hard disks almost always show some signs of decay,
such as the following:
Spin-up time gradually slows
Drive temperature increases
The seek error rate increases
The read error rate increases
The write error rate increases
The number of reallocated sectors increases
The number of bad sectors increases
The cyclic redundancy check (CRC) produces an increasing number of errors
Other factors
that might indicate a potential failure are the number of times that the
hard drive has been powered up, the number of hours in use, and the
number of times the drive has started and stopped spinning.
Since about 1996, almost all hard-disk manufacturers have built into their drives a system called Self-Monitoring, Analysis, and Reporting Technology, or SMART.
This system monitors the parameters just listed (and usually quite a
few more highly technical hard disk attributes) and uses a sophisticated
algorithm to combine these attributes into a value that represents the
overall health of the disk. When that value goes beyond some
predetermined threshold, SMART issues an alert that hard-disk failure
might be imminent.
Although SMART has been
around for a while and is now standard, taking advantage of SMART
diagnostics has, until now, required third-party programs. However,
Windows Vista comes with a new Diagnostic Policy Service (DPS)
that includes a Disk Diagnostics component that can monitor SMART. If
the SMART system reports an error, Vista displays a message that your
hard disk is at risk. It also guides you through a backup session to
ensure that you don’t lose any data before you can have the disk
replaced.
Understanding Resource Exhaustion Detection
Your system can become unstable if it runs low on virtual memory,
and there’s a pretty good chance it will hang if it runs out of virtual
memory. Older versions of Windows displayed one warning when they
detected low virtual memory and another warning when the system ran out
of virtual memory. However, in both cases, users were simply told to
shut down some or all of their running programs. That often solved the
problem, but shutting everything
down is usually overkill because it’s often the case that just one
running program or process is causing the virtual memory shortage.
Vista takes this more subtle point of view into account with its new Windows Resource Exhaustion Detection and Resolution tool (RADAR),
which is part of the Diagnostic Policy Service. This tool also monitors
virtual memory and issues a warning when resources run low. However,
RADAR also identifies which programs or processes are using the most
virtual memory, and it includes a list of these resource hogs as part of
the warning. This enables you to shut down just one or more of these
offending processes to get your system in a more stable state.
Microsoft is also providing
developers with programmatic access to the RADAR tool, thus enabling
vendors to build resource exhaustion detection into their applications.
When such a program detects that it is using excessive resources, or if
it detects that the system as a whole is low on virtual memory, the
program can free resources to improve overall system stability.
Note
The Resource Exhaustion Detection and Recovery tool divides the current amount of committed virtual memory by the commit limit,
the maximum size of the virtual memory paging file. If this percentage
approaches 100, RADAR issues its warning. If you want to track this
yourself, run the Reliability and Performance Monitor ,
select Performance Monitor and add the % Committed Bytes In Use counter
in the Memory object. If you want to see the exact commit numbers, add
the Committed Bytes and Commit Limit counters (also in the Memory object).
Running the Memory Diagnostics Tool
Few computer problems are as maddening as those related to
physical memory defects because they tend to be intermittent and they
tend to cause problems in secondary systems, forcing you to waste time
on wild goose chases all over your system.
Therefore, it is welcome
news indeed that Vista ships with a new Windows Memory Diagnostics tool
that works with Microsoft Online Crash Analysis to determine whether
defective physical memory is the cause of program crashes. If so,
Windows Memory Diagnostics lets you know about the problem and schedules
a memory test for the next time you start your computer. If it detects
actual problems, the system also marks the affected memory area as
unusable to avoid future crashes.
Windows
Vista also comes with a Memory Leak Diagnosis tool that’s part of the
Diagnostic Policy Service. If a program is leaking memory (using up
increasing amounts of memory over time), this tool will diagnose the
problem and take steps to fix it.
To run the Memory Diagnostics Tool yourself, follow these steps:
1. | Select Start, Control Panel, System and Maintenance, Administrative Tools to open the Administrative Tools window.
|
2. | Double-click Memory Diagnostics Tool and enter your UAC credentials to display the Windows Memory Diagnostics Tool window.
|
3. | Click one of the following options:
Restart Now and Check for Problems—
Click this option to force an immediate restart and schedule a memory
test during startup. Be sure to save your work before clicking this
option.
Check for Problems the Next Time I Start My Computer— Click this option to schedule a memory test to run the next time you boot.
After the test runs (it takes 10 or 15 minutes, depending on how
much RAM is in your system), Vista restarts and you see (for a short
time) the Windows Memory Diagnostic Tool icon in the taskbar’s
notification area. This icon displays the results of the memory test.
Tip
If you’re
having trouble starting Windows Vista and you suspect memory errors
might be the culprit, boot your machine to the Windows Boot Manager menu .
When the menu appears, press Tab to select the Windows Memory
Diagnostic item, and then press Enter. If you can’t get to the Windows
Boot Manager, you can also run the Memory Diagnostic Tool using Vista’s
new System Recovery Options.
|
Checking for Solutions to Problems
Microsoft constantly collects information about Vista from users.
When a problem occurs, Vista usually asks whether you want to send
information about the problem to Microsoft and, if you do, it stores
these tidbits in a massive database. Engineers then tackle the “issues”
(as they euphemistically call them) and hopefully come up with
solutions.
One of Vista’s most
promising new features is Problem Reports and Solutions, and it’s
designed to make solutions available to anyone who goes looking for
them. Vista keeps a list of problems your computer is having, so you can
tell it to go online and see if a solution is available. If there’s a
solution waiting, Vista will download it, install it, and fix your
system.
Here are the steps to follow to check for solutions to problems:
1. | Select Start, Control Panel, System and Maintenance, Problem Reports and Solutions.
|
2. | In
the Problem Reports and Solutions window, click the Check for New
Solutions link. Windows Vista begins checking for solutions.
|
3. | If you see a dialog box asking whether you want to send more information about your problems, click Send Information.
|
4. | If
a solution exists for your computer, you’ll see it listed in the
Solutions to Install section of the Problem Reports and Solutions
window. Click the solution to install it.
|
By default, when a problem occurs, Vista does two things:
You can control this behavior by configuring a few settings:
1. | In the Problem Reports and Solutions window, click Change Settings.
|
2. | In
the Choose How to Check for Solutions to Computer Problems window,
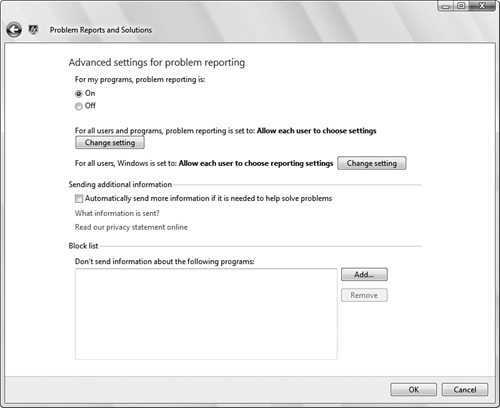
click Advanced Settings to display the Advanced Settings for Problem
Reporting window shown in Figure 1.
|
3. | If
you don’t want to report problems at all on your user account, activate
the Off option. Alternatively, you can configure problem reporting for
all users of your computer. Click Change Setting beside the For All
Users and Programs, Problem Reporting Is Set To, and then click one of
the following options (when you’re done, click OK and enter your UAC
credentials):
On— Activate this option to force all users to report problems
Off— Activate this option to force all user not to report problems
Allow Each User to Choose Settings— Activate this option (it’s the default) to enable each user to turn problem reporting on or off
|
4. | To
configure problem reporting, click Change Setting beside For All Users,
Windows Is Set To, and then click one of the following options (when
you’re done, click OK and enter your UAC credentials):
Allow Each User to Choose Reporting Settings— Activate this options to enable the Automatically Send More Information If It Is Need to Help Solve Problems check box.
Ask Each Time a Problem Occurs—
Activate this option to have Vista prompt each user to check box
solutions and to send additional information about the problem.
Automatically Check for Solutions— Activate this option (it’s the default) to have Vista automatically check online for an existing solution to a problem.
Automatically Check for Solutions and Send Additional Information, If Needed—
Activate this option to have Vista automatically check online for an
existing solution to a problem and to automatically send extra
information about the problem.
|
5. | If
you want Vista to always send the extra troubleshooting information,
activate the Automatically Send More Information If It Is Needed To Help
Solve Problems check box.
|
6. | If
you don’t want Vista to send information about a specific program,
click Add, locate and select the program’s executable file, and then
click Open.
|
7. | Click OK. |
