Creating an Answer File
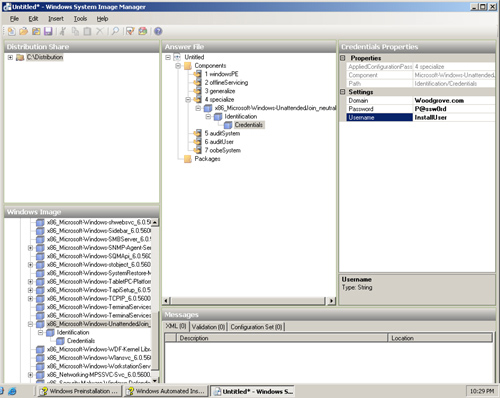
You can use Windows SIM to create a new unattended setup answer file (Figure 4).
The process of creating an answer file involves selecting an image,
creating a catalog file to index image components (the catalog describes
the available settings), selecting and configuring settings for these
components, and saving the answer file in a location where it will be
detected during setup.
Note To correctly identify components in a Windows image, Windows SIM must use a catalog file.
A catalog (.clg) file is a binary file that describes the settings and
packages in a Windows image. Windows SIM automatically creates catalog
files when you open an image. You can also manually create a catalog by
clicking Create Catalog on the Tools menu in Windows SIM. |
To create a new answer file
1. | Start
Windows SIM. Click Start, point to All Programs, point to Microsoft
Windows AIK, and then click Windows System Image Manager.
| 2. | Copy Install.wim from the product DVD to the local hard disk if you haven’t already copied the product media to a local folder.
| 3. | On the File menu, click Select Windows Image.
| 4. | In the Select A Windows Image dialog box, browse to the folder containing the Install.wim file, and then open the file.
| 5. | In the Select An Image dialog box, select the edition of Windows Vista that you intend to deploy, and then click OK.
| 6. | Click OK to create a new catalog file when prompted.
| 7. | On the File menu, click New Answer File.
| 8. | Choose
Components in the Windows Image pane and choose settings to add in the
Answer File pane. To add a setting to the answer file, right-click a
setting in a component and choose a configuration pass from the menu.
| 9. | Verify your settings by clicking Validate Answer File on the Tools menu.
| 10. | Save
the answer file by clicking File and then clicking Save Answer File.
Save the answer file in your distribution share using a descriptive
name.
|
|
Windows Setup looks in a number of places for an answer file named Autounattend.xml when starting each configuration pass. Table 2
describes each location in which you can put Autounattend.xml for
Windows Setup to automatically find and use it during installation.
Table 2. Answer File Locations| Order | Location | Description |
|---|
| 1 | In the registry value HKLM\System\Setup\UnattendFile. | Specifies the location of an answer file. The answer file is not required to be named Unattend.xml. | | 2 | %WINDIR%\panther\unattend | The name of the answer file must be Unattend.xml or Autounattend.xml. | | 3 | %WINDIR%\panther | Windows Setup caches answer files to this location. Do not overwrite any files found here. | | 4 | Removable read/write media in order of drive letter, at the root of the drive. | The
name of the answer file must be Unattend.xml or Autounattend.xml, and
the answer file must be located at the root of the drive. | | 5 | Removable read-only media in order of drive letter, at the root of the drive. | Removable read-only media in order of drive letter, at the root of the drive
The name of the answer file must be Unattend.xml or Autounattend.xml, and must be located at the root of the drive.
| | 6 | During
windowsPE and offlineServicing passes in the Sources folder of the
distribution media or share. For all other passes, Windows Setup looks
in %WINDIR%\system32\sysprep. | In the windowsPE and offlineServicing passes, the name of the answer file must be Autounattend.xml.
For all other configuration passes, the file name must be Unattend.xml.
| | 7 | %SYSTEMDRIVE% | The answer file name must be Unattend.xml or Autounattend.xml. |
|
To edit an existing answer file
1. | In Windows SIM, click Select Windows Image on the File menu.
| 2. | In the Select A Windows Image dialog box, browse to the folder containing the Install.wim image file, and then open it.
| 3. | In the Select An Image dialog box, choose the appropriate edition of Windows Vista, and then click OK.
| 4. | On the File menu, click Open Answer File.
|
Adding Files to Answer Files
Microsoft provides updates as packages that you can import into the installation project, as shown in Figure 5. You can also use Windows SIM to add device drivers.
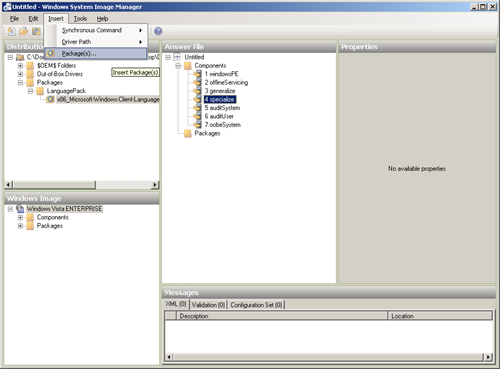
In addition to packages,
you can add device drivers to an answer file and specify a device driver
path. This device driver path processes additional out-of-box device
drivers during Windows Setup. You can copy out-of-box device drivers to a
Windows image during the windowsPE configuration pass. In this
configuration pass, you can add boot-critical drivers to a Windows image
before that image is installed.
Note You can also add additional drivers to the Windows installation during the auditSystem configuration pass. |
When you select a
driver path, you select a folder that contains one or more .inf-type
device drivers. The folder path is added to the answer file and, during
an unattended installation, is referenced to find all drivers in the
path and install them. You can only use this procedure to add .inf
drivers to a Windows image. Drivers packaged as .exe files or other file
types must be installed on a running Windows operating system.
To add a package to an answer file by using the Insert menu
1. | | 2. | Open an image, distribution share, and answer file.
| 3. | On the Insert menu, click Package(s) to open the Select Package(s) To Insert dialog box.
| 4. | Open the folder containing the package to add, and then open the package file. Package files have the .cab file extension.
| 5. | In the Properties pane, under Settings, choose Install, Remove, Configure, or Stage.
|
To add a device driver path to an answer file
1. | Open Windows SIM.
| 2. | Open an image, distribution share, and answer file.
| 3. | On the Insert menu, select Driver Path.
| 4. | Choose
the configuration pass in which you install the driver. This can be in
the windowsPE pass, offlineServicing, or the auditSystem pass. By adding
device driver paths to the windowsPE or offlineServicing configuration
passes, you can add out-of-box device drivers to the Windows image
before the system starts. This enables you to add boot-critical device
drivers to a Windows image. Adding drivers to auditSystem enables you to
add additional out-of-box drivers during audit mode. This enables you
to maintain a simple Windows image, and then add only the drivers that
are required for a specific hardware configuration.
Note The
device driver path you add to the answer file should be relative to the
destination computer. If the destination computer must access the
device drivers from a network share, for example, then the path should
be the UNC path to the network share containing the device drivers. |
| 5. | In
the Select a Folder That Contains Driver Files dialog box, select the
driver path to add to the answer file, and then click OK.
|
The driver path
selected is added to the answer file under the configuration pass that
you selected. Depending on the configuration pass that you selected, the
driver path is included as a list item to one of the following
components:
Microsoft-Windows-PnpCustomizationsWinPE for windowsPE Microsoft-Windows-PnpCustomizationsWinPE for offlineServicing Microsoft-Windows-PnpCustomizationsNonWinPE for auditSystem
Note You
can also drag drivers from an Out-of-Box Drivers folder in the
Distribution Share pane to the Answer File pane and drop it in either
the WinPE or auditSystem pass, or right-click to add it. |
|
