One of the ongoing mysteries
that all Windows Vista users experience at one time or another is what
might be called the “now-you-see-it-now-you-don’t” problem. This is a
glitch that plagues you for a while and then mysteriously vanishes
without any intervention on your part. (This also tends to occur when
you ask a nearby user or someone from the IT department to look at the
problem. Like the automotive problem that goes away when you take the
car to a mechanic, computer problems will often resolve themselves as
soon as a knowledgeable user sits down at the keyboard.) When this
happens, most people just shake their heads and resume working, grateful
to no longer have to deal with the problem.
Unfortunately, most
computer ills aren’t resolved so easily. For these more intractable
problems, your first order of business is to track down the source of
the glitch. This is, at best, a black art, but it can be done if you
take a systematic approach. Over the years, I’ve found that the best
approach is to ask a series of questions designed to gather the required
information and/or to narrow down what might be the culprit. The next
few sections take you through these questions.
Did You Get an Error Message?
Unfortunately, most
computer error messages are obscure and do little to help you resolve a
problem directly. However, error codes and error text can help you down
the road, either by giving you something to search for in an online
database or by providing information to a tech support
person. Therefore, you should always write down the full text of any
error message that appears.
Tip
If
the error message is lengthy and you can still use other programs on
your computer, don’t bother writing down the full message. Instead,
while the message is displayed, press Print Screen to place an image of
the current screen on the clipboard. Then open Paint or some other
graphics program, paste the screen into a new image, and save the image.
If you think you’ll be sending the image via email to a tech support
employee or someone else that can help with the problem, consider saving
the image as a monochrome or 16-color bitmap or, if possible, a JPEG
file, to keep the image size small.
Tip
If the error message
appears before Windows Vista starts, but you don’t have time to write it
down, press the Pause Break key to pause the startup. After you record
the error, press Ctrl+Pause Break to resume the startup.
Does an Error or Warning Appear in the Event Viewer Logs?
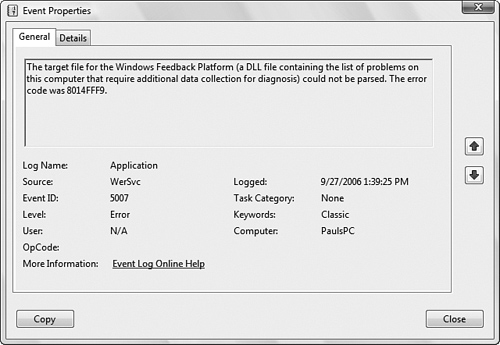
Open the Event Viewer and examine the Application and System logs. In particular, look in the
Level column for Error or Warning events. If you see any, double-click
each one to read the event description. Figure 1 shows an example.

Does an Error Appear in System Information?
Select Start, All
Programs, Accessories, System Tools, System Information to launch the
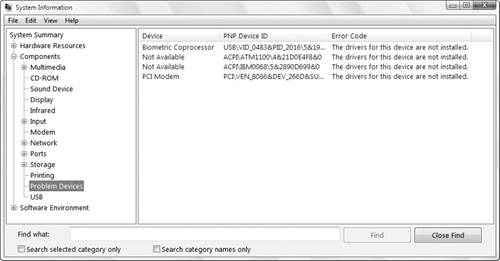
System Information utility. (Alternatively, press Windows Logo+R, type msinfo32, and click OK.) In the Hardware Resources branch, check the Conflicts/Sharing sub-branch for device conflicts. Also, see whether the Components\Problem Devices category lists any devices, as shown in Figure 2.

Did You Recently Edit the Registry?
Improper Registry
modifications can cause all kinds of mischief. If the problem occurred
after editing the Registry, try restoring the changed key or setting.
Ideally, if you exported a backup of the offending key, you should
import the backup.
Did You Recently Change Any Windows Settings?
If the
problem started after you changed your Windows configuration, try
reversing the change. Even something as seemingly innocent as activating
a screensaver can cause problems, so don’t rule anything out. If you’ve
made a number of recent changes and you’re not sure about everything
you did, or if it would take too long to reverse all the changes
individually, use System Restore to revert your system to the most
recent checkpoint before you made the changes.
Did Windows Vista “Spontaneously” Reboot?
When certain errors
occur, Windows Vista will reboot itself. This apparently random behavior
is actually built into the system in the event of a system failure
(also called a stop error or a blue screen of death—BSOD).
By default, Windows Vista writes an error event to the system log,
dumps the contents of memory into a file, and then reboots the system.
So, if your system reboots, check the Event Viewer to see what happened.
You can control how Windows Vista handles system failures by following these steps:
1. | Select Start, Control Panel, System and Maintenance, System.
|
2. | Click
the Advanced System Settings link and then enter your UAC credentials
to open the System Properties dialog box with the Advanced tab
displayed.
|
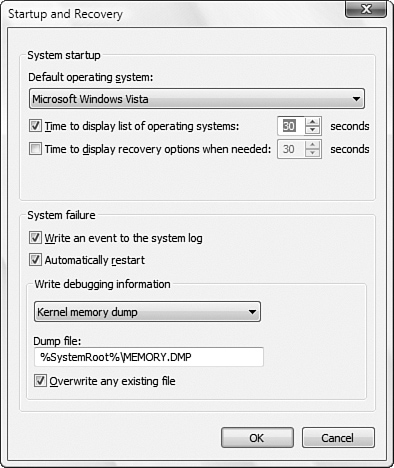
3. | In the Startup and Recovery group, click Settings. Figure 3 shows the Startup and Recovery dialog box that appears.

|
4. | Configure how Windows Vista handles system failures using the following controls in the System Failure group:
Write an Event to the System Log—
Leave this check box activated to have the system failure recorded in
the system log. This enables you to view the event in the Event Viewer.
Automatically Restart—
This is the option that, when activated, causes your system to reboot
when a stop error occurs. Deactivate this check box if you want to avoid
the reboot. This is useful if an error message appears briefly before
Vista reboots. By disabling the automatic restart, you give yourself
time to read and write down the error message.
Tip
If
the BSOD problem occurs during startup, your computer windows up in an
endless loop: you reboot, the problem occurs, the BSOD appears, and then
your computer reboots. Unfortunately, the BSOD appears only fleetingly,
so you never have enough time to read (much less record) the error
message. If this happens, display the Windows Boot Manager menu , press F8
to display the Advanced Boot Options menu, and then select the Disable
Automatic Restart On System Failure item. This tells Vista not to reboot
after the BSOD appears, so you can then write down the error message
and, hopefully, successfully troubleshoot the problem.
|
Write Debugging Information—
This list determines what information Windows Vista saves to disk (in
the folder specified in the text box below the list) when a system
failure occurs. This information—it’s called a memory dump—contains data that can help a tech support employee determine the cause of the problem. You have four choices:
None— No debugging information is written.
Small Memory Dump (64 KB)—
This option writes the minimum amount of useful information that could
be used to identify what caused the stop error. This 64KB file includes
the stop error number and its description, the list of running device
drivers, and the processor state.
Kernel Memory Dump— This option writes the contents of the kernel memory to the disk. (The kernel
is the Windows Vista component that manages low-level functions for
processor-related activities such as scheduling and dispatching threads,
handling interrupts and exceptions, and synchronizing multiple
processors.) This dump includes memory allocated to the kernel, the
hardware abstraction layer, and the drivers and programs used by the
kernel. Unallocated memory and memory allocated to user programs are not
included in the dump. This information is the most useful for
troubleshooting, so I recommend using this option.
Complete Memory Dump— This option writes the entire contents of RAM to the disk.
Caution
Windows Vista first writes the debugging information to the paging file—Pagefile.sys in the root folder of the %SystemDrive%.
When you restart the computer, Windows Vista then transfers the
information to the dump file. Therefore, you must have a large enough
paging file to handle the memory dump. This is particularly true for the
Complete Memory Dump option, which requires the paging file to be as
large as the physical RAM, plus one megabyte. The file size of the
Kernel Memory Dump is typically about a third of physical RAM, although
it may be as large as 800MB. If the paging file isn’t large enough to
handle the dump, Vista only writes as much information as can fit into
the paging file.
Overwrite Any Existing File— When
this option is activated, Windows Vista overwrites any existing dump
file with the new dump information. If you deactivate this check box,
Windows Vista creates a new dump file with each system failure. Note
that this option is enabled only for the Kernel Memory Dump and the
Complete Memory Dump (which by default write to the same file: %SystemRoot%\Memory.dmp).
Did You Recently Change Any Application Settings?
If so, try reversing
the change to see whether doing so solves the problem. If that doesn’t
help, here are three other things to try:
Check the developer’s website to see whether an upgrade or patch is available.
Run
the application’s Repair option (if it has one), which is often useful
for fixing corrupted or missing files. To see whether a program as a
Repair option, select Start, Control Panel, Programs, Programs and
Feature to display a list of your installed applications. Click the
problematic application and then look for a Repair item in the task bar.
Reinstall the program.
Note
If a program freezes, you
won’t be able to shut it down using conventional methods. If you try,
you might see a dialog box warning you that the program is not
responding. If so, click End Now to force the program to close. If that
doesn’t work, right-click the taskbar and then click Task Manager. When
you display the Applications tab, you should see your stuck application
listed, and the Status column will likely say Not responding. Click the program and then click End Task.
Did You Recently Install a New Program?
If you suspect a new program
is causing system instability, restart Windows Vista and try operating
the system for a while without using the new program.If the problem doesn’t reoccur, the new program is likely the
culprit. Try using the program without any other programs running.
You should also
examine the program’s readme file (if it has one) to look for known
problems and possible workarounds. It’s also a good idea to check for a
Windows Vista-compatible version of the program. Again, you can also try
the program’s Repair option or you can reinstall the program.
Similarly, if you recently upgraded an existing program, try uninstalling the upgrade.
Tip
One
common cause of program errors is having one or more program files
corrupted because of bad hard disk sectors. Before you reinstall a
program, run a surface check on your hard disk to identify and block off
bad sectors.
Tip
When a program
crashes, Windows Vista displays a dialog box asking if you want to see
if a solution to the problem is available. You can control the behavior
of this prompt.
Did You Recently Install a New Device?
If you recently installed a
new device or if you recently updated an existing device driver, the new
device or driver might be causing the problem. Check Device Manager to
see whether there’s a problem with the device.
Did You Recently Install an Incompatible Device Driver?
Windows Vista allows you to install drivers that aren’t Windows
Vista–certified, but it also warns you that this is a bad idea.
Incompatible drivers are one of the most common sources of system
instability, so whenever possible, you should uninstall the driver and
install one designed for Windows Vista. If you can’t uninstall the
driver, Windows Vista automatically set a system restore point before it
installed the driver, so you should use that to restore the system to
its previous state.
Did You Recently Apply an Update from Windows Update?
It’s an unfortunate fact
of life that occasionally updates designed to fix one problem end up
causing another problem. Fortunately, Vista offers a couple of solutions
for problems caused by updates:
Select Start,
Control Panel, Programs, View Installed Updates. In the Installed
Updates window, click the update you want to remove and then click
Uninstall.
Before you install an update from the Windows Update site, Windows Vista creates a system restore point—usually named (Install) Windows Update. If your system becomes unstable after installing the update, use System Restore to revert to the preupdate configuration.
Tip
If
you have Windows Vista set up to perform automatic updating, you can
keep tabs on the changes made to your system by select Start, System and
Maintenance, Windows Update. Click the View Update History link to see a
list of the installed updates, which includes the update Name, Status
(such as Successful), Type (such as Important or Optional), and Date
Installed.