With most printers, by default, drivers for x86-based
PCs are installed when the printer is. However, not all PCs are
x86-based; some are x64-based, and some are Itanium-based. You need to
look at each computer on your network to see what type of processor it
uses so you can install drivers if necessary.
Understand Types of Processors
The term x86
is the name given to all the Intel microprocessor families, and it
started with the 80286 computer processor in 1982. The x86
microprocessors include the 386, 486, 586, 686, and higher technologies,
as well as the Pentium family of computer chips. Most computers on your
network are most likely these technologies. x86 chips are used with
32-bit operating systems.
You’ll
find newer chip technologies in the x64 family. These 64-bit processors
are from AMD and Intel and support the x64 extensions to the x86
architecture. You might have one of these types of processors if you
recently purchased a high-end PC running Windows Vista Premium,
Ultimate, or Business. x64 processors are compatible with 32-bit
operating systems and hardware, but if a driver exists for x64, it
should be installed.
Itanium is much different
from x86 or x64 technology. Itanium is the brand name for 64-bit Intel
microprocessors. Itanium’s primary use is to support large applications
that require more than 4 GB of memory. It is unlikely you have any
Itanium-based computers at your home or small office.
Find Your Processor Type
To find out what type of processor your computer uses, follow these steps:
1. | Click Start, Computer, and select System Properties.
|
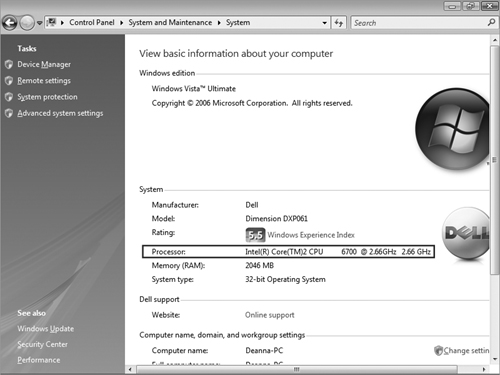
2. | Under System, locate Processor.
|
3. | In Figure 1,
note that the processor is an Intel Core 2. Find out what your
processor is here. Note that you can also see the manufacturer name,
model, and Windows Experience rating, among other things.

|
Note
On Windows XP, click
Start, right-click My Computer, and on the General tab, locate the
processor type. If you don’t see 64 anywhere, it’s an x86 processor.
Add a Printer Driver
To add a printer driver for any computer on your network, follow these steps:
1. | Locate the printer in the Printers folder, and right-click the printer.
|
2. | Select Run As Administrator, and select Sharing.
|
3. | Click Continue.
|
4. | If necessary, click Change Sharing Options.
|
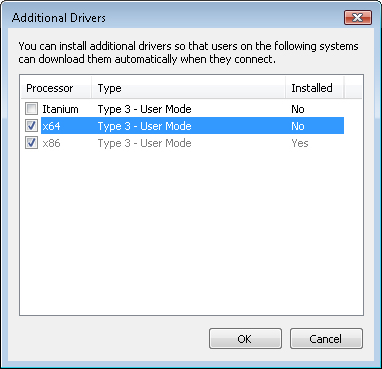
5. | Click Additional Drivers.
|
6. | Select the driver to add, as shown in Figure 2.

|
7. | Click OK.
|
8. | If
prompted, insert the disk where the driver can be found, or click
Browse to locate the driver. (If you don’t have the driver available,
click Cancel, visit the printer manufacturer’s Web site, and then locate
and download the driver you need. Return here, click Browse again, and
locate the driver you downloaded to your PC.)
|
9. | Work through the installation wizards if they appear.
|
10. | Once installed, click Close. |