You can personalize how the taskbar operates and looks to make it more efficient and suit your working style.
For example, you can
unlock the taskbar, which enables you to change the size of the taskbar,
such as making the taskbar taller to make the icons appear less
crowded. You can also temporarily hide the taskbar to give your programs
more room on the desktop. You can also display smaller taskbar icons,
which enables you to fit more icons on the taskbar.
Customize the Taskbar
• You can click and drag a taskbar icon to move it to a different location.
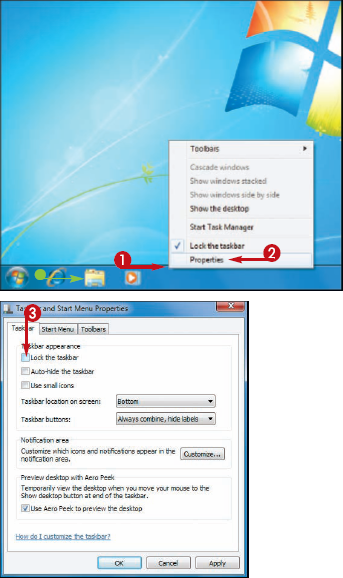
1 Right-click an empty section of the taskbar.
2 Click Properties.
The Taskbar and Start Menu Properties dialog box appears with the Taskbar tab displayed.
3 Click Lock the taskbar ( changes to
  ) to unlock the taskbar.
NOTE
Unlocking the taskbar enables you resize the taskbar.
NOTE
To quickly lock and unlock the taskbar, right-click an empty section of the taskbar and click Lock the taskbar.
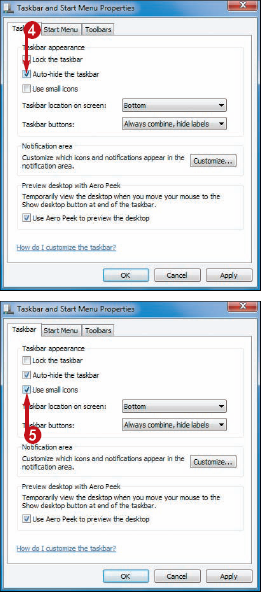
4 Click Auto-hide the taskbar ( changes to ) to hide the taskbar when you are using a program.
NOTE
Auto-hiding the taskbar gives you more room on the desktop to display your program windows.
NOTE
To display the hidden taskbar, move the mouse  to the bottom edge of the screen.
5 Click Use small icons ( changes to ) to use smaller versions of the taskbar icons.
NOTE
Switching to smaller icons enables you to fit more icons on the taskbar.
|
How do I resize the taskbar?
To resize the taskbar, first make sure you have followed Steps 1 to 3 (and then clicked OK)
to unlock the taskbar. Click and drag the top edge of the taskbar up to
get more taskbar rows. If you later find that the taskbar is too big,
click and drag the top edge of the taskbar down to get fewer taskbar
rows.
What is Aero Peek?
Aero Peek is a new Windows 7 feature that enables you
to temporarily hide all your open windows to see the desktop. This is
useful if you have gadgets on the desktop that you want to quickly view.
When you activate the Use Aero Peek to preview the desktop check box ( changes to ), position your mouse pointer over the right edge of the taskbar to view the desktop.
|
To further personalize
your taskbar, the Taskbar tab of the Taskbar and Start Menu Properties
dialog box offers several other customization options. For example, you
can change the taskbar location to the top of the screen or to the left
or right side of the screen. You can also group taskbar buttons from the
same application, which gives you more room to display other taskbar
icons. Finally, you can also customize the notification area icons to
determine which ones are hidden and which of the system icons you want
to display.
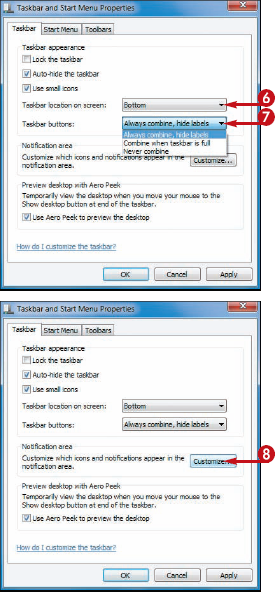
6 Click the Taskbar location on screen  and then click the location you prefer: Bottom, Left, Right, or Top.
7 Click the Taskbar buttons  and then click the grouping option you prefer.
NOTE
See the tip on the next page to learn about the various grouping options.
8 Click Customize.
The Notification Area Icons window appears.
9 For each notification area icon, click  and then click the setting you prefer.
NOTE
See the tip below to learn about the various settings.
If you choose to hide one or more notification area icons, you can click here to display the hidden icons.
You can click this link to turn the system icons on or off.
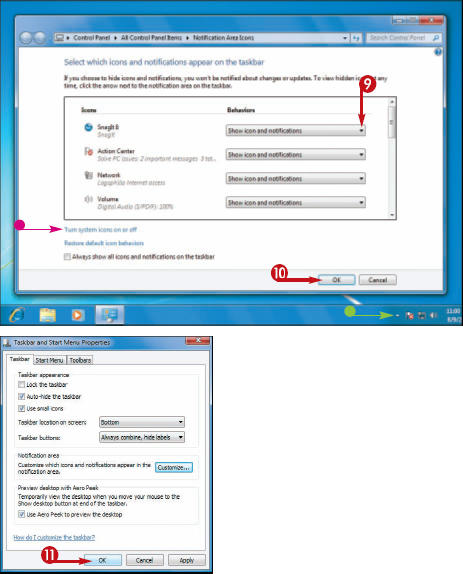
10 Click OK.
11 Click OK.
What do the different taskbar grouping options mean?
Grouping taskbar buttons means showing only a single
button for a program that has multiple windows open. To switch to one of
those windows, click the taskbar button and then click the window name.
Always combine, hide labels means that Windows 7 always groups buttons; Combine when taskbar is full means that Windows 7 waits until the taskbar is full before grouping; and Never combine disables grouping.
What do the different options for the notification area icons mean?
These options control whether the icon
appears in the notification area and whether you see messages from the
icon's program. Choose Show icon and notifications to see both the icon and its messages; choose Only show notifications to hide the icon but still see the messages; or choose Hide icons and notifications to hide the icon and not show the messages.
