Windows 7’s accessibility tools are designed mainly to help users
who have some form of visual or motor impairment. And users without such
impairments can sometimes benefit from using them as well.1. Using the Ease of Access Center
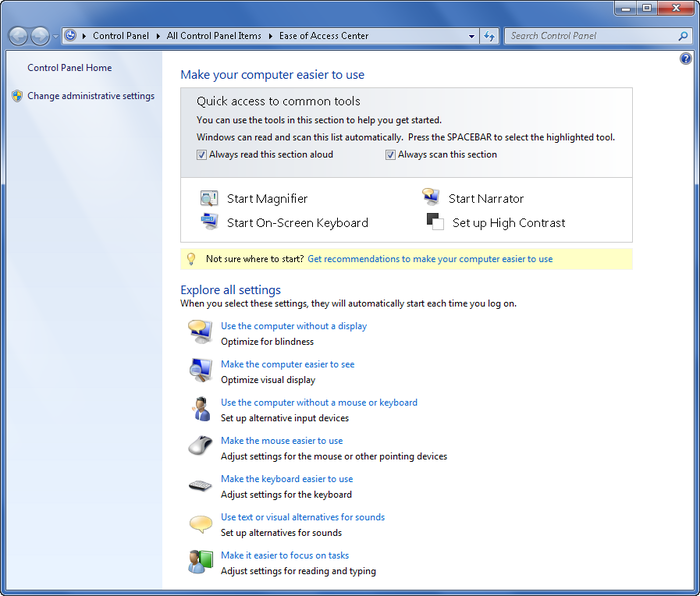
In Windows 7, all accessibility tools are accessible from
the Ease of Access page in the Control Panel. To display this page, as
shown in Figure 1,
click Start, click Control Panel, click Ease of Access, and then click
Ease of Access Center. You can also use the keyboard shortcut Windows-U.
The Ease of Access page has three main areas:
Quick access to common tools
Use these options to turn common accessibility features on
and off. These features include High Contrast, Narrator,
Magnifier, and On-Screen Keyboard utilities. By default, Windows 7
uses the Narrator feature to read these options aloud and
automatically highlights each option in turn. When an option is
highlighted, you can press the Space bar to select it.
Get recommendations…
When you click the “Get recommendations…” link, Windows 7
starts a Recommendation Wizard that is similar to, but more
intuitive than, the Accessibility Wizard in Windows XP. The five
questions in this Recommendation Wizard are designed to help
Windows 7 determine and suggest the best accessibility options for
you to use.
Explore all settings
If you don’t want to use the Recommendation Wizard, you can
use the additional options provided to find related settings that
might improve accessibility. You can optimize the computer for the
blind, optimize the visual display to make it easier to see, set
up alternative input devices, adjust settings for the mouse and
keyboard, use text or visual alternatives to sounds, and adjust
settings for easier reading and typing.

2. Using the Magnifier
The Magnifier enlarges part of the screen in a separate
window to make it easier for those with limited vision to work with a
computer. On an Aero-capable system, Magnifier functions in full-screen
mode by default, with a limited viewport on the full screen. Move the
cursor around to see other areas of your screen. On a non-Aero system,
the Magnifier window is docked at the top of the screen and displays the
area around the cursor, the text you are editing, or the focus of the
keyboard. You can resize the Magnifier window by moving the mouse
pointer over the edge of the window and then dragging the window border.
If you move the mouse pointer over the Magnifier window, you can click
and drag the window to make it float.
You can turn on and use the Magnifier by completing these
steps:
Click Start→Control Panel→Ease of Access→Ease of Access
Center. (You can also press Windows-U to quickly open the Ease of
Access Center.)
Click Start Magnifier. As you move the mouse pointer to a
desired area of the screen, the current position is shown
magnified.
To exit the Magnifier and prevent it from starting automatically,
follow these steps:
Click the Magnifier taskbar button. This displays a Properties
dialog box.
Click the Magnifier window and then press Alt-X.
While the Magnifier is running, you can increase magnification by
pressing the Windows key and the equals sign (=) key, or decrease
magnification by pressing the Windows key and the minus sign (−) key.
You can set Magnifier options by completing the following steps:
Click the Magnifier taskbar button. This displays a Properties
dialog box.
Press the + or – button to set the magnification level of the
Magnifier window. The default magnification is 200 percent, or twice
normal, and you can select a value as high as 1600 percent.
To reverse the colors on the screen, click the gear icon and
select the “Turn on color inversion” checkbox.
By default, the Magnifier is docked at the top of the screen.
Click the Views menu to switch between Full Screen, Lens, or Docked
mode. Full Screen and Lens requires an Aero-capable computer and
Windows 7 edition.
When you have finished configuring your settings, click the
Magnifier taskbar button again to close the Properties dialog box.
Your preferences are remembered each time you start and use the
Magnifier.