The Disk Management utility offers support for
managing storage. You can create, delete, and format partitions or
volumes on your hard drives. You can also extend or shrink volumes on
dynamic disks. Additionally, you can delete volume sets and striped
sets. The first topic I am going to cover is dynamic storage and
volumes.
Managing Dynamic Storage
A dynamic disk can contain simple, spanned, or striped volumes.
Through the Disk Management utility, you can create volumes of each
type. You can also create an extended volume, which is the process of
adding disk space to a single simple volume. The following sections
describe these disk-management tasks.
1. Creating Simple, Spanned, and Striped Volumes
As explained earlier, you use
the New Volume Wizard to create a new volume. To start the New Volume
Wizard, in the Disk Management utility right-click an area of free space
where you want to create the volume. Then, you can choose the type of
volume you want to create: simple, spanned, or striped.
When you choose to create a
spanned volume, you are creating a new volume from scratch that includes
space from two or more physical drives, up to a maximum of 32 drives.
When you choose to create a
striped volume, you are creating a new volume that combines free space
from 2 to 32 drives into a single logical partition. The free space on
all drives must be equal in size. Data in the striped volume is written
across all drives in 64 KB stripes. (Data in spanned and extended
volumes is written sequentially.)
Striped volumes are RAID-0
because striped volumes do not offer any type of redundancy. Striped
volumes offer you better performance and are normally used for temporary
files or folders. The problem with a striped volume is if you lose one
of the drives in the volume, the entire striped volume is lost.
Another option that you have
with volumes is extending the volumes to create a larger storage area.
In the next section we will look at extending volumes.
2. Creating Extended Volumes
When you create an extended
volume, you are taking a single, simple volume (maybe one that is
almost out of disk space) and adding more disk space to it, using free
space that exists on the same physical hard drive. When the volume is
extended, it is seen as a single drive letter. To extend a volume, the
simple volume must be formatted as NTFS. You cannot extend a system or
boot partition.
An extended volume assumes
that you are using only one physical drive. A spanned volume assumes
that you are using two or more physical drives. Exercise 1 shows you how to create an extended volume.
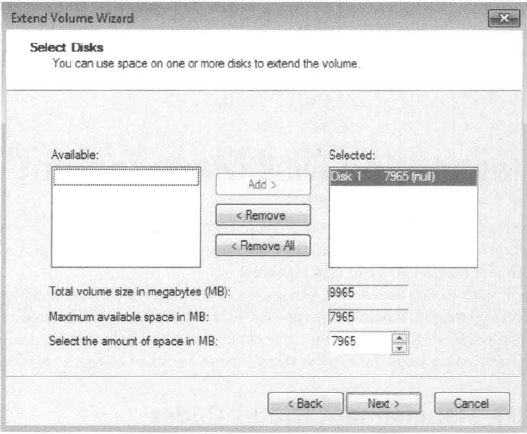
In the Disk Management utility, right-click the volume you want to extend and choose Extend Volume. The Extend Volume Wizard starts. Click Next. The
Select Disks screen appears. You can specify the maximum size of the
extended volume. The maximum size you can specify is determined by the
amount of free space that exists in all of the dynamic drives on your
computer. Click Next to continue.

The Completing The Extend Volume Wizard screen appears. Click the Finish button.
|
Once a volume is extended,
no portion of the volume can be deleted without losing data on the
entire set. (However, you can shrink a volume without losing data by
using the Shrink Volume option in Disk Management.)
|
Crystal, a user on your
network, is running out of disk space. The situation needs to be
corrected so she can be brought back up and running as quickly as
possible. Crystal has a 250 GB drive (C:) that runs a very large
customer database. She needs additional space added to the C: drive so
the database will recognize the data because it must be stored on a
single drive letter. Crystal's computer has a single IDE drive with
nothing attached to the second IDE channel.
You have two basic
options for managing space in these circumstances. One is to upgrade the
disk to a larger disk, but this will necessitate reinstalling the OS
and the applications and restoring the user's data. The other choice is
to add a temporary second drive and extend the volume. This will at
least allow Crystal to be up and running-but it should not be considered
a permanent solution. If you do choose to extend the volume and then
either drive within the volume set fails, the user will lose access to
both drives. When Crystal's workload allows time for maintenance, you
can replace the volume set with a single drive.
|
One issue you may run into with
hard drives is that they go bad from time to time. If you have never
heard a hard drive fail, it is a distinct clicking. Once you have
experienced it, you will never forget it. When drives go bad, Disk
Management can help determine which drive and what the issue may be. In
the next section, we will look at hard disk errors.