Deploying Web applications is more complicated than
deploying Windows applications. One key difference is what occurs during
the build process. Windows applications are compiled into assemblies.
You can distribute those assemblies by any means you want. Visual Studio
provides a number of tools to assist with the distribution of Windows
assemblies, as described in the preceding section.
Web sites are different. When
you use the Build command with a Web site, Visual Studio compiles the
page only for testing. You can't deploy the output created from the
Build command — and you don't need to. Because ASP.NET Web sites are
compiled on demand when users access the Web site, you can just copy and
paste your Web site, if you want.
You may want to compile your Web sites before you deploy them, which is often called precompiling. Precompiled Web sites have these benefits:
They start faster because no performance hit occurs while the requested page compiles.
Source code isn't deployed to the Web server; only assemblies and static files are.
You get feedback from compiler errors before the Web site is deployed.
Next, the deployment begins. Web sites often have two stages of deployment:
Test server:
When a Web site is first created, it may be initially deployed to a
test server. Several developers and testers can access the test site.
The test site usually remains up after the site is deployed to
production. The test site provides a working copy of the production Web
site, where changes can be made.
Production server: After a site is ready to go live, it's published to a production Web server.
In reality, several versions
of the Web site can run on different test servers. Developers can also
have local copies of the site running on their development machines.
They may deploy their local copies to the test server.
Because of the nature of Web
sites, they're often changed more frequently than Windows applications.
Changes are usually made to a single page or a set of pages, and then
only those changes are deployed. In other cases, the entire Web site may
be deployed.
NOTE
Making frequent changes to
the structure, layout, and design of a Web site can be disruptive to
your site's visitors. As a result, more firms are starting to limit the
number of changes they make to the site. Rather than change the site,
firms are creating fluid sites that use content databases and
configuration files to control the site's content and flow. Rather than
change the Web site when you want to change content or the site flow,
changes are made to content databases or configuration files.
Whether you're deploying to
a test server or a production Web server, Visual Studio provides
several options for deploying Web sites:
Web setup project: Packages your Web site by using an installer that you then execute on the Web server
Copy Web Site tool: Copies and synchronizes sites between a local store and a server
Publish Web Site: Precompiles the Web site and copies it to the target of your choice
Web Deployment Projects: This add-in gives you the most flexibility in precompiling your Web site
You can also just copy and
paste your files from your test server to production. The major drawback
of copy-and-paste strategies is that you can easily make mistakes.
1. Using the Publish Web Site utility
To use the Publish Web Site utility in Visual Studio, follow these steps:
Open your Web site in Visual Studio.
Choose Build=>Publish Web Site.
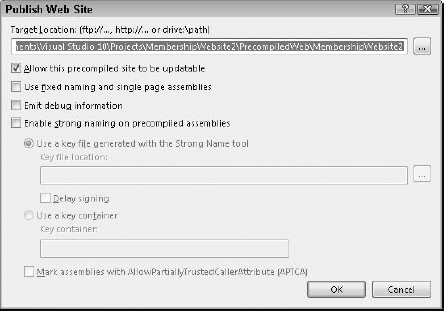
The Publish Web Site dialog box, shown in Figure 1, appears.
Specify a target location where the Web site should be copied.
You can enter or browse to a URL, Universal Naming Convention (UNC), or local file path.
Select the Allow This Precompiled Site to Be Updateable option.
This
feature copies your ASPX files as-is to the Web site. You can update
these pages later without having to recompile and deploy the entire
site.
Click OK.
All
code-behind files are compiled into a single assembly. The assembly,
ASPX files, and static files (such as images) are copied to the target
location that you specify in Step 3.

|
Make a backup of your
production Web site before deploying a new Web site. If the new site
doesn't work, you can quickly roll back.
|
|
2. Handling web.config files for testing and production
A common challenge when you're deploying Web sites is not overwriting the web.config file. The web.config
file on a test server usually has different settings than on a
production server. For example, the test server may have connection
strings that point to test databases. Visual Studio 2010 automatically
creates a web.debug.config and web.release.config file for you and gives you control over precompilation and other deployment settings.
To configure deployment of an ASP.NET Web project, follow these steps:
Choose Build=>Publish Web Site.
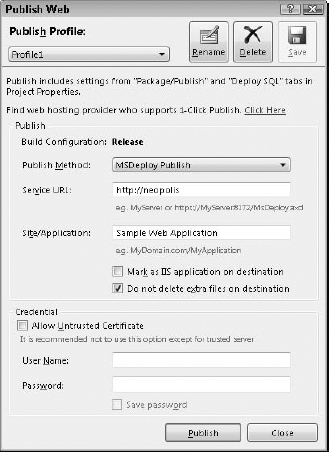
The Publish Web dialog box appears, as shown in Figure 2.
Choose Publish.
Visual Studio creates a web.release.config file and publishes the Web site with your settings.
You configure a group of
property page settings for each build configuration. For example, you
likely don't want to use the deployment project with your debug build
configuration. You can create different deployment settings for staging
and release build configurations.
Build your site by using the release configuration. The web.config file is merged with the .config
file. And you have a release version of your Web site that you can
deploy to your production server, using whatever method suits you.
