In the late 1990s, the development world went crazy
for Web applications. Part of the draw was capturing the ease of
administration that comes along with Web sites. Rather than install a
single Windows application on a thousand computers, why not have a
thousand computers access a single Web application? It sounds great in
theory; however, many folks quickly realized that using Windows
applications sometimes just makes the most sense.
Microsoft listened and
created a hybrid deployment model that allows you to deploy your Windows
application to a Web server. Using the ClickOnce feature, Visual Studio
2010 copies the files needed to deploy your Windows application to a
Web server. Your Windows clients then install, or even just run, the
application from the Web server.
Of course, sometimes
your application needs to exercise more control over the target
installation machine than you can with a Web server. When you need more
control over your application's installation, you may want to use Windows Installer,
which is a component in Windows operating systems that manages software
installation. Visual Studio 2010 provides several project templates you
can use to target the services of Windows Installer.
1. From No Touch to ClickOnce
Microsoft started
introducing the concept of Web-based installation in previous versions
of the .NET Framework. The technology was improved, and the name changed
from No Touch to ClickOnce.
You use ClickOnce to
Copy application files to a central Web site.
Deploy updates to a Web site.
Install applications on client machines from the Web site.
You aren't restricted to
deploying to a Web site; you can also deploy to an FTP server or to CD.
You can configure an application to automatically check a Web site for
updates. Alternatively, you can use the System.Deployment namespace to write custom code that targets ClickOnce.
You can choose for your
clients to run an application locally or only from the Web server.
Either way, the application is downloaded to a local cache. You can find
the cache at Documents and Settings\[username]\Local Settings\Apps.
The user is supplied with a link
to the Web server or file server. For example, a user can click a link
that you send by e-mail so that the application is downloaded to a local
cache and executed. The user doesn't need administration privileges
because the application runs in a secure mode and can't access the
machine.
A ClickOnce process using Visual Studio may work like this:
The developer publishes a Windows application to a deployment server.
Visual
Studio 2010 creates a Web site to act as a deployment server, and all
files needed to run the application are copied to the Web site.
The client clicks a hyperlink that deploys the Windows application on the local machine.
The
hyperlink is a link to a setup file on the deployment server. The setup
file downloads the application's files to the local computer and
executes the application.
You have two options for deploying the application on the client:
Online:
The user must click the hyperlink every time she wants to run the
application. The application is always installed in the local cache.
When the user clicks the link, the deployment server downloads any
updated components before executing the application from the local
cache.
Offline: The user can choose a shortcut from the Start menu to open the application. An uninstaller is provided via Control Panel.
The good news is that you don't
have to do anything special to use ClickOnce. The features are part of
the .NET Framework. The bad news is that you can't install all
applications by using ClickOnce. For example, you can't access the
Registry or add assemblies to the Global Assembly Cache (GAC) by using
ClickOnce. Use Windows Installer instead.
NOTE
ClickOnce is
intended for scenarios where your applications use a rich user interface
(UI) to provide access to resources, such as database servers and Web
services. Many corporate applications fit into this scenario, which
makes ClickOnce helpful from an administration standpoint. You don't
have to physically deploy or update applications on every machine.
Visual Studio 2010
provides the Publishing Wizard for taking advantage of the .NET
Framework ClickOnce technology. You have two options for accessing the
Publishing Wizard:
NOTE
Applications published via the Publishing Wizard are ClickOnce applications.
To publish a Windows application to a Web site by using the Publishing Wizard, follow these steps:
Open the Windows application in Visual Studio.
Choose Build=>Publish <projectname>.
Your project name appears after the Publish command on the Build menu. The Publish Wizard appears.
The default choice is to publish to a publish subfolder of the solution folder (see Figure 1), and the wizard lists a location to create the Web site. If you want to use a different URL, type the pathname in the wizard.
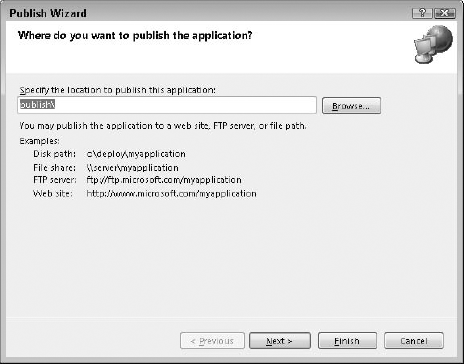
Alternatively, you can type or browse to a file share, FTP server, or disk location.
At the prompt, choose whether users will install the application from a web site, UNC path or file share, or CD/DVD-ROM media.
Click Next.
The
Where Will the Application Check for Updates page appears. By default,
the application won't check for updates. You can also specify a location
where the application will check for updates.
Click Next
The Ready to Publish page appears with a summary of your choices.
Verify your choices and click Finish.
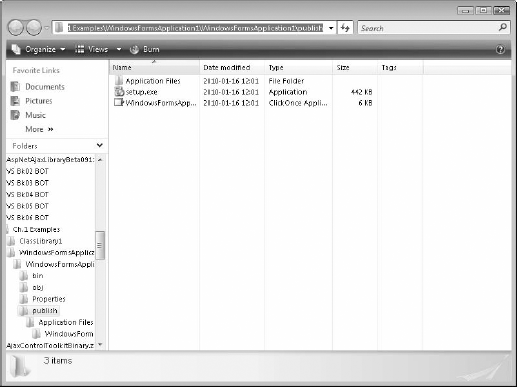
The
wizard builds your project and publishes it to the Web server. If your
application is published to a file, a folder directory will open,
showing you the target, as shown in Figure 2.
1.1. Accessing the published application
When you publish the application to a Web server, ClickOnce creates a Web site with a publish.htm file you can use to deploy the application to the local client. Accessing a published application is often referred to as consuming the application.
To access the published application locally, follow these steps:
Browse to the URL where the application was published.
You
can find the URL in the output window, as described in the preceding
section. You can also view the Publish tab in Project Designer to
determine where the application is published.
If you publish your application to a file share, use the UNC path to access the publish.htm file. If you publish to a CD, run the setup.exe file.
Click the Install button on publish.htm or setup.exe.
|
On machines that use Vista as
the operating system, you either need the install application to be
signed, or you need to use administrative privileges.
|
|
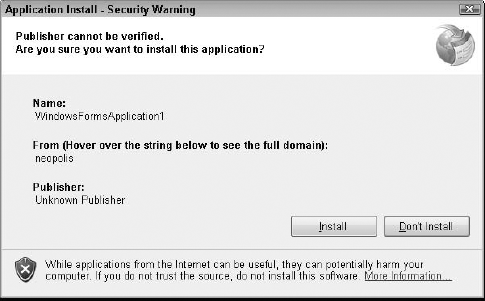
ClickOnce
downloads local copies of the application to a cache and launches the
application. A security warning appears if the application isn't
properly signed, as shown in Figure 3. See the later section "Signing your code" for more information on removing this security warning.
Click the Install button to complete the installation.
The files are copied, and the application is launched.
If you chose to publish your
application so that it runs offline, the installation process creates
(on the Start menu) a shortcut to the cached copy of the application.
Otherwise, you can run the application only by using the URL to the
deployment server. You can remove or configure the application by using
the Add/Remove Programs applet in Control Panel.
To remove an installed application by using Control Panel, follow these steps:
Double-click the Add or Remove Programs icon.
Navigate to the program you want to remove in the Add or Remove Programs window.
Click the Change/Remove button
A maintenance window appears, as shown in Figure 4.
Select the radio button to remove the application and then click OK.
The application is removed from the local computer.

1.2. Checking out your publishing options
Visual Studio provides
several options for deploying applications with ClickOnce. You access
these options from the Publish tab in Project Designer. To access the
Publish tab, follow these steps:
Right-click the project in Solution Explorer.
Choose Properties from the shortcut menu.
Project Designer appears.
Click the Publish tab, shown in Figure 5.
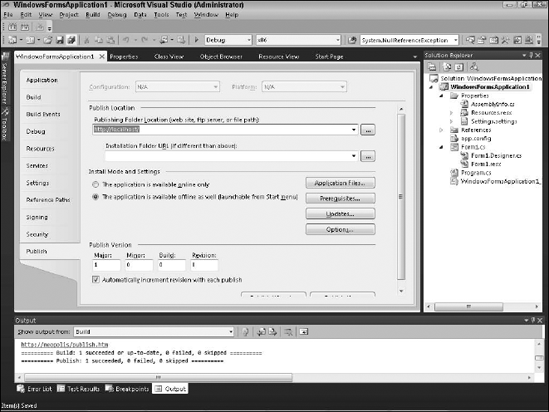
You can use the Publish tab to do the following:
Set the publishing location. Specify the path to a Web server, FTP server, network file share, or local file path where you want to publish files.
Designate the installation as online or offline.
Specify which application files to include in the deployment.
Select prerequisite components to install on the client machine.
By default, version 4 of the .NET Framework is required. You can choose
to require your own custom components or components from third parties,
such as Crystal Reports.
Schedule application updates and provide an alternative location for retrieving updated files.
Set options, such as a URL for support, or make an application deployed to a CD automatically start when the CD is inserted.
Specify that the Publishing Wizard automatically increments version numbers each time the application publishes.
1.3. Signing your code
For a ClickOnce application to
run on a local computer, the computer needs to know that the application
is safe to run. ClickOnce accomplishes this by digitally signing the
application, also known as code signing.
Digitally signed applications bind an application's publisher to the
application and ensure that the application hasn't been tampered with en
route to the consumer.
A digitally signed
application uses a digital certificate to store all the information
required to validate an application and its publisher. When you use the
Publishing Wizard, Visual Studio automatically creates a certificate you
can use for testing. Common practice dictates using a separate
certificate for testing and releasing software to prevent someone from
obtaining test code with a release certificate.
Code signing is a fairly
common requirement. You should create a single test certificate and
reuse it rather than allow Visual Studio to create a new certificate
every time. To sign a ClickOnce application, follow these steps:
Right-click the project in Solution Explorer.
Choose Properties from the shortcut menu.
Project Designer appears.
Click the Signing tab
The Signing tab has two purposes:
Sign ClickOnce files.
Sign assembly files.
See the upcoming section "Sharing assemblies" for more information on signing assembly files.
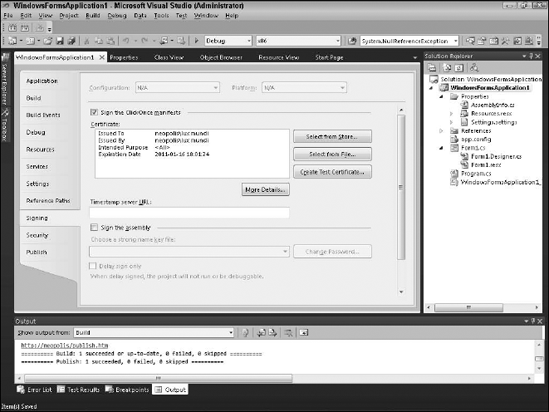
Select the Sign the ClickOnce Manifests check box.
If
you've already run the ClickOnce Wizard, Visual Studio automatically
creates a test certificate. You see a check mark and the certificate's
details, as shown in Figure 6.
Click Select from Store or Select from File to select a certificate to use.
If you need to create a new test certificate
Click the Create Test Certificate button.
You're
prompted for a password to use for the certificate. Visual Studio
creates the certificate and adds it to the project. The certificate is
installed in your computer's personal store of certificates.
Copy the .pfx file (personal exchange file) to a central location so that you can reuse it.
Next time, you can choose Select from File and select the test certificate.
Alternatively, you can use the makecert.exe command in the .NET Software Development Kit to create certificates.
Click the More Details button.
The Certificate window appears.
The
text in the certificate states that the certificate isn't trusted. At
this point, a certificate in your personal store doesn't come from a
trusted certificate authority (CA). You must install the certificate in
the Trusted Root Certificate Authorities store.
Click the Install Certificate button, as shown in Figure 7.
The Certificate Import Wizard appears.
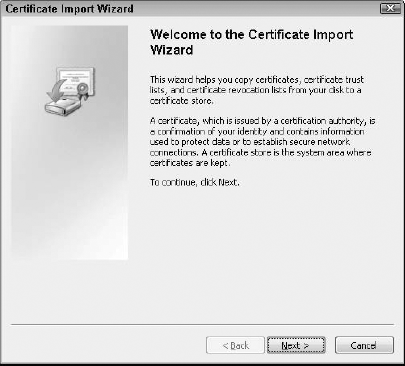
Click Next to step through the wizard.
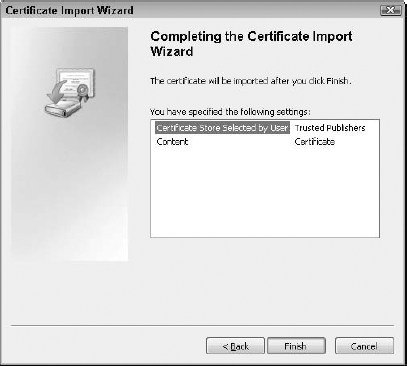
The Certificate Store page appears.
Select the Place All Certificates in the Following Store option.
Click the Browse button.
The Select Certificate Store window appears.
Select Trusted Root Certificate Authorities and then click OK.
The store appears in the wizard.
On the Completion page, click Finish.
A
security warning informs you that you're about to install a new trusted
certificate authority. The danger is that someone can sign software
with your test certificate and run the software on your computer.
Click Yes to accept the security warning.
The certificate is installed in the Trusted Root Certificate Authorities store.
Repeat Steps 7 through 13 to install the certificate in the Trusted Publishers store and click Finish.
Figure 8 shows a certificate published in the Trusted Publishers store.
Now, whenever you install the application, you aren't prompted to install it.
|
You must use Internet Explorer to sign up for its certificate. At this time, Firefox and other browsers don't appear to work.
|
|
Obviously, you don't want
to deploy your test certificate into production. You need to acquire a
release certificate from a CA, which is an entity whose identity has
been verified and who can validate your identity. For example, VeriSign
is a CA from whom you can buy a certificate. Read more about the
VeriSign code-signing products on its Web site:
www.verisign.com/products-services/security-services/code-signing
If you're distributing
software only within your internal organization, you may not want to
purchase a certification from a third party. In that case, your
organization can make itself a CA for within your organization and issue
certifications.
Whichever route you take, you
need some way to distribute the certificates to the Trusted Publishers
store on all your clients. Additionally, if your company is issuing its
own certificates, it needs to register itself on each client machine in
the Trusted Root Certification Authorities store.
|
You probably don't want to
run around to each client machine and install code-signing certificates.
That defeats the purpose of using ClickOnce. Instead, use Windows
Installer to create an installer package that installs the certificates.
You can use other tools, too, such as the Windows
certificate-management console (certmgr.exe).
|
|
If you want to read more about code signing, check out the Microsoft white paper on code-signing best practices at
www.microsoft.com/whdc/winlogo/drvsign/best_practices.mspx
1.4. Updating your applications
You have several options
for updating your ClickOnce applications. When you need to publish
updates, you just update your software in Visual Studio and publish it
again via the Publishing Wizard. Old versions of the software are
retained, and new versions are pushed out.
When and how frequently a
user's application checks for updates depends on how you configure the
Publishing Wizard. You access update options by using the Updates button
on the Publish tab of Project Designer. See the earlier section "Checking out your publishing options" for more information on using the Publish tab.
These update choices are available to you:
After the application starts:
Speeds up start time because the application checks for updates after
it opens. Any new updates are downloaded and installed the next time the
application runs.
Before the application starts: Updates are installed when a user launches the application.
Scheduled updates: Indicates how frequently the application should check for updates, as shown in Figure 9.
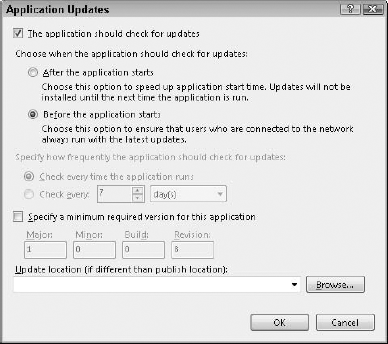
Required update to a minimum version: Forces a client to update by requiring the use of at least a minimum version of the application.
You can use the Application
Updates window to specify an update location that's different from a
publish location. For example, you can publish to a CD and update to a
Web server.
NOTE
Each time you run the
Publishing Wizard, Visual Studio automatically updates the application's
version number. The version number is part of the application's digital
signature, which .NET uses to ensure that the application is valid. If
you haven't made any changes to the application, the build process
doesn't build the application. As a result, the wizard uses a new
version number when it publishes a copy of the application from the
previous version. As a result, the application doesn't run on the client
machine. If you want to force Visual Studio to publish an update when
you haven't made any changes to the code, be sure to use the Build=>Clean command first. The Publishing Wizard is then forced to build the application.
