1. Troubleshooting Disk Management
The Disk Management utility
can be used to troubleshoot disk errors through a set of status codes;
however, if a disk will not initialize, no status code will be
displayed. Disks will not initialize if there is no valid disk
signature.
The problem with disk
errors is that you don't know when a disk fails or which disk failed.
Disk Management can help you with this. When disks have problems or
errors, status codes get assigned. Knowing what these codes mean will
help you determine what the problem is and, more important, what steps
need to be taken to fix the problem.
1.1. Using Disk Management Status Codes
The main window of the Disk
Management utility displays the status of disks and volumes. The
following list contains the possible status codes and a description of
each code; these are very useful in troubleshooting disk problems.
Online Indicates that the disk is accessible and that it is functioning properly. This is the normal disk status.
Online (Errors)
Used only with dynamic disks. Indicates that I/O errors have been
detected on the dynamic disk. One possible fix for this error is to
right-click the disk and select Reactivate Disk to attempt to return the
disk to Online status. This fix will work only if the I/O errors were
temporary. You should immediately back up your data if you see this
error and suspect that the I/O errors are not temporary.
Healthy Specifies that the volume is accessible and functioning properly.
Healthy (At Risk)
Used to indicate that a dynamic volume is currently accessible but I/O
errors have been detected on the underlying dynamic disk. This option is
usually associated with Online (Errors) for the underlying disk.
Offline or Missing
Used only with dynamic disks. Indicates that the disk is not
accessible. This can occur if the disk is corrupted or the hardware has
failed. If the error is not caused by hardware failure or major
corruption, you may be able to re-access the disk by using the
Reactivate Disk option to return the disk to Online status. If the disk
was originally offline and then the status changed to Missing, it
indicates that the disk has become corrupted, has been powered down, or
was disconnected.
Unreadable
This can occur on basic or dynamic disks. Indicates that the disk is
inaccessible and might have encountered hardware errors, corruption, or
I/O errors or that the system disk configuration database is corrupted.
This message may also appear when a disk is spinning up while the Disk
Management utility is rescanning the disks on the computer.
Failed
Can be seen with basic or dynamic volumes. Specifies that the volume
can't be started. This can occur because the disk is damaged or the file
system is corrupted. If this message occurs with a basic volume, you
should check the underlying disk hardware. If the error occurs on a
dynamic volume, verify that the underlying disks are online.
Unknown
Used with basic and dynamic volumes. Occurs if the boot sector for the
volume becomes corrupted—for example, from a virus. This error can also
occur if no disk signature is created for the volume.
Incomplete
Occuts when you move some, but not all, of the disks from a multidisk
volume. If you do not complete the multivolume set, then the data will
be inaccessible.
Foreign
This error can occur if you move a dynamic disk from a computer running
Windows 2000 (any version), Windows 2008, Windows XP Professional,
Windows Vista, or Windows Server 2003 to a Windows 7 computer. This
error is caused because configuration data is unique to computers where
the dynamic disk was created. You can correct this error by
right-clicking the disk and selecting the option Import Foreign Disks.
Any existing volume information will then be visible and accessible.
In addition to errors, there
are some other issues that can arise when installing or configuring
disks. One issue that may occur is that a disk fails to initialize when
installed.
1.2. Troubleshooting Disks That Fail to Initialize
When you add a new disk to
your computer in Windows 7, the disk does not initially contain a disk
signature, which is required for the disk to be recognized by Windows.
Disk signatures are at the end of the sector marker on the Master Boot
Record (MBR) of the drive.
When you install a new drive
and run the Disk Management utility, a wizard starts and lists all new
disks that have been detected. The disk signature is written through
this process. If you cancel the wizard before the disk signature is
written, you will see the disk status Not Initialized. To initialize a
disk, you right-click the disk you want to initialize and select the
Initialize Disk option.
So as you have know seen, Disk
Management can be a very useful tool in your computer management
arsenal. If you decide to format your partition or volume using NTFS,
you then receive added benefits like compression, encryption, quotas,
and security. In the next section, we will start taking a looking at
some of these benefits.
2. Managing Data Compression
One of the advantages of using
NTFS over FAT32 is the ability to compress data. I teach IT
administrators data compression and I like to refer to a well-known
infomercial as an example. Have you seen the commercial where people put
all of the blankets into a large bag and then hook a vacuum to the bag
and suck all the air out? This is a great example of how compression
works. Data compression is the process of storing data in a form that
takes less space than uncompressed data.
If you have ever "zipped" or
"packed" a file, you have used a form of data compression. The
compression algorithms support cluster sizes only up to 4 KB, so if you
are using larger cluster sizes, NTFS compression support is not
available. If you have the Modify permission on an NTFS volume, you can
manage data compression through Windows Explorer or the Compact
command-line utility.
Files as well as folders in
the NTFS file system can be either compressed or uncompressed. Files and
folders are managed independently, which means that a compressed folder
can contain uncompressed files, and an uncompressed folder can contain
compressed files.
Access to compressed
files by applications is Transparent. For example, if you access a
compressed file rhrough Microsoft Word, the file will be uncompressed
automatically when it is opened and then automatically compressed again
when ir is closed.
Compression happens very
quickly, but if, for example, you compress a 500 GB hard drive, there is
no guarantee that there won't be any lag time on your machine or
server.
Data compression is available
only on NTFS partitions. Because of this, if you copy or move a
compressed folder or file to a FAT32 partition, Windows 7 automatically
uncompressed the folder or file.
Certain system files (e.g. Pagefile.sys) can't be compressed. You also have the ability to show compressed files and folders with an alternate color.
In Exercise 1, you will compress and uncompress folders and files.
Select Start => Run, and then type Explorer and click OK. In
Windows Explorer, find and select Computer, Local Disk (C:), and then a
folder on the C: drive. The folder you select should contain files. Right-click
the folder and select Properties. In the General tab of the folder's
Properties dialog box, note the value listed for Size On Disk. Then
click the Advanced button. In the Advanced Attributes dialog box, check the Compress Contents To Save Disk Space option. Then click OK.
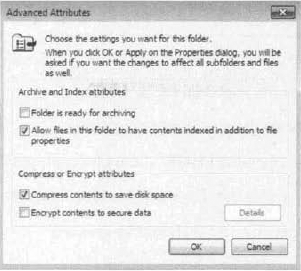
In
the Confirm Attribute Changes dialog box, select the option Apply
Changes To This Folder, Subfolders and Files. (If this confirmation
dialog box does not appear, you can display it by clicking the Apply
button in the Properties dialog box.) Click OK to confirm your changes. On
the General tab of the folder's Properties dialog box, note the value
that now appears for Size On Disk. This size should have decreased
because you compressed the folder.
|
To uncompress folders and files, repeat the steps in Exercise 1 and uncheck the Compress Contents To Save Disk Space option in the Advanced Attributes dialog box.
As I stated earlier, you can
specify that compressed files be displayed in a different color from the
uncompressed files. To do so, in Windows Explorer, select Organize => Folder And Search Options => View, Under Files And Folders, check the Show Encrypted Or Compressed NTFS Files In Color option.
In addition to
compressing files and folders in Windows Explorer, you can compress the
files and folders using the Compact command-line utility.
2.1. Using the Compact Command-Line Utility
The command-line options for
managing file and folder compression are Compact and Expand. You can
access these commands from a command prompt. The Compact command offers
you more control over file and folder compression than Windows Explorer.
For example, you can use the Compact command with a batch script or to
compress only files that meet a specific criterion (for example, all the
DOC files in a specific folder). Some of the options that can be used
with the Compact command are shown in Table 1.
Table 1. Compact commands
| Command | Description |
|---|
| /e | Compresses the specified file or folder |
| /U | Uncompresses the specified file or folder |
| /S: dir | Used to specify which folder should be compressed or uncompressed |
| /A | Displays any files that have been hidden or system file attributes |
| /I | Indicates that any errors should be ignored |
| /F | Forces a file to be compressed |
| /Q | Used with reporting, to report only critical information |
| /? | Displays help |
Another way that you can save
disk space is by zipping folders. In the following section we will
discuss how to save space using zipped folders.
2.2. Using Compressed (Zipped) Folders
Windows 7 also supports
compressed (zipped) folders. This feature is different from NTFS
compressed folders. The advantage of using compressed (zipped) folders
is that it is supported on FAT32 or NTFS volumes. In addition, you can
use compressed (zipped) folders to share data with other programs that
use zipped files. The downside to using compressed (zipped) folders is
that it is slower than using NTFS compression.
Within Windows Explorer, you create a zipped folder (or file) by right-clicking on the folder and selecting Send To => Compressed (Zipped) Folder. You create a zipped file by right-clicking on a file and selecting New => Compressed (Zipped) Folder. When you create a compressed folder, it will be displayed as a folder with a zipper.
Compression is a nice
advantage to using NTFS, but another advantage is data encryption. In
the following section, I will discuss the benefits to using data
encryption.
