Each power plan contains advanced settings that can
be configured, such as when the hard disks will be turned off and
whether a password is required on wakeup. To configure these advanced
settings, you click Control Panel =>
Power Options and select the power plan to use. You then click Change
Advanced Power Settings to open the Advanced Settings tab of the Power
Options dialog box, shown in Figure 1.
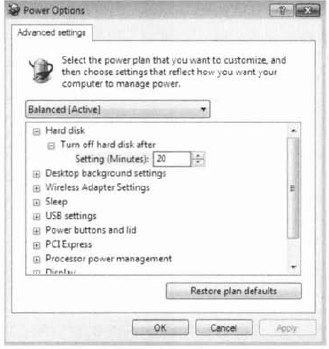
You can then modify the
settings as desired or restore the plan defaults. For example, one
option that you might want to change if you are using a mobile computer
is the Power Buttons And Lid option, which configures what happens when
you press the power button or close the lid of the mobile computer. When
either of these actions occurs, the computer can be configured to do
nothing, shut down, go into Sleep mode, or go into Hibernation mode.
1. Configuring Hibernation
Although Sleep is the
preferred power-saving mode in Windows 7, Hibernation is still available
for use. Hibernation for a computer means that anything stored in
memory is also stored on your hard disk. This ensures that when your
computer is shut down, you do not lose any of the information that is
stored in memory. When you take your computer out of hibernation, it
returns to its previous state.
To configure your computer
to hibernate, access the Advanced Settings tab of the Power Options
dialog box. The Hibernate option appears under the Sleep option.
Complete Exercise 1 to configure a power plan for your computer. If Hibernate is not present, complete the steps in this Exercise to enable hibernation.
Select Start => Control Panel => Power Options. Select a power plan to modify from the Preferred Plans list and click Change Plan Settings. Configure
the power plan options for your computer based on your personal
preferences. Click Change Advanced Power Settings to modify advanced
power settings. When atl changes have been made, click Save Changes.
|
There is a useful tool when
you're using a laptop on the battery that allows you to see how much
time you have left until the battery dies. Let's take a look at the
Battery Meter.
2. Managing Power Consumption Using the Battery Meter
Windows 7 includes a battery
meter that you can use to monitor the battery power consumption on your
computer. The battery meter also provides notification on what power
plan is being used.
The battery meter appears
in the notification area of the Windows Taskbar and indicates the status
of the battery, including the percentage of battery charge. As the
battery charge gets lower, the battery meter provides a visual
indication of the amount of charge left. For example, when the battery
charge reaches the low-battery level, a red circle with a white X is
displayed.
The battery meter also
provides a quick method for changing the power plan in use on the
computer. By clicking the battery meter icon, you can select between the
three preferred power plans available with Windows 7.
3. Using Windows ReadyBoost and Windows 7
With Windows Vista,
Microsoft introduced several new technologies to help boost operating
system performance. Windows ReadyBoost is a new technology that was
introduced with Windows Vista and is also available in Windows 7.
Windows ReadyBoost allows for
the use of multiple nonvolatile flash memory devices as an additional
memory cache. When the physical memory devices become full on a computer
with Windows ReadyBoost configured, data is written to the flash device
instead of to the hard drive. This improves performance because data
can be read more quickly from the flash drive than from the hard drive.
When a compatible device
is installed on a Windows 7 computer, a ReadyBoost tab is displayed on
the device's Properties dialog that can be used to configure Windows
ReadyBoost.
To use a flash memory device with Windows ReadyBoost, the device must meet the following specifications:
The device must have a storage capacity of at least 256 MB.
The device must support USB 2.0.
The device must support a throughput of 2.5 MB/sec for 4 K random reads and 1.75 MB/sec for 512 K random writes.
4. Using ReadyDrive and Windows 7
ReadyDrive is also a
technology included with Windows 7 that you can use to speed up the boot
process, resume from a hibernation state faster, and conserve battery
power for mobile computers. ReadyDrive relies on new hybrid hard disks,
which use flash memory technology in conjunction with mechanical hard
disk technology.
When you use ReadyDrive, data
is written to flash memory instead of to the mechanical hard disk. This
saves battery power because the mechanical hard disk does not need to
perform as many read/write actions. Additionally, read/write times with
flash memory are quicker than with traditional hard disk media, so
resuming from hibernation occurs faster.
Configuring the power options on a laptop can help save energy and extend battery life.
Another important item to look at when configuring Windows 7 is how you are managing your Windows services.
