End user support for most IT departments is a major
concern and a time-consuming endeavor. Anything we can do to provide a
more efficient solution to user issues is a major benefit. Basic
telephone or chat support works in many cases, but what if you could see
what the end user sees or even interface with their machine? By using
Remote Assistance and Remote Desktop, you can. If you've been using them
with XP and Vista, you're really going to be pleased with the
improvements with Windows 7.
Remote Assistance
in Windows Vista provided many enhancements over previous versions,
including improvements in security, performance, and usability. Windows 7
goes even further by adding Easy Connect, which makes it even easier
for novice users to request help from expert users. Group Policy support
has been increased. There is command-line functionality (meaning we can
add scripting), bandwidth optimization, logging, and even more.
Remote Desktop
is a tool that allows you to take control of a remote computer's
keyboard, video, and mouse. This tool does not require someone
collaborating with you on the remote computer. Remote Desktop is used to
access remote machines' applications and troubleshoot issues as well as
provide end user needs where you want complete control of the remote
machine. Let's start the discussion with Remote Assistance.
1. Remote Assistance
Remote Assistance provides a
method for inviting help by instant message, email, a file, or now an
Easy Connect option. To use Remote Assistance, the computer requesting
help and the computer providing help must have Remote Assistance
capabilities and both computers must have network connectivity (they
have to be able to talk to each other).
Remote Assistance is designed
to have an expert user provide assistance to a novice user, The "expert"
and "novice" terms are used to describe the as sis tor (experr) and
assistee (novice). When assisting a novice user, the expert can use
text-based chat built into Remote Assistance. The expert can also take
control of a novice user's desktop (with permission of course). Here are
some common examples of when you would use Remote Assistance:
Diagnosing
problems that are difficult to explain or reproduce. Remote Assistance
can allow an expert to remotely view the computer and the novice user
can show the expert an error or problem.
Guiding
a novice user to perform a complex set of instructions. The expert can
also take control of the computer and complete the tasks if necessary.
1.1. Easy Connect
The Easy Connect method for
getting remote assistance is new for Windows 7. Easy Connect uses Peer
Name Resolution Protocol (PNRP) to set up direct peer-to-peer transfer
using a central machine on the Internet to establish the connection.
PNRP uses IPv6 and Teredo tunneling to register a machine as globally
unique. You're not using IPv6? You are with PNRP; Windows 7 (as well as
Vista and Windows Server 2008) has IPv6 turned on natively as well as
the currently used standard of IPv4. You will, however, be able to use
only Easy Connect with Windows 7 and beyond. You can see the
structure of the PNRP Teredo IPv6 packet in Figure 1.

To establish a
Remote Assistance session with a user using Easy Connect, the novice
(the user being helped) should open the Windows Remote Assistance
screen. This is done by selecting Start => All Programs => Maintenance => Windows Remote Assistance.
You can also access the Remote Assistance feature by clicking Start =>
Help And Support and choosing more support options in the lower-left
portion of the Windows Help And Support window. Some users may be used
to going to the Windows Help And Support window from previous operating
system versions. It looks different, but it's still there. You can also
launch the Windows Remote Assistance screen by typing msra in the
integrated search box from the Start menu (click the Starr button).
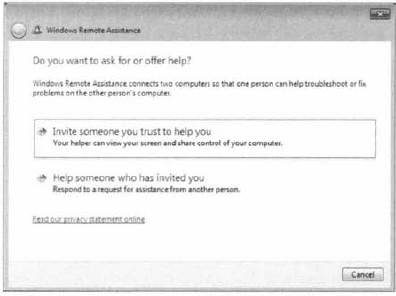
Whichever way the novice or
the expert launches the feature, the Windows Remote Assistance screen
will become available. To start using Easy Connect, the novice user will
select Invite Someone You Trust To Help You. The initial Remote
Assistance window where the novice will initiate an invitation is shown
in Figure 2.
NOTE
The Windows 7 machine
is configured by default to allow Remote Assistance. If this has been
disabled in the configuration, an error will be generated here and you
must enable Remote Assistance. To enable a remote computer to allow
Remote Desktop access, select Start => Control Panel => System And Security =>
System. Click Remote Settings in the left pane. Select the Allow Remote
Assistance Connections To This Computer check box and click OK. This
will create an exception in Windows Firewall to allow Remote Assistance
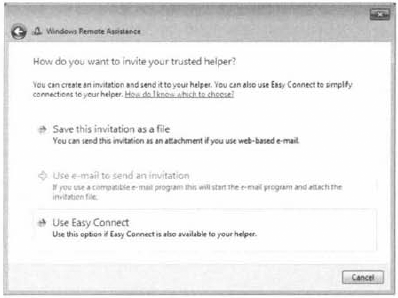
The Windows Remote Assistance screen (Figure 3) will ask, "How do you want to invite your trusted helper?" and will offer the user the option to use Easy Connect.
One nice feature of Easy
Connect is that if the novice user has already established an Easy
Connect session previously with an expert user, the screen after
selecting Use Easy Connect will offer the novice the ability to connect
to the same expert. The novice user can also choose to invite someone
new and/or delete the old contact if necessary. The expert user will
have the same option after choosing Use Easy Connect from the machine
used for a previous Easy Connect session.
After the Use Easy Connect
option is selected, Windows 7 will verify network connectivity briefly.
This is the point at which the PNRP actions take place and the novice
user's information is added to a cloud in the Internet space. The cloud
is the group of machines holding little pieces of information, the
identifiers of users needing connectivity, set up in a peer-to-peer
sharing environment. PNRP uses this distributed infrastructure for its
peer-to-peer name resolution. The novice user's contact information is
entered into the PNRP cloud and an associated password is created and
displayed to the novice user.
The novice user will now
relay the password to the expert by text message, telephone, or any
convenient conversation method. The novice will simply have to wait for
the expert to initiate their part. The novice user will still have to
accept the connection once the expert starts the remote assistance
session.
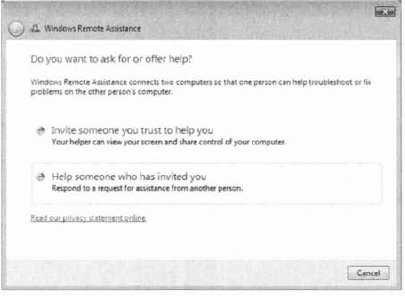
The expert user needs
to start a Remote Assistance session the same way the novice did, but
the expert will choose Help Someone Who Has Invited You from the Windows
Remote Assistance screen (Figure 4).
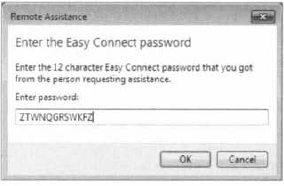
The expert user will be presented a dialog box to enter the password given by the novice user (Figure 5) who is initiating the Remote Assistance session.
After a few moments of
querying the PNRP cloud and finding the connection path back to the
novice user, Remote Assistance presents the novice user a confirmation
box verifying that the user wants to allow help from the expert.
The novice user will then have a
control bar on their screen indicating that the Remote Assistance
session is active. From this control bar, the novice can initiate a chat
session with the expert and modify some general session settings
(bandwidth, logging, contact information exchange, and sharing control).
The expert user will be
shown the novice user's Desktop within a separate Remote Assistance
window. The expert user will also have some general con
figuration-setting capabilities as well as an option to request control
of the novice user's desktop. The novice user will, of course, be
allowed to accept or reject the expert's request.
The expert and novice user
can now have a interactive session in which the necessary assistance can
be provided. This method of help really takes out the "can you tell me
what you see on your screen" issues between two users. The Easy Connect
feature takes one more problem out of the equation, getting a novice
user to send an invitation to another user. The one caveat here is that
both users must be using Windows 7 for Easy Connect to be an option.
Now what if the user is not
available to send you the invitation? You can still connect to a user's
computer using Remote Desktop, which I will discuss in the next section.
