Logo
programming4us
programming4us
programming4us
programming4us
Home
programming4us
XP
programming4us
Windows Vista
programming4us
Windows 7
programming4us
Windows Azure
programming4us
Windows Server
programming4us
Windows Phone
 
programming4us
Windows 7

Microsoft Visio 2010 : Using the Auto Align & Space Feature

- Free product key for windows 10
- Free Product Key for Microsoft office 365
- Malwarebytes Premium 3.7.1 Serial Keys (LifeTime) 2019
7/14/2011 3:25:59 PM
Visio 2010 includes a powerful new Auto Align & Space feature that makes a best effort to position the shapes in your drawing for you.


Note:

 You need the HR Recruiting Flowchart with labels_start drawing located in the Chapter05 practice file folder to complete this exercise. Open the drawing in Visio.


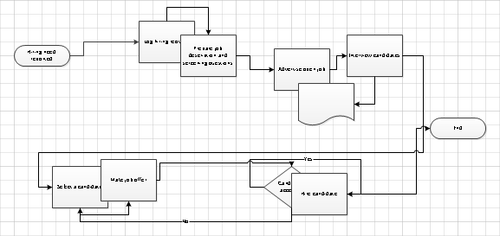
  1. Move various shapes around to make the flowchart less understandable. The graphic below shows one “messy diagram” arrangement.


    Auto Align & Space


  2. On the Home tab, in the Arrange group, click the Auto Align & Space button.
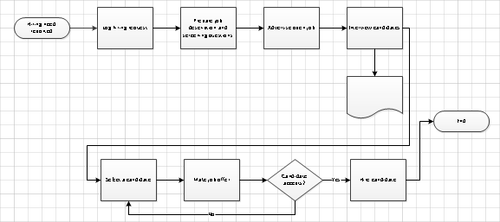
    The auto-arrange feature made a significant improvement in the diagram, although you may still want to do some fine tuning. It’s important to understand that the results you achieve using Auto Align & Space are closely tied to the locations of each shape on the page before you click the button. Sometimes, if you move just one shape a short distance before clicking Auto Align & Space, you will get very different results. Consequently, if your Auto Align & Space results are not satisfactory, press Ctrl+Z to undo the operation, move a shape or two, and try again.


Note:

Close the Visio drawing; it is not necessary to save it first.


What Other Arrangements Are Possible?

In addition to the spacing and distribution functions you used in the preceding exercises, Visio offers other auto-arrange options.

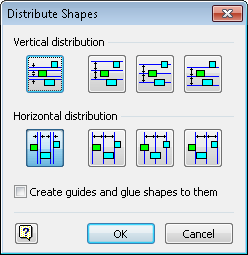
If you would like to see how these other options work, open the Align and Space BEFORE drawing that you created in a previous exercise. Select all shapes in the top row. On the Home tab, in the Arrange group, click Position, and then in the Space Shapes area, click More Distribute Options. The Distribute Shapes dialog box that opens may take a moment to understand but does provide multiple options for horizontal and vertical spacing.

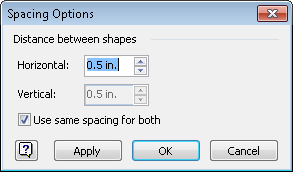
You can change the vertical and horizontal spacing used by any Visio auto-arrange options from the Spacing Options dialog box. To open this dialog box, on the Home tab, in the Arrange group, click Position, and then click Spacing Options.

Other -----------------
- Managing the Windows 7 Environment : Configuring Remote Connections (part 3) - Configuring a VPN Connection
- Managing the Windows 7 Environment : Configuring Remote Connections (part 2) - Remote Desktop
- Managing the Windows 7 Environment : Configuring Remote Connections (part 1) - Remote Assistance
- Microsoft Visio 2010 : Aligning and Spacing Shapes
- Microsoft Visio 2010 : Using the Organization Chart Wizard with New Data
- Configuring the Windows 7 Operating System (part 3) - Understanding the System Icon & Using the Registry Editor
- Configuring the Windows 7 Operating System (part 2) - Configuring Windows Aero & Using Control Panel
- Configuring the Windows 7 Operating System (part 1) - Configuring the Desktop Environment
- Microsoft Visio 2010 : Using the Organization Chart Wizard with Existing Data
- Visual Studio 2010 : Building Smart Client User Interfaces - Laying Out Your Controls
 
 
Top 10
- Microsoft Visio 2013 : Adding Structure to Your Diagrams - Finding containers and lists in Visio (part 2) - Wireframes,Legends
- Microsoft Visio 2013 : Adding Structure to Your Diagrams - Finding containers and lists in Visio (part 1) - Swimlanes
- Microsoft Visio 2013 : Adding Structure to Your Diagrams - Formatting and sizing lists
- Microsoft Visio 2013 : Adding Structure to Your Diagrams - Adding shapes to lists
- Microsoft Visio 2013 : Adding Structure to Your Diagrams - Sizing containers
- Microsoft Access 2010 : Control Properties and Why to Use Them (part 3) - The Other Properties of a Control
- Microsoft Access 2010 : Control Properties and Why to Use Them (part 2) - The Data Properties of a Control
- Microsoft Access 2010 : Control Properties and Why to Use Them (part 1) - The Format Properties of a Control
- Microsoft Access 2010 : Form Properties and Why Should You Use Them - Working with the Properties Window
- Microsoft Visio 2013 : Using the Organization Chart Wizard with new data
 
programming4us
Windows Vista
programming4us
Windows 7
programming4us
Windows Azure
programming4us
Windows Server