So let’s say someone else has requested detailed data
about your project. Arguably the easiest route in this case is to
simply send a copy of the file to the other person and have that person
open it with Project 2010 on his or her machine. Unfortunately, it’s
rarely that easy. If the person requesting information doesn’t have
Project 2010 installed, your options become a little less direct, but
not necessarily less detailed.
Depending on what the other
person wants to do with the project data, a few different options are
available, as covered in the following sections.
Copying the Timeline
The timeline is new to Project
2010 and provides a highly visual way to share project information.
After setting the timeline up with the information you want to share,
you can easily copy it for pasting in another application.
Follow these steps to copy the timeline:
1. | If the timeline is not currently displayed, on the View tab, in the Split View group, select the Timeline check box, as shown in Figure 1.

|
2. | Click once in the Timeline portion of the Project window to select it.
|
3. | On the Format tab, in the Copy group, click Copy Timeline and then choose whether you’re copying it For E-mail, For Presentation, or Full Size. Project will use different formatting options based on your selection.
|
With the timeline copied to
the Clipboard, open the e-mail message, presentation deck, or other file
where you want to include the project information, and then paste the
copied timeline. It will be pasted as an image within the e-mail message
or file.
Exporting Data to Excel
If the person
requesting project data wants to be able to actually work with the data
itself, the right solution might be to export the data as an Excel
workbook.
To export project data to Excel, follow these steps:
1. | On the File tab, click Save As.
|
2. | Browse to the location where you want to save the Excel file.
|
3. | Type a name for the file in the File name box.
|
4. | Click Save as type and then choose Excel Workbook.
|
If the person requesting
project data is using an older version of Excel, choose Excel 97-2003.
You can also choose to save the data as tab-delimited text,
comma-delimited text (CSV), or XML.
|
|
5. | Click Save.
|
6. | Follow the steps in the Export Wizard to save the project data.
|
Taking a Picture of Your Project Data
If the person
requesting project data just wants to look at the data, not actually do
anything with it, you can copy a picture of your project data and share
it by pasting it into another file or e-mail message.
Follow these steps to copy a picture of your project data:
1. | Format
the data in a view the way you want to share it and then select the
data you want to share. If you want to share all of the data in the
view, you don’t need to select any data, just click once anywhere in the
view to select it.
|
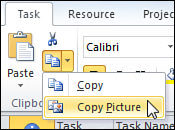
2. | On the Task tab, in the Clipboard group, click the arrow on Copy and then click Copy Picture, as shown in Figure 2.
|
3. | Under Render image, choose whether you want to copy the image For screen, For printer, or To GIF image file. If you choose To GIF image file, click Browse
to locate where you want to save the GIF file. |
4. | Under Copy, click Rows on screen to copy all of the rows displayed on the screen, or click Selected rows to copy only the rows you selected before you clicked Copy Picture.
|
5. | Under Timescale, click As shown on screen to use the full timescale currently displayed in the view, or choose From and To dates to specify a time period to include.
|
6. | Click OK to copy a picture of the project data in the view using the options you selected.
|
Saving the Project As a PDF or XPS File
Another option for simply viewing project data is to save the project as a PDF or XPS file.
To save the project as a PDF or XPS file, follow these steps:
1. | Format the data in a view the way you want to share it and then, on the File tab, click Save As.
|
2. | Browse to the location where you want to save the PDF or XPS file.
|
3. | Type a name for the file in the File name box.
|
4. | Click Save as type and then choose PDF Files or XPS Files.
|
5. | Click Save.
|
6. | On the Document Export Options dialog box, under Publish Range, click All to include the entire project or click From and specify a date range to only include a certain time period.
|
7. | Under Include Non-Printing Information, select or clear the Document Properties and Document Showing Markup check boxes to choose which options to include.
|
8. | Under PDF Options, select or clear the ISO 19005-1 compliant (PDF/A) check box to determine whether the PDF should conform to long-term archiving standards.
|
9. | Click OK to save the PDF or XPS file. |
