Logo
programming4us
programming4us
programming4us
programming4us
Home
programming4us
XP
programming4us
Windows Vista
programming4us
Windows 7
programming4us
Windows Azure
programming4us
Windows Server
programming4us
Windows Phone
 
programming4us
Windows 7

Troubleshooting and Recovering from Disaster : Getting Help with the Problem Steps Recorder

- Free product key for windows 10
- Free Product Key for Microsoft office 365
- Malwarebytes Premium 3.7.1 Serial Keys (LifeTime) 2019
10/28/2011 6:09:27 PM
Windows Troubleshooting works well, but sometimes you will run into an issue that isn't covered by the built-in troubleshooters. When that happens, it's time to escalate the issue, either with Microsoft Support or, if you're a corporate customer, with your IT help desk. Either way, Windows 7 includes an excellent new tool that takes the guesswork out of explaining what happened when something went wrong. It's called the Problem Steps Recorder, and it enables you to record the steps you took leading up to a problem so you can duplicate it and provide a record of what happened.

NOTE

Problem Steps Recorder is hidden in Windows 7, so you have to know it exists before you can access it. To enable this tool, open the Start menu and type problem steps in Start Menu Search. You'll see an item called Record steps to reproduce a problem in the search results. Click that, and the minimalistic Problem Steps Recorder application, shown in Figure 1, appears.

Figure 1. Problem Steps Recorder is hidden in the Windows 7 UI and pretty subtle when it's running, too.

Here's how it works. Click the Start Record button in Problem Steps Recorder. When you do, the application interface changes slightly, to indicate that it's recording and provide a few additional options, including Pause Record, Stop Record, and Add Comment (see Figure 2).

Figure 2. You're on candid camera: duplicate that bug.

Now you step through the things you did that caused the issue you're trying to report. Along the way, as you click on things, you'll see an orange circle appear below the mouse pointer, indicating that Problem Steps Recorder has taken note of that step. If you get to a particularly important part, you can take a manual screenshot and provide a note: just click Add Comment and you'll see something like Figure 3.

Figure 3. Take a picture and leave a note if you want to explain something further.

When you're done, click Stop Record. Problem Steps Recorder will prompt you to save a ZIP file on your desktop. Give it a name and click Save. At this point, you're supposed to e-mail this to the entity that's going to provide the help. But take a look inside that ZIP file to see what's going on.

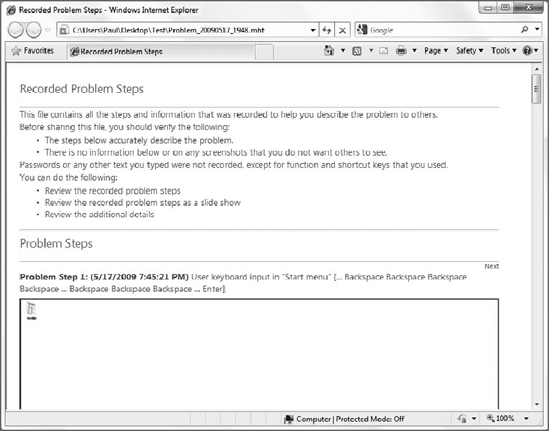
Inside the ZIP file, surprisingly, you'll find a single MHTML document, which can be viewed with Internet Explorer. The file, an example of which is shown in Figure 4, is actually pretty impressive. It includes a complete walk-through of all the steps you took.
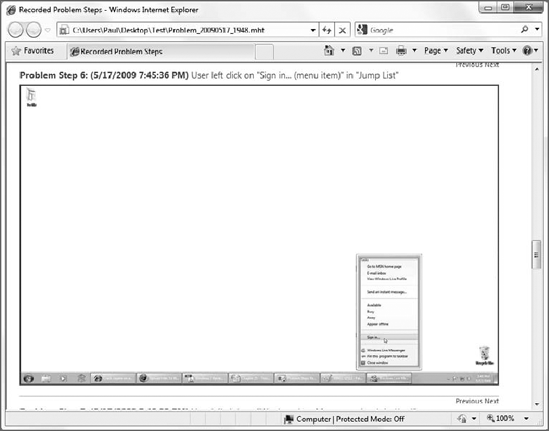
Figure 4. The Recorded Problem Steps file documents what went wrong.

But it's even more impressive than that. Each time you clicked anything, the Problem Steps Recorder took a screenshot and highlighted what was clicked. As you can see in Figure 5, this can be very specific.

NOTE

Problem Steps Recorder is so helpful, in fact, that it's not hard to imagine using it as a training tool or for other kinds of documentation. Hmm...

Figure 5. Each mouse click triggers a screenshot.
Other -----------------
- Microsoft OneOnte 2010 : Tagging Notes for Follow Up
- Microsoft OneOnte 2010 : Moving, Copying, and Merging Pages and Sections
- Microsoft Project 2010 : Reporting on Your Project (part 1) - Generating and Customizing a Basic Report
- Microsoft Project 2010 : Reporting on Your Project (part 1) - Generating and Customizing a Visual Report
- Zipping and Packing Files, File and Folder Security
- Searching (part 2) - Searching As You Type
- Searching (part 1) - Changing Search and Indexing Settings
- Using Windows Troubleshooting (part 3)
- Using Windows Troubleshooting (part 2) - Examining the Troubleshooters
- Using Windows Troubleshooting (part 1) - Accessing Windows Troubleshooting & Configuring Windows Troubleshooting
 
 
Top 10
- Microsoft Visio 2013 : Adding Structure to Your Diagrams - Finding containers and lists in Visio (part 2) - Wireframes,Legends
- Microsoft Visio 2013 : Adding Structure to Your Diagrams - Finding containers and lists in Visio (part 1) - Swimlanes
- Microsoft Visio 2013 : Adding Structure to Your Diagrams - Formatting and sizing lists
- Microsoft Visio 2013 : Adding Structure to Your Diagrams - Adding shapes to lists
- Microsoft Visio 2013 : Adding Structure to Your Diagrams - Sizing containers
- Microsoft Access 2010 : Control Properties and Why to Use Them (part 3) - The Other Properties of a Control
- Microsoft Access 2010 : Control Properties and Why to Use Them (part 2) - The Data Properties of a Control
- Microsoft Access 2010 : Control Properties and Why to Use Them (part 1) - The Format Properties of a Control
- Microsoft Access 2010 : Form Properties and Why Should You Use Them - Working with the Properties Window
- Microsoft Visio 2013 : Using the Organization Chart Wizard with new data
 
programming4us
Windows Vista
programming4us
Windows 7
programming4us
Windows Azure
programming4us
Windows Server