Searching
The Search function has
been greatly refined in Windows 7 compared to Vista and previous Windows
editions. Called Desktop Search (or Search, for short), Windows 7 lets
you search for files, folders, email messages, hard drives, PCs, and
much more, whether the items are local or remote. You can search from
the Search box on the Start menu, or use the familiar Search feature in
Computer or Windows Explorer.
In addition, Windows 7
introduces a new technology referred to as federated search, which
enables you to use something called a search connector to easily find
web-based applications on internal and external sites, right from your
Search tool.
Types of Searching
Windows 7 uses two different types of searching:
Intermediate searching—
Uses an index to find objects with filenames that you type into the
Search box in Windows as well as in the Start menu. Like the index of a
book, Windows 7 stores information about files such as the filename,
file date, and properties, including words in a document. As you type
your search criteria into the Search box, the list of programs changes
to show you files that meet that criteria based on what Windows 7 finds
in the index. The big advantage to intermediate searching is that it’s
fast, but it only uses one criteria (the filename), so if you need more
information you need deep searching.
Deep searching—
Lets you search for different and multiple criteria such as the
filename, the date the file was saved, and the location in which the
file was saved. You can use Boolean arguments such as AND and OR as well
as “greater than” and “less than” to help Windows 7 search for the
files you need. For example, you may want to search for a file that was
saved before (or less than) a certain date. You can also use wildcards
in filenames to search for filenames that contain letters in certain
places. For example, if you want to search for files that start with the
letter N and end with the letter W, you would type N*W as the filename to search for; the asterisk represents all characters and any number of characters between N and W. In this case, Windows 7 would also find folders in which a parent folder begins with N and the child folder begins with W, such as \Notebooks\Work.
|
The Search feature
in Computer and Windows Explorer is not exactly the same as the Search
box in the Start menu or the Live Search feature in Internet Explorer 8.
The Search feature
in the Start menu searches for programs, Control Panel items, Internet
favorites, and websites you have visited that are in your web history,
in addition to documents, music, videos, and email messages. When you
use the search engine in Internet Explorer 8 (be it the default Live
Search or another search engine), that search engine searches the Web,
not your computer.
What’s more, the
Search feature doesn’t exist in some Windows 7 components (such as
Windows Help and Support) or in many third-party programs, which include
older programs such as Microsoft Office 2003.
|
Changing Search and Indexing Settings
Note while reading
this section that we’re describing the built-in Windows 7 Search
features. Your system might have a different search tool installed, such
as Google Desktop Search, Yahoo Widgets, or some other brand—those
tools will operate differently. You’ll have to refer to those tools’
help files or websites to learn how they work. However, you might want
to know that you can choose which program will do your searching for
you, and even switch back and forth between the programs you want to use
as your default. Choose Start, Default Programs, Set Your Default
Programs, and you’ll see a screen that allows you to change which search
tool to use by default.
Windows 7 indexes
most common files on your computer, including all the files in your
personal folder, your email, your offline files, Internet Explorer
History, and the Start menu. Program files and system files are not
indexed because Microsoft says those files are rarely searched.
That doesn’t
mean that Windows 7 won’t search nonindexed files. Windows 7 searches
filenames and contents in indexed locations and only searches filenames
in nonindexed files by default. You can change this default in the
Folder Options dialog box from Computer or Windows Explorer.
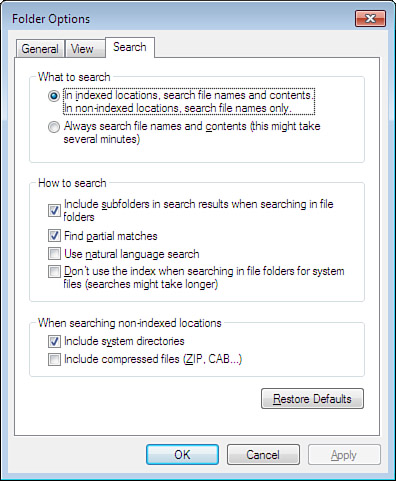
Open the Folder Options
dialog box by clicking the Organize button in the menu toolbar and then
clicking Folder and Search Options. In the Folder Options dialog box,
click the Search tab, which appears as shown in Figure 1.

You determine what to
search in the What to Search area at the top of the tab. Your other
option is to have Windows 7 search filenames and contents in all files.
This type of search could be a lot slower than the default, depending on
how many files you’re searching. When you search nonindexed locations,
you can also tell Windows 7 whether you want to include system
directories and compressed files at the bottom of the tab.
In the How to Search
area in the middle of the tab, the default search parameters are to
search in subfolders and to find partial matches. You can also decide
how to search, including using natural language search (where you get to
ask a question), and turn off the index. If you decide you don’t like
your changes and want to revert to the defaults, click Restore Defaults.
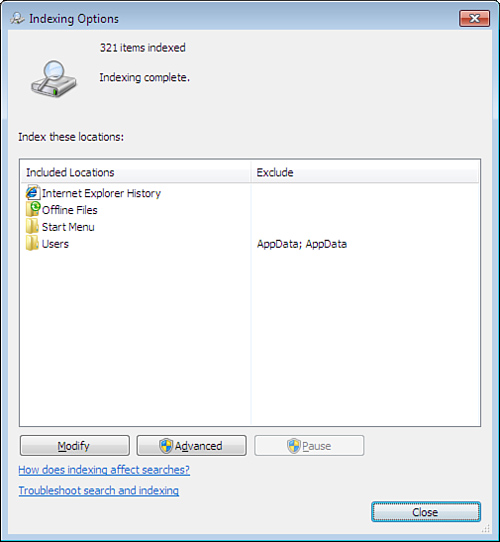
The Indexing Options applet
in the Control Panel also lets you view the state of the index and make
changes to the file types and folders you want to index. Open the
Indexing Options applet by clicking Start, Control Panel, and then
Indexing Options (in Icons view). The Indexing Options window appears as
shown in Figure 2.

The Indexing Options
window shows how many items are indexed and which folder locations have
indexed files. You can modify the folder locations by clicking Modify.
If you want to really drill down when configuring your index, click
Advanced. The Advanced Options dialog box appears so that you can index
encrypted files, delete and rebuild your index, and set the index
location.
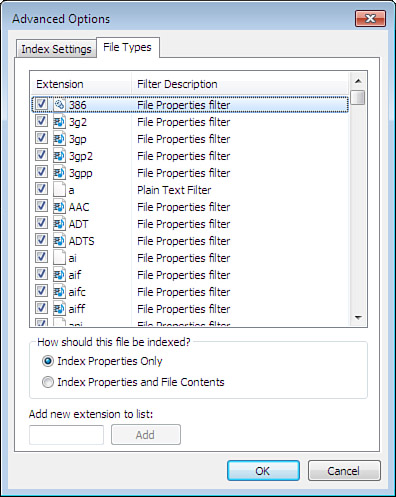
If you click the File Types tab, as shown in Figure 3,
you can scroll down the list and add and remove files to index
categorized by file extension. You can also tell Windows 7 whether you
want the file to be indexed by properties only or by properties and file
contents. If you don’t see the extension in the list, type the file
extension in the Add New Extension to List text box at the bottom of the
tab and then click Add.
