Setting Developer Options
The
Developer tab is a specialized Ribbon that you can use to access
developer controls, write code, or create macros. You can set an option
in the Customize Ribbon pane in Word Options to show or hide the
Developer tab. As a developer, you can also set an option to show errors
in your user interface customization code.
Set Developer Options
 Click the File tab, and then click Options.
 In the left pane, click Customize Ribbon.
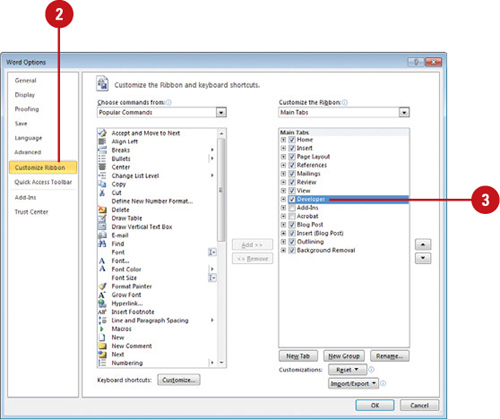
 Select the Developer check box to display the Developer tab.
 In the left pane, click Advanced.
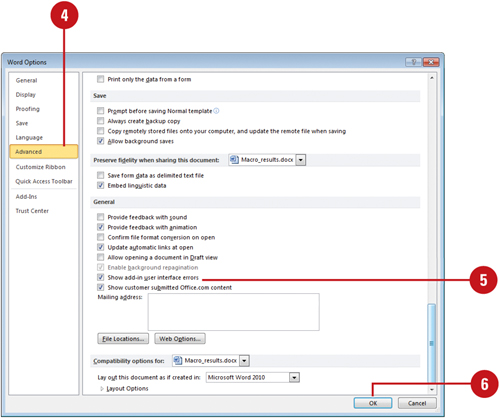
 Select the Show add-in user interface errors check box.
 Click OK.
Understanding How Macros Automate Your Work
To
complete many tasks in Word, you need to execute a series of commands
and actions. To print two copies of a selected text in a document, for
example, you need to open the document, select the text, open the Print
dialog box, and specify that you want to print two copies. If you often
need to complete the same task, you’ll find yourself repeatedly taking
the same series of steps. It can be tiresome to continually repeat the
same commands and actions when you can easily create a mini-program, or
macro, that accomplishes all of them with a single command.
Creating a macro
is easy and requires no programming knowledge on your part. Word simply
records the steps you want included in the macro while you use the
keyboard and mouse. When you record a macro, Word stores the list of
commands with any name you choose. You can store your macros in the
current document or in a new document.
Once a macro is created, you
can make modifications to it, add comments so other users will
understand its purpose, and test it to make sure it runs correctly.
You can run a macro by
choosing the Macro command on the View or Developer tab, or by using a
shortcut key or clicking a Quick Access Toolbar button you’ve assigned
to it. From the Macro dialog box, you can run, edit, test, or delete any
Word macro on your system, or create a new one.
If you have problems with a macro, you can step through the macro one command at a time, known as debugging. Once you identify any errors in the macro, you can edit it.

