Windows Presentation Foundation offers a powerful data-binding engine, held by the System.Windows.Data
namespace, which makes even simpler binding data to the user interface
and receiving input from the user as well. At a higher level you perform
data-binding between a user control and a data source making use of the Binding
markup extension, that lots of controls enable. It is worth mentioning
that in WPF a data source can be a collection of .NET objects but also a
property from another user control. The following examples show you
both scenarios. Particularly you receive an explanation of the new DataGrid control for tabular data representations and the ObservableCollection(Of T) in action for binding to a collection. Before going on, create a new WPF project with Visual Basic and name it IntroducingDataBinding. When the code editor is ready, write the following XAML code that divides the root Grid into two columns and adds some controls that will be necessary for next examples:
<Grid Name="Grid1">
      <Grid.ColumnDefinitions>
          <ColumnDefinition Width="200" />
          <ColumnDefinition />
      </Grid.ColumnDefinitions>

      <StackPanel Grid.Column="0">
          <TextBox Name="ValueTextBox"
                   Margin="5"/>

          <Slider Name="ValueSlider" Margin="5"
                  Minimum="0" Maximum="10"/>
      </StackPanel>
      <StackPanel Grid.Column="1">
          <DataGrid Name="DataGrid1"
                    Height="150"/>
          <TextBox Margin="5" Foreground="Red"
                   Name="LogBox"
                   Height="100"/>
      </StackPanel>
  </Grid>
Utilized user controls now
have no other properties than the one necessary for defining their
layout, which are set in code in the next sections.
Binding UI Elements with the Binding Markup Extension
You perform data-binding between a user control and a data source via the Binding XAML markup extension. Such an extension requires specifying two properties: ElementName, which is the source item name and Path that is the property containing the actual data to bind, whose name must be exposed by the object assigned to ElementName. The following example, in which you have to substitute to the first TextBox in the earlier example, shows how to bind the context of a TextBox to the value of a Slider control so that when the user moves the selector, the slider value is reflected into the TextBox:
<TextBox Text="{Binding ElementName=ValueSlider,
                        Path=Value}"
         Name="ValueTextBox"
         Margin="5"/>
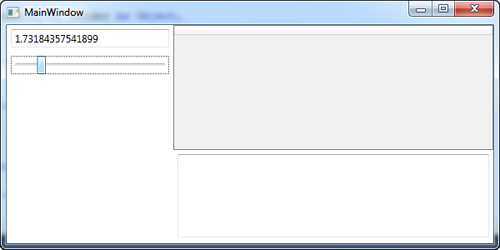
Binding has to be applied to the property that will present bound data, in this case Text. If you now run the application and move the selector on the slider, you see how its value is reflected as the TextBox.Text content, as demonstrated in Figure 1.
This is the most basic
data-binding example and can be considered as the one-way mode, because
the binding is performed only from the data-source (the Slider.Value property) to the UI control (the TextBox). In fact, the data-binding does not return a value from the TextBox to the Slider. To accomplish this, which means updating the Slider value according to the TextBox
content, we need the two-way data-binding that enables binding from and
to the data source. You apply for two-way data-binding by adding the Mode=TwoWay assignment within the Binding markup extension. The following code demonstrates this:
<TextBox Text="{Binding ElementName=ValueSlider,
                        Path=Value, Mode=TwoWay}"
         Name="ValueTextBox"
         Margin="5"/>

<Slider Name="ValueSlider" Margin="5"
        Minimum="0" Maximum="10"
        Value="{Binding ElementName=ValueTextBox,
        Path=Text, Mode=TwoWay}"/>
Notice how both controls
need to set binding on the two-way mode so that they can reflect each
other’s value. If you run the application you can see how the slider’s
selector value is updated according to the text box content. One-way and
two-way are not the only allowed modes. Table 1 summarizes available data-binding modes in WPF, exposed by the System.Windows.Data.BindingMode enumeration.
Table 1. Available Data-Binding Modes
| Mode | Description |
|---|
| OneWay | The
data-binding is performed only from the data source to the UI. Changes
on the data source are reflected to the UI but not vice versa. |
| TwoWay | The
data-binding is performed from the data source to the UI and vice
versa. Changes on the data source are reflected to the UI and changes
via the UI are reflected to the data source. |
| OneWayToSource | Changes on the UI are reflected to the data source but not vice versa. This is basically the opposite of OneWay. |
| OneTime | The
data-binding is performed from the data source to the UI only once.
When performed, changes are ignored and the UI is not updated. This is
useful for presenting data, where you are sure that you will not update
the data source. |
| Default | Applies the most convenient mode according to the user control. For example, the TextBox supports the two-way mode and thus this is the default mode. When you do not specify a different mode, this is the default. |
Creating Bindings with Visual Basic
In case you need to create
data-binding expressions at runtime, you need to write some Visual Basic
code. Basically you need an instance of the System.Windows.Data.Binding
class setting some of its property and then pass such instance to the
target control. The following snippet reproduces the data-binding
expression described in the previous section, this time utilizing Visual
Basic code:
Dim bind As New Binding
'Instead of ElementName, use Source assigning the control
bind.Source = ValueSlider
bind.Path = New PropertyPath("Value")
bind.Mode = BindingMode.TwoWay
'You set the binding considering a dependency property
Me.ValueTextBox.SetBinding(TextBox.TextProperty, bind)
Until now you saw the most
basic data-binding technique that can be useful when you need to make
controls depend on other controls’ properties. In the next section you
will see data-binding techniques against data sources based on .NET
collections.
Understanding the DataGrid and the ObservableCollection
In most cases you perform
data-binding operations against .NET collections, even when fetching
data from databases. WPF offers a different binding mechanism, such as
user controls like the new DataGrid, the ListView, or the ListBox; moreover you can bind specific data to single controls like TextBox
(for example when building master-details representations).The
goal of next example is binding a collection of objects to a DataGrid allowing insert/update/delete operations onto the collection. First, add a new implementation of the Person class to the project as follows:
Public Class Person


    Public Property FirstName As String
    Public Property LastName As String
    Public Property Age As Integer


End Class
Now add a new People class, which inherits from ObservableCollection(Of Person) as follows:
Imports System.Collections.ObjectModel


Public Class People
    Inherits ObservableCollection(Of Person)


End Class
This new collection is the data source for binding to the DataGrid. Now go the VB code behind the file for the main window. Basically we need to declare a variable of type People and handle the Window_Loaded event to instantiate some Person objects to populate the collection. The following code accomplishes this:
Private WithEvents source As People


Private Sub MainWindow_Loaded(ByVal sender As Object,
                              ByVal e As System.Windows.
                              RoutedEventArgs) Handles Me.Loaded

    Dim personA As New Person With {.FirstName = "Alessandro",
                                    .LastName = "Del Sole",
                                    .Age = 32}
    'fantasy name
    Dim personB As New Person With {.FirstName = "Robert",
                                    .LastName = "White",
                                    .Age = 35}

    source = New People From {personA, personB}
    Me.Grid1.DataContext = source

    'If you plan to data-bind only the DataGrid:
    'Me.DataGrid1.ItemsSource = source
End Sub
Notice how easy it is to create an instance of the People collection with collection initializers. The most important thing here is the assignment of the Grid.DataContextDataContext is a property that points to a data source, and all children controls within the panel that exposes the property. As a general rule, DataContext property will populate picking up data from this property. This also means that DataContext has scope; for example, the Window.DataContext property can share data to all controls in the user interface, whereas the DataContext
from a particular panel can share data only with controls nested in
that particular panel, as in the previous code example where only
controls nested in the Grid (including thus the DataGrid) can populate picking data from the DataContext. This is not mandatory. If you have a single control that you want to bind, you do not need to assign the DataContext, whereas you can simply assign the specific control data property. For instance, the DataGrid control exposes an ItemsSource property (like ListView and ListBox)
that populates the control. Data-binding to user interface controls in
WPF is generally possible thanks to the implementation of the INotifyPropertyChanged interface. Substantially controls can reflect changes from data sources that implement that interface. The ObservableCollection(Of T)
generic collection also implements behind the scenes and therefore can
notify the user interface of changes so that it can be refreshed
automatically. This is the reason why we use such a collection in the
example. This specialized collection is also interesting because it
enables getting information on what changed on data. It exposes a CollectionChanged event that offers an e argument of type NotifyCollectionEventArgs
that offers some useful information. For example it enables
intercepting when an item is added or removed or retrieving a collection
of added items. Continuing with the example, suppose you want to create
a sort of log to write a message each time an item is added or removed
from the source collection. This is
useful for demonstrating that the collection is effectively updated
with changes performed through the user interface. The second TextBox
in the user interface of the sample application is the place where log
messages will be put. According to this consideration, consider the
following code snippet that provides an event handler for the CollectionChanged event:
'Requires an Imports System.Collections.Specialized directive    Private Sub
source_CollectionChanged(ByVal sender As Object,
                                         ByVal e As _
                                         NotifyCollectionChangedEventArgs) _
                                         Handles source.CollectionChanged

        Me.LogBox.Text += e.Action.ToString & Environment.NewLine
    End Sub
The code simply sends to the text box the current value of the System.Collection.Specialized.NotifyCollectionChangedAction enumeration, which can be one of the following: Add, Remove, Move, Replace, or Reset. If you perform multiple CRUD operations on an ObservableCollection instance, you might also be interested in the NewItems and OldItems properties in e.
They respectively represent a collection of items added to the data
source and a collection of items affected by a remove, replace, or move
operation. Before running the application, it is necessary to perform a
couple of operations on the DataGrid at the XAML level; therefore switch back to the XAML code editor. Extend the DataGrid declaration as follows:
<DataGrid Name="DataGrid1"
          AutoGenerateColumns="True"
          AlternatingRowBackground="LightGreen"
          ItemsSource="{Binding}"
          Height="150"/>
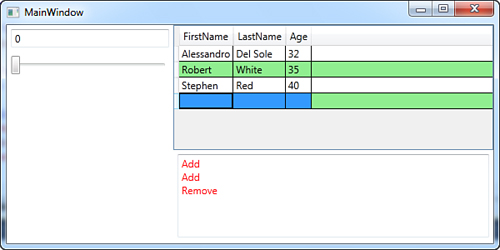
First, the DataGrid automatically generates columns for you according to each property exposed by a single item (Person) in the bound collection (People). Second, the ItemsSource, which populates the control, is set to Binding with no arguments meaning that the data-binding will be performed at runtime. Notice how the AlternatingRowBackground
property enables specifying a color (which you can eventually replace
with a brush) for the background in alternating rows. Now run the
application. You get the result shown in Figure 2.
|
Different from controls such as the ListView and the ListBox, the DataGrid allows binding any collection implementing IList or IBindingList.
This is because such control requires a place for editing, other than
presenting. So remember this requirement when you try to bind to a DataGrid
the result of LINQ queries, which requires conversion into a generic
collection. For LINQ, if you try to bind LINQ to Xml, query results also
remember to create a class for holding objects, just like the Person class and People collection instead of directly binding the query result.
|
If you play with the DataGrid
you can easily understand how it enables adding, removing, and editing
items. The log text box stores messages each time you perform an
operation, confirming that the underlying collection is actually
affected by changes performed through the user interface. You can then
plan to implement some code for saving your data. The DataGrid exposes other interesting properties:
SelectedItem, which returns the instance of the selected object in the control
CurrentCell, which returns the content of the selected cell
CanUserAddRows and CanUserRemoveRows, which respectively provide (or not) the user the ability of adding and deleting rows
CanUserReorderColumns, CanUserResizeColumns, CanUserSortColumns which respectively provide (or not) the ability of changing the order of resizing and sorting columns
CanUserResizeRows, which provides (or not) the ability of resizing rows
RowStyle, which allows overriding the style for rows
Until now you saw simple
data-binding tasks, although the last code example provides a good way
for understanding the mechanism. WPF data-binding is even more complex
and the .NET Framework offers specific objects that are important in
more articulate scenarios. The next section describes such objects
taking advantage of new Visual Studio features.
