6. Step 6: Deployment
To make the HotelAdapter
available for consumption by the client applications, you have to
deploy it. The deployment procedure is not complicated. First you have
to GAC the adapter by signing the adapter's assembly with a strong name
key and calling the gacutil.exe utility with the /if
switch. Second, you have to register the adapter with WCF by making a
few entries in the machine.config file. Here is the process to follow to
register the HotelAdapter with WCF:
Go to the <%WINDIR%>\Microsoft.NET\Framework\Config folder, locate the machine.config file, and open it in Visual Studio.
Update the <system.serviceModel> configuration section to include the HotelAdapter entries as follows:
<system.serviceModel>
<system.serviceModel>
  <client>
    <endpoint binding="hotelBinding" contract="IMetadataExchange"
      name="hotel" />
  </client>
  <extensions>
    <bindingElementExtensions>
      <add name="HotelAdapter"
           type="HotelApp.HotelAdapter.HotelAdapterBindingElementExtension,
            HotelApp.HotelAdapter.HotelAdapter,Version=1.0.0.0,
            Culture=neutral, PublicKeyToken=XXXXXXXXXXXXX" />
    </bindingElementExtensions>
    <bindingExtensions>
      <add name="hotelBinding"
           type="HotelApp.HotelAdapter.HotelAdapterBindingCollectionElement,
           HotelApp.HotelAdapter.HotelAdapter,Version=1.0.0.0,
           Culture=neutral, PublicKeyToken=XXXXXXXXXXXXXX" />/>
    </bindingExtensions>
  </extensions>
</system.serviceModel>
7. Step 7: Consuming from an .NET Application
Now that you have finished the deployment, the HotelAdapter
can be consumed from the WCF-enabled client applications. You have to
generate a proxy and update the app.config file to include the adapter
configuration. The Add Adapter Service Reference plug-in is your main
tool to do the job.
Here is the process to follow:
Open Visual Studio, and create new project called ConsumeAdapterApplication.
In
the Solution Explorer, right-click the ConsumeAdapterApplication
project, and select the Add Adapter Service Reference menu item.
In the Select Binding combo box, select hotelBinding. Click the Configure button. The Configure Adapter dialog box will open.
Specify the username and password, as shown in Figure 11. Click the OK button to return to the Add Adapter Service Reference plug-in.
Click the Connect button. Make sure that the connection status has changed to "connected."
In the "Select a category" list, select "Hotel operations."
In
the "Available categories and operations" list, select Get Rooms, and
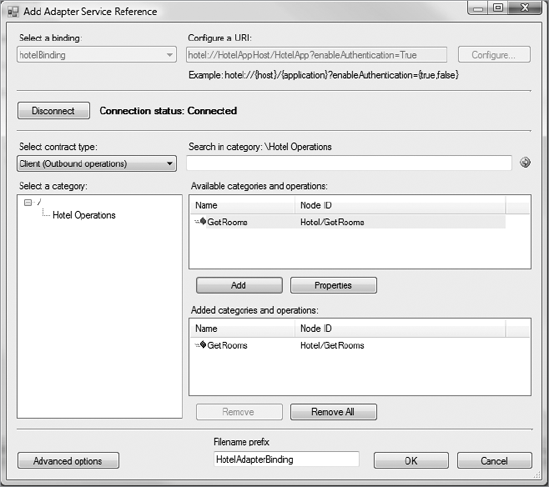
click the Add button. The Add Adapter Service Reference window now
should look like Figure 13.

Click
the OK button to generate a proxy file. The app.config file will also
be updated. Note that the proxy file named HotelAdapterBindingClient.cs
is now part of the solution.
Open the Program.cs file, and replace content with the following code:
using System;
using System.Collections.Generic;
using System.Linq;
using System.Text;

namespace ConsumeAdapterApplication
{
    class Program
    {
        static void Main(string[] args)
{
            HotelServiceClient client = new HotelServiceClient();
            client.ClientCredentials.UserName.UserName = "Probiztalk2009";
            string response = client.GetRooms("Indigo hotel");
            Console.WriteLine(response);
            Console.Read();
        }
    }
}
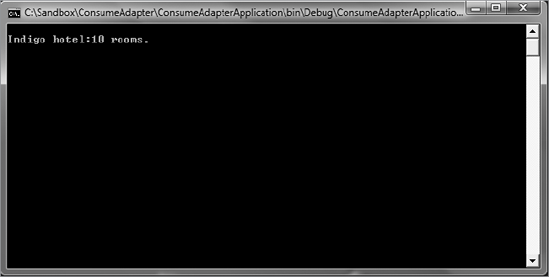
Build and run the application. You will see the HotelAdapter response, as shown in Figure 14.

8. Step 8: Consuming from BizTalk Application
To consume the HotelAdapter
from a BizTalk application, you have to generate the schemas for the
operations supported by the adapter and the binding file to create
physical ports. In case of a BizTalk application, the tool to do the job
is the Consume Adapter Service add-in. This tool has the same UI as the
Add Adapter Service Reference plug-in, but it generates different
artifacts.
Here is the process to follow:
In Visual Studio, open your BizTalk project.
In Solution Explorer, right-click the project, and select Add => Add Generated Items => Consume Adapter Service.
In the Select Binding box, select hotelBinding. Click the Configure button. The Configure Adapter dialog box will open.
Specify the username and password. Click the OK button to return to the Add Adapter Service Reference window.
Click the Connect button. Make sure that the connection status has changed to "connected."
In the "Select a category" list, select "Hotel operations."
In the "Available categories and operations" list, select Get Rooms, and click the Add button.
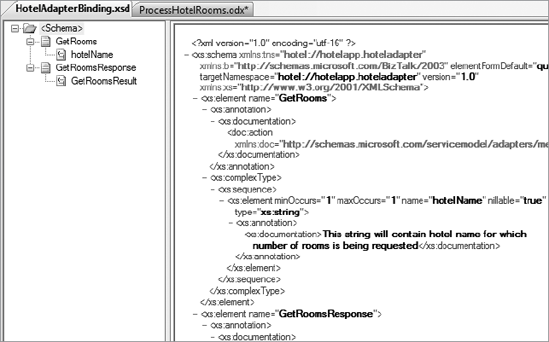
Click OK to generate the schemas and the binding file. The schema file
named HotelAdapterBindings.xsd contains message definitions for the HotelAdapter request and response messages, as shown in Figure 15.

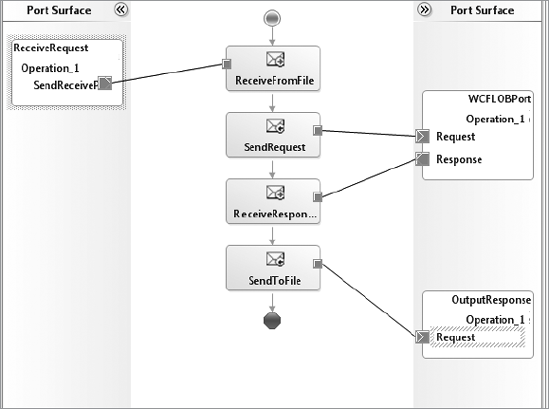
Implement your project orchestration to communicate with the HotelAdapter through a request-response port. Your orchestration should look like Figure 16.
Build and deploy the project.
Open the BizTalk Administration Console.
Import the binding file to create physical ports. Right-click your application under the Applications group, select Import => Bindings, navigate to your binding file, and click the Open button.
Map the orchestration logical ports to the newly created physical ports.
Enlist and start your orchestration.
