Using an Internal Certificate Authority for OWA Certificates
If a third-party
certificate authority is not utilized, an internal CA can be set up
instead. There are several different CA options, including several
third-party products, and it might be advantageous to take advantage of
an existing internal CA. Windows Server 2003 also has a very functional
CA solution built in to the product, and one can be installed into an
organization.
Caution
Proper design of a
secure PKI is a complex subject, and organizations might want to spend a
good amount of time examining the many factors that can influence CA
design. This step-by-step scenario assumes a very basic design, with an
enterprise CA installed directly into a domain.
To set up an internal
certificate authority, on a domain member server or, more commonly, on a
domain controller, the Certificate Authority component of Windows
Server 2003 can be installed using the following procedure:
1. | Click Start, Control Panel, Add or Remove Programs.
|
2. | Click Add/Remove Windows Components.
|
3. | Check the Certificate Services check box.
|
4. | At the warning message box, shown in Figure 3, click Yes to acknowledge that the server name cannot be changed.

|
5. | |
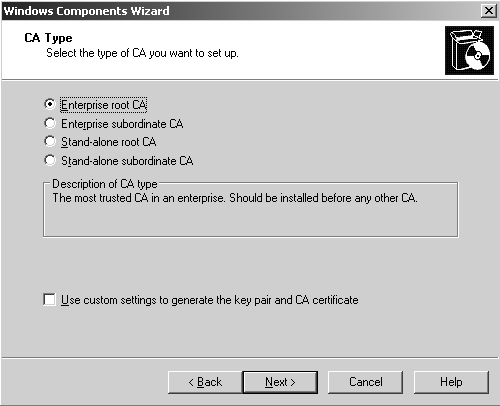
6. | From the subsequent dialog box, shown in Figure 4,
select which type of CA will be set up. Choosing each type of CA has
different ramifications and is useful in different situations.

|
The following types of CAs are available for installation:
Enterprise Root CA—
An enterprise root CA is the highest level CA for an organization. By
default, all members of the forest where it is installed trust it, which
can make it a convenient mechanism for securing OWA or other services
within a domain environment. Unless an existing enterprise root CA is in
place, this is the typical choice for a homegrown CA solution in an
organization.
Enterprise Subordinate CA—
An enterprise subordinate CA is subordinate to an existing enterprise
root CA, and must receive a certificate from that root CA to work
properly. In certain large organizations, it might be useful to have a
hierarchy of CAs, or the desire might exist to isolate the CA structure
for OWA to a subordinate enterprise CA structure.
Stand-alone Root CA—
A stand-alone root CA is similar to an enterprise root CA, in that it
provides for its own unique identity, and can be uniquely configured. It
differs from an enterprise root CA in that it is not automatically
trusted by any forest clients in an organization.
Stand-alone Subordinate CA—
A stand-alone subordinate CA is similar to an enterprise subordinate
CA, except that it is not directly tied or trusted by the forest
structure, and must take its own certificate from a stand-alone root CA.
After choosing the type of CA required, continue the CA installation process by performing the following steps:
1. | In this example, choose Enterprise Root CA. Click Next to continue.
|
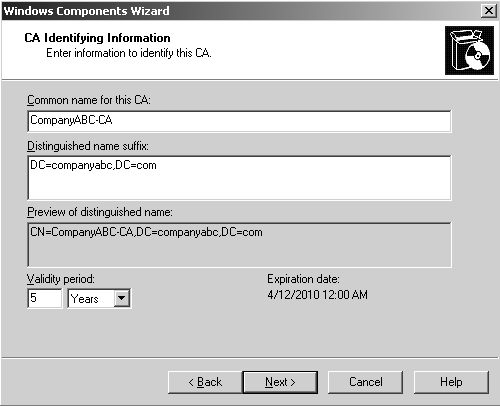
2. | Enter a common name for the CA, such as that shown in Figure 5. Click Next to continue.

|
3. | Enter
locations for the certificate database and the database log (the
defaults can normally be chosen), and click Next to continue.
|
4. | Click Yes when warned that the IIS Services will be restarted.
|
5. | Click Finish after the installation is complete.
|
After the internal CA is in
place, the CAS can automatically use it for generation of certificates.
To generate and install a certificate on a CAS using an internal CA, use
the following technique:
1. | From the CAS, open IIS Manager (Start, All Programs, Administrative Tools, Internet Information Services [IIS] Manager).
|
2. | In
the console tree, expand SERVERNAME (local computer) – Web Sites,
right-click the ActiveSync Virtual Server (typically named Default Web
Site, it is typically the same one used for OWA), and then click
Properties on the shortcut menu.
|
3. | Select the Directory Security tab.
|
4. | Under Secure Communications, click the Server Certificate button.
|
5. | On the welcome screen, click Next to continue.
|
6. | Select Create a New Certificate, and then click Next to continue.
|
7. | From
the Delayed or Immediate Request dialog box, select Send the Request
Immediately to an Online Certification Authority, and click Next to
continue.
|
8. | Enter a name for the certificate, such as CompanyABC OWA Certificate, leave the bit length at 1024, and click Next to continue.
|
9. | Enter
the organization and OU name, keeping in mind that they should
accurately reflect the real name of the requestor. Click Next to
continue.
|
10. | Enter the FQDN of the CAS, such as mail.companyabc.com.
|
11. | In the Geographical Information dialog box, enter an unabbreviated state, city, and country, and click Next to continue.
|
12. | Specify the SSL port (443 is the default) that the server will use, and click Next to continue.
|
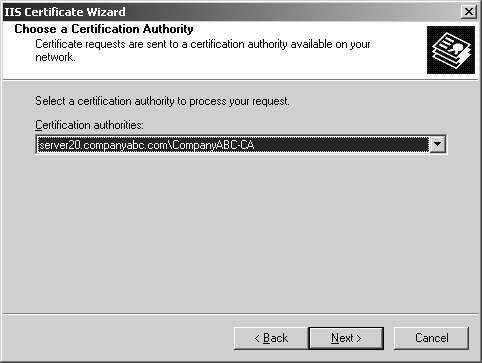
13. | In the Choose a Certification Authority dialog box, shown in Figure 6, select the CA that was set up in the previous steps, and click Next to continue.

|
14. | Review the request in the Certificate Request Submission dialog box, and click Next to continue.
|
15. | Click Finish.
|
After
installation, the certificate can be viewed by clicking the View
Certificate button on the Directory Services tab in the Virtual Server
properties dialog box.
After being placed on a
server, SSL encryption will be made available on the CAS. If the
enterprise CA was installed in an Active Directory domain, all of the
domain members will include the internal CA as a trusted root authority
and connect to OWA via SSL with no errors. External or nondomain
members, however, will need to install the enterprise CA into their
local trusted root authorities. This includes Windows Mobile devices as
well.