Forcing SSL Encryption for ActiveSync Traffic
After either a
third-party or a local internal certificate has been installed on a CAS,
it is typical to then set up the CAS to have ActiveSync traffic forced
to use SSL encryption, rather than allow that traffic to use the
unencrypted HTTP. To solve this problem, SSL encryption must be forced
from the CAS via the following procedure:
1. | On the CAS, open IIS Manager (Start, All Programs, Administrative Tools, Internet Information Services [IIS] Manager).
|
2. | Navigate to Internet Information Services, Web Sites, OWA Web Site (usually named Default Web Site).
|
3. | Right-click
on the Microsoft-Server-ActiveSync virtual directory (under the Virtual
Server), and choose Properties on the shortcut menu.
|
4. | Click the Directory Security tab.
|
5. | Under Secure Communications, click the Edit button.
|
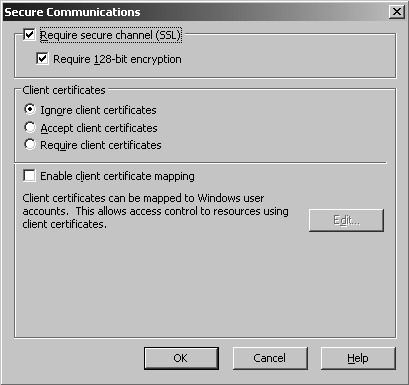
6. | From the Secure Communications dialog box, shown in Figure 7, check the Require Secure Channel (SSL) and Require 128-bit Encryption check boxes.
|
7. | Click OK and then click OK again.
|
Installing a Root Certificate on a Windows Mobile Device
If a
third-party or self-generated certificate authority is used for
ActiveSync, Windows Mobile devices must be configured to trust that CA.
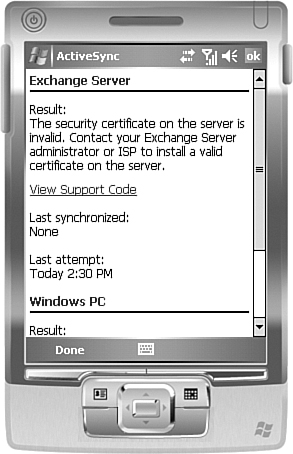
If they are not configured like this, they will error out with something
similar to the error shown in Figure 8 when attempting to connect via ActiveSync.
For Windows desktops
and laptops, this task is relatively straightforward, and involves
simply installing the enterprise root CA for this third-party
certificate into the Trusted Root Certificate Authority group for the
machine. For Windows Mobile devices, however, the enterprise root
certificate must first be exported to a .cer
file, which then needs to be copied physically to the device, either
via a memory card or with ActiveSync. After being copied, the .cer file can be installed by clicking on it. To export the Enterprise Certificate, perform the following steps:
1. | On the CAS, open IIS Manager (Start, All Programs, Administrative Tools, Internet Information Services [IIS] Manager).
|
2. | Navigate to Internet Information Services, Web Sites, OWA Web Site (usually named Default Web Site).
|
3. | Right-click on the virtual server, and choose Properties.
|
4. | Select the Directory Security tab.
|
5. | Under Secure Communications, click View Certificate.
|
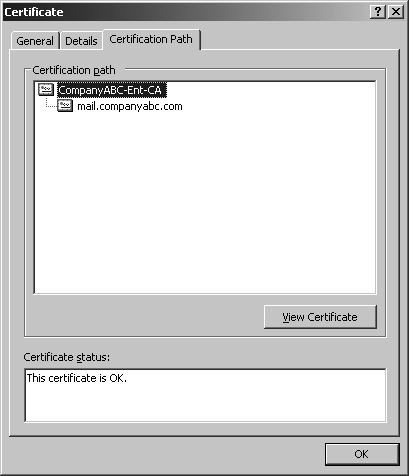
6. | Under the Certification Path, select the root certificate from the path, such as that shown in Figure 9, and click View Certificate.
Note
Be sure to select the root certificate, and not the actual certificate used for the virtual server (that is, mail.companyabc.com in this example).
|
7. | Click the Details tab.
|
8. | Click the Copy to File button.
|
9. | In the Certificate Export Wizard, click Next on the welcome screen.
|
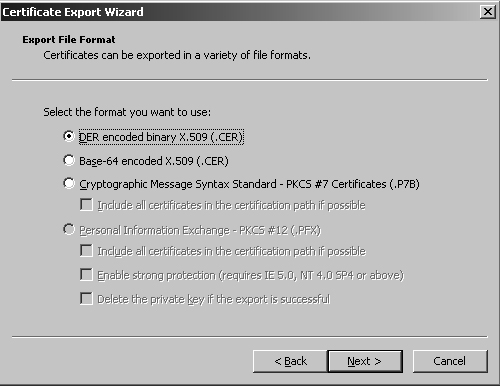
10. | Select to export the certificate into a DER encoded binary form, as shown in Figure 10. Click Next to continue.
|
11. | Enter a filename for the .cer file, and click Next.
|
12. | Click Finish upon completion of the wizard.
|
After the certificate
has been exported, it must be copied to the Windows Mobile device,
either through the Explore button in Microsoft ActiveSync (while the
device is cradled), or via a memory chip.
After the .cer
file is installed, clicking on it using the File Explorer in Windows
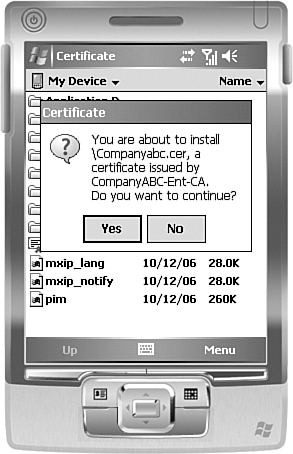
Mobile (Start, Programs, File Explorer) invokes a dialog box similar to
the one shown in Figure 11
warning that you are about to install the certificate. Click Yes and
the certificate will be automatically installed and ActiveSync over SSL
can be performed.
