2. Manage Replication
When managing
replication, it's important to understand which public folders are
replicated where and how to control this replication. This section shows
you how to perform some key tasks in managing the replication of public
folders.
2.1. Add a Replica Server
Public folder replication
is defined on a per-folder basis. Therefore, public folder databases
can contain replicas of different folders from multiple servers. A
single public folder can be replicated across many servers. You can add
replicas to an existing public folder using either the Public Folder
Management Console or the Exchange Management Shell.
To add a replica with the Public Folder Management Console, follow these steps:
Open the PFMC and browse to the Default Public Folders node in the Console tree.
Using
the Console tree, browse to the parent folder of the public folder that
you want to create a replica of. When you click on the parent folder in
the Console tree, all of its child folders are displayed in the Results
pane.
In
the Results pane, click on the public folder that you want to create
the replica for. Select the Properties option from the Action menu or
double-click the folder to open the properties dialog box.
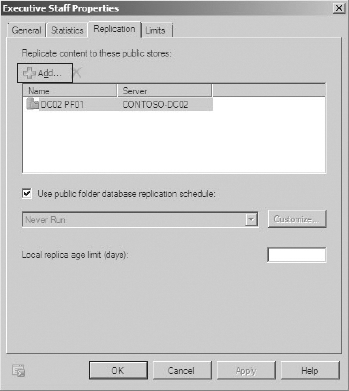
In the properties dialog box, click the Replication tab. At the top of the tab, the replica databases are listed.
You can add a replica to the list by clicking the Add button, as shown in Figure 2.

The
Select Public Folder Database dialog box will be displayed and a list
of existing public folder databases in the Exchange organization is
displayed along with the server that those databases reside on. Select
the database that you want to replicate the folder to and click OK to
add it to the list of replicas.
Back in the properties dialog box, click OK to make the changes and close the dialog box.
To add a replica to an existing public folder using the EMS, you will use the Set-PublicFolder cmdlet with the Replicas parameter. The Replicas
parameter lists each database that holds a replica of the public
folder. When you add a replica to the set, you need to make sure that
you also list the names of the existing replicas. If you run this
command and leave one of the existing replicas out of the list, that
replica is removed from the list and no longer receives replication of
that folder. The following command shows you how to list the current
replicas on the folder:
Get-PublicFolder "\Helpdesk" | ft Name, Replicas
The following command illustrates how multiple public folder replicas can be defined for a public folder using the EMS:
Set-PublicFolder "\Helpdesk" -Replicas
"PFDB (CONTOSO-PF01)", "PFDB (CONTOSO-PF02)"
2.2. Move Public Folders to a Different Server Using PowerShell Scripts
There are common situations
where you may need to move all public folders hosted on one server to
another server. For example, this is a typical concern when you
decommission a Mailbox server that has a public store. The following
steps are involved if you wanted to move all the folders from PFDB01 on
the server CONTOSO-PF01 to PFDB02 on the server CONTOSO-PF02:
Create the PFDB02 public folder database on CONTOSO-PF02.
Replicate the hierarchy to PFDB02.
Modify the default public folder database on Mailbox servers that are pointing clients to PFDB01.
Add PFDB02 to the replica list and remove PFDB01 from the list.
Wait for content replication to complete.
You can certainly perform
these steps one at a time for each public folder on the old database.
You can even use a series of EMS commands so you don't have to click
through each public folder in the PFMC. However, Exchange Server 2010
provides you with PowerShell scripts that do the heavy lifting for you. Table 1
outlines the scripts available for moving public folders. All scripts
are stored in the \Scripts folder under the path where the Exchange
Server 2010 binaries are installed.
Table 1. PowerShell Scripts for Moving Public Folders
| Script Name | Description |
|---|
| MoveAllReplicas.ps1 | Moves all public folders from one server to another |
| ReplaceReplicaOnPFRecursive.ps1 | Moves a public folder and all its child folders to another server |
|
The one thing that these
scripts do not do for you is unset the old public folder database as the
default public folder database on existing mailbox databases. You will
need to do this manually on the mailbox databases.
|
|
To move all the public folders from one server to another using a PowerShell script, complete the following steps:
Open the Exchange Management Shell.
Use the following command to change your current directory to the scripts directory:
cd "\Program Files\Microsoft\Exchange Server\v14\Scripts"
If you did not install Exchange
to the default location, you will need to change the current directory
to the folder path that you installed Exchange into.
Run the MoveAllReplicas.ps1 script, specifying the old server name and the new server name:
.\MoveAllReplicas.ps1 -Server <OldServer>
-NewServer <NewServer>
Modify
the default public folder store on the mailbox databases that were
pointing to the old replica. You can use the following one-liner to
change them to the new public folder store:
Get-MailboxDatabase | where { $_.PublicFolderDatabase
-eq <OldServer> } | Set-MailboxDatabase
-PublicFolderDatabase <NewServer>
After you are certain that content replication is complete, delete the old database using the steps in the section "Delete a Public Folder Database,"
earlier in this article. The easiest way to determine if content
replication is complete is to look at the folders in the replicas and
see if the public folder content is present.
2.3. Suspend and Resume Public Folder Content Replication
Having the ability to
suspend replication across the Exchange organization gives you an "In
case of emergency, break glass!" option if public folder replication is
out of control. This may be helpful in situations where there is a lot
of public folder data to replicate and bandwidth is at a premium.
NOTE
Keep in mind that
suspending replication of public folders only stops content replication.
While replication is suspended, the hierarchy will continue to
synchronize.
You must use the EMS to suspend replication of public folder content. Use the Suspend-PublicFolderReplication cmdlet to get the job done. This will suspend replication across the entire organization with one command:
Suspend-PublicFolderReplication -Confirm:$False
When you are ready to continue replication, the Resume-PublicFolderReplication will turn content replication back on:
Resume-PublicFolderReplication
2.4. Force Public Folder Replication
If you have public folders that
are out of sync across replicas or if the hierarchy information is out
of sync, you can manually trigger hierarchy replication or content
replication. The methods for forcing hierarchy replication and content
replication are different.
2.4.1. Force Public Folder Hierarchy Replication
To force hierarchy replication, you can use the Public Folder Management Console or the Exchange Management Shell.
To force public folder hierarchy replication in the PFMC, follow these steps:
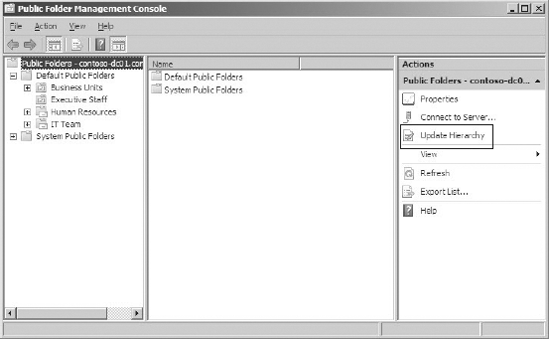
Open the PFMC and click on the top node in the Console tree, which represents the server that you are currently connected to.
In the Actions pane, click the Update Hierarchy option, as shown in Figure 3.

The public folder hierarchy is replicated. You will not receive a notification in the PFMC.
To update the hierarchy from the EMS, you can use the Update-PublicFolderHierarchy cmdlet. You must specify the Server
parameter in the command. The server that you specify here will be the
source server for the hierarchy update. The following command
demonstrates hierarchy synchronization from a single server:
Update-PublicFolderHierarchy -Server CONTOSO-PF01
2.4.2. Force Public Folder Content Replication
You can force the replication of content from a specific public folder replica. To do this in the PFMC, use these steps:
Open the PFMC and browse to the Default Public Folders node in the Console tree.
From
the Console tree, select the parent folder of the public folder that
you want to force replication for. When you select the parent folder,
the child folders will be listed in the Results pane.
Click
on the public folder that you want to force replication for from the
Results pane. In the Actions pane, click Update Content from the public
folder's Action menu.
If content replication is
successful, you will not receive a notification. You will only receive
notification if there was an error with replication of the folder.
|
If you receive an error
stating that the server doesn't have a replica of the folder that you
are trying to replicate, you can connect to a server that does contain a
replica from the same PFMC session.
|
|
To force replication of a public folder's content in the EMS, you can use the Update-PublicFolder
cmdlet. You will need to specify the identity of the public folder that
you want to replicate and the server that should be used as the source
of replication, using the Server parameter. The following example demonstrates the syntax of this command:
Update-PublicFolder "\Human Resources" -Server CONTOSO-PF01