Logo
programming4us
programming4us
programming4us
programming4us
Home
programming4us
XP
programming4us
Windows Vista
programming4us
Windows 7
programming4us
Windows Azure
programming4us
Windows Server
programming4us
Windows Phone
 
Windows Server

InfoPath Designer 2010 : Create an InfoPath 2010 Add-In & Create a Custom Task Pane

- Free product key for windows 10
- Free Product Key for Microsoft office 365
- Malwarebytes Premium 3.7.1 Serial Keys (LifeTime) 2019
10/29/2011 4:28:31 PM

Create an InfoPath 2010 Add-In


You may use Visual Studio 2010 to create an InfoPath 2010 add-in that can be used within InfoPath. The add-in is an application-level add-in that customizes the InfoPath Designer experience. Two common uses of an InfoPath add-in are to customize the ribbon and generate a custom task pane.

To create an InfoPath 2010 add-in, follow these steps:

1.
Launch Visual Studio 2010.

2.
Click File, New, Project. The New Project dialog appears.

3.
Navigate to Office, 2010 from the left-side Installed Templates navigation.

4.
Select the InfoPath 2010 Add-In project template, as shown in Figure 1.
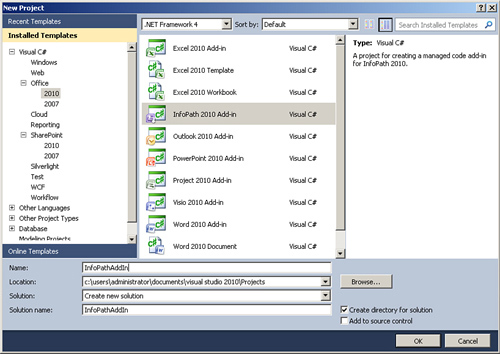


Figure 1. Selecting the project template generates an InfoPath 2010 add-in project.

5.
Click OK.

6.
Add user controls or classes as appropriate; see the next section for an example.

7.
Build the add-in project. The add-in is generated.

8.
Open InfoPath Designer 2010.

9.
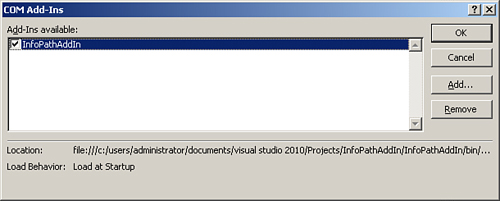
Click the COM Add-Ins button on the Developer ribbon. The add-in is available and installed, as shown in Figure 2

Figure 2. Clicking COM Add-Ins shows the available and installed application add-ins.

Create a Custom Task Pane


To create a new task pane, follow the steps for creating a new InfoPath 2010 add-in. Then perform these steps:

1.
Add a user control to your project.

2.
Add windows controls to your user control as needed. In this example, a user control named CustomTaskPaneControl is used.

3.
Add any code to handle options or selections.

4.
In the ThisAddIn class, add private variables to handle the user control and custom task pane, as shown in Listing 3.

5.
In the startup method of the ThisAddIn class, add code to instantiate the user control as a custom task pane, as shown in Listing 4.

Listing 3. Private Declarations
private CustomTaskPaneControl customTaskPaneControl;
private Microsoft.Office.Tools.CustomTaskPane customTaskPane;

Listing 4. Custom Task Pane Instantiation
  customTaskPaneControl = new CustomTaskPaneControl();
customTaskPane = this.CustomTaskPanes.Add(customTaskPaneControl, "Custom
Task Pane");
customTaskPane.Visible = true;

6.
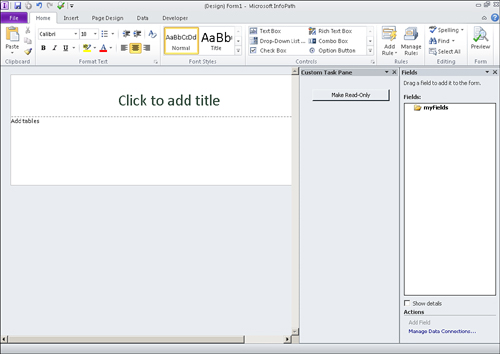
Build the project, and then launch InfoPath Designer 2010. The custom task pane appears as shown in Figure 3.

Figure 3. Building a custom task pane add-in displays the user control in InfoPath.
Other -----------------
- InfoPath Designer 2010 : Access Your Form Within a Visual Studio Workflow
- Microsoft SQL Server 2008 R2 : Query Plan Caching (part 2) - Monitoring the Plan Cache
- Microsoft SQL Server 2008 R2 : Query Plan Caching (part 1) - Query Plan Reuse & Query Plan Aging
- Microsoft Dynamics AX 2009 : Processing Business Tasks - Posting general journals
- Microsoft Dynamics AX 2009 : Processing Business Tasks - Creating new general journals
- Windows Small Business Server 2011 : An Email Primer (part 2) - Connecting an Exchange Server to the Internet
- Windows Small Business Server 2011 : An Email Primer (part 1) - Understanding Email Addresses & Email Server Functions
- Exchange Server 2007 : Securing Access to ActiveSync with Secure Sockets Layer Encryption (part 3) - Installing a Root Certificate on a Windows Mobile Device
- Exchange Server 2007 : Securing Access to ActiveSync with Secure Sockets Layer Encryption (part 2) - Using an Internal Certificate Authority for OWA Certificates
- Exchange Server 2007 : Securing Access to ActiveSync with Secure Sockets Layer Encryption (part 1) - Installing a Third-Party CA on a CAS
 
 
Top 10
- Microsoft Visio 2013 : Adding Structure to Your Diagrams - Finding containers and lists in Visio (part 2) - Wireframes,Legends
- Microsoft Visio 2013 : Adding Structure to Your Diagrams - Finding containers and lists in Visio (part 1) - Swimlanes
- Microsoft Visio 2013 : Adding Structure to Your Diagrams - Formatting and sizing lists
- Microsoft Visio 2013 : Adding Structure to Your Diagrams - Adding shapes to lists
- Microsoft Visio 2013 : Adding Structure to Your Diagrams - Sizing containers
- Microsoft Access 2010 : Control Properties and Why to Use Them (part 3) - The Other Properties of a Control
- Microsoft Access 2010 : Control Properties and Why to Use Them (part 2) - The Data Properties of a Control
- Microsoft Access 2010 : Control Properties and Why to Use Them (part 1) - The Format Properties of a Control
- Microsoft Access 2010 : Form Properties and Why Should You Use Them - Working with the Properties Window
- Microsoft Visio 2013 : Using the Organization Chart Wizard with new data
 
programming4us
Windows Vista
programming4us
Windows 7
programming4us
Windows Azure
programming4us
Windows Server