Journals in Dynamics AX are manual worksheets that
can be posted into the system. One of the frequently used journals for
financial operations is the General journal.
Sometimes, I call it the father of all other financial journals as it
allows processing virtually all types of postings: ledger account
transfers, fixed asset operations, customer/vendor payments, bank
operations, project expenses, and similar. Other derived journals like
the Fixed assets journal or Payment journal in Accounts receivable or Accounts payable are optimized for specific business tasks but, basically, they do the same job.
Dynamics AX also contains other types of journals, for example, in the Inventory management or Production modules. Although those journals are more connected to their specific area, they still share the same principles.
In this recipe, we will
demonstrate how to create a new general journal from X++ code. This is
often required when developing custom functionality, which automatically
creates journals on the user's behalf in order to save time. To
demonstrate the principle, we will create a journal with a single line. A
similar approach could be applied when creating other journals types.
How to do it...
1. Open AOT and create a new class called LedgerJournalTransData with the following code:
class LedgerJournalTransData extends JournalTransData
{
}
void create(
boolean _doInsert = false,
boolean _initVoucherList = true)

{;
lastLineNum++;
journalTrans.LineNum = lastLineNum;
if (journalTableData.journalVoucherNum())
{
this.initVoucher(
lastVoucher,
false,
_initVoucherList);
}
this.addTotal(false, false);
if (_doInsert)
{
journalTrans.doInsert();
}
else
{
journalTrans.insert();
}
if (journalTableData.journalVoucherNum())
{
lastVoucher = journalTrans.Voucher;
}
}
2. Open the LedgerJournalStatic class in AOT and replace its newJournalTransData() with the following code:
LedgerJournalTransData newJournalTransData(
JournalTransMap _journalTrans,
JournalTableData _journalTableData)

{
return new LedgerJournalTransData(
_journalTrans,
_journalTableData);
}
3. In AOT, create a new class called JournalCreate with the following code:
class JournalCreate

{
}
void create()

{
LedgerJournalTable jourTable;
LedgerJournalTrans jourTrans;
LedgerJournalTableData jourTableData;
LedgerJournalTransData jourTransData;
LedgerJournalStatic jourStatic;
;
jourTableData = JournalTableData::newTable(jourTable);
jourTable.JournalNum = jourTableData.nextJournalId();
jourTable.JournalType = LedgerJournalType::Daily;
jourTable.JournalName = 'GenJrn';
jourTableData.initFromJournalName(
LedgerJournalName::find(jourTable.JournalName));
jourStatic = jourTableData.journalStatic();
jourTransData = jourStatic.newJournalTransData(
jourTrans,
jourTableData);
jourTransData.initFromJournalTable();
jourTrans.CurrencyCode = 'USD';
jourTrans.initValue();
jourTrans.TransDate = systemdateget();
jourTrans.AccountNum = '110180';
jourTrans.OffsetAccount = '170150';
jourTrans.AmountCurDebit = 1000;
jourTransData.create();
jourTable.insert();
general journalgeneral journalcreating, steps}
void run()

{;
try
{
ttsbegin;
this.create();
ttscommit;
}
catch (Exception::Deadlock)
{
retry;
}
}
public static void main(Args _args)

{
JournalCreate journalCreate;
;
journalCreate = new JournalCreate();
journalCreate.run();
}
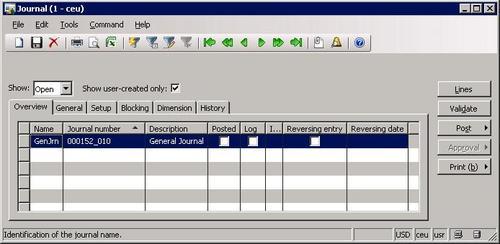
4. Run the class and check the results by opening General ledger | Journals | General journal:

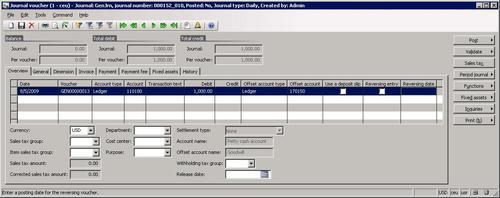
5. Click the Lines button to open journal lines and notice the created line:

How it works...
First we create the LedgerJournalTransData class, which will handle the creation of journal lines. Basically, it is the same as JournalTransData and extends all of its methods apart from create(). This method is also a copy of the same method in JournalTransData with the exception that it does not check the VoucherDraw field on the LedgerJournalTable table. Although this checking is valid for other journals, it has to be excluded here, because the LedgerJournalTable table does not contain this field.
Next, we modify newJournalTransData() of LedgerJournalStatic to use our newly created class.
The new JournalCreate class will be used to demonstrate the journal creation. All logic is placed in its create(). Here, we create a new jourTableData
object used for journal record handling. Then, we initialize journal
number, type, and the name of the actual journal record. For
demonstration purposes the journal name is text, but it could be easily
replaced with a value from some parameter. Next, we call initFromJournalName() on the jourTableData
object to initialize some additional values from journal name settings.
At this stage, the journal header record is ready to be created.
Next, we create a journal line. Here we first create a new jourTransData object for handling the journal line, then we call initFromJournalTable()
to initialize additional values from the journal header, and finally we
set journal line values like currency, transaction date, and so on.
Normally, those values have to be taken from user input, external data,
or any other source depending on the functionality being built. In this
example, we simply specify the values manually. Replace them with your
own values matching your current environment. Also note that we call initValue() on jourTrans after we set the currency value. This ensures that exchange rate and some other values are initialized correctly. initValue() can also be called without setting the currency value first. In this case, the company currency will be used.
And finally, we call create() on jourTransData and insert() on jourTable to create journal line and header records respectively.
The methods run() and main() contain common code. The first one calls create()
inside a single transaction and ensures that it is repeated if deadlock
occurs. The second one allows the class to be executed on its own or
from a menu item.
There's more
The example could easily
be modified to create a different type of journal. To demonstrate that,
let's create a vendor payment journal, which can be found at Accounts payable | Journals | Payments | Payment journal. If we open the form of this journal in AOT, we can see that it is actually the same form as General journal General journal lines it still uses the same LedgerJournalTrans data source. and although the form of the journal lines is different from that of
1. Let's replace create() in JournalCreate class with the following code:
void create()

{
LedgerJournalTable jourTable;
LedgerJournalTrans jourTrans;
LedgerJournalTableData jourTableData;
LedgerJournalTransData jourTransData;
LedgerJournalStatic jourStatic;
;
jourTableData = JournalTableData::newTable(jourTable);
jourTable.JournalNum = jourTableData.nextJournalId();
jourTable.JournalType = LedgerJournalType::Payment;
jourTable.JournalName = 'APPay';
jourTableData.initFromJournalName(
LedgerJournalName::find(jourTable.JournalName));
jourStatic = jourTableData.journalStatic();
jourTransData = jourStatic.newJournalTransData(
jourTrans,
jourTableData);
jourTransData.initFromJournalTable();
jourTrans.CurrencyCode = 'USD';
jourTrans.initValue();
jourTrans.TransDate = systemdateget();
jourTrans.AccountType = LedgerJournalACType::Vend;
jourTrans.AccountNum = '1001';
jourTrans.OffsetAccountType = LedgerJournalACType::Bank;
jourTrans.OffsetAccount = 'USA OPER';
jourTrans.AmountCurDebit = 1000;
jourTransData.create();
jourTable.insert();
}
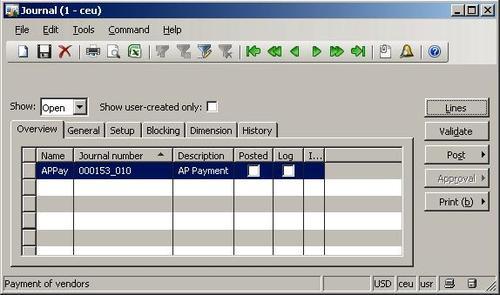
2. Run the class now and open Accounts payable | Journals | Payments | Payment journal to check the results:

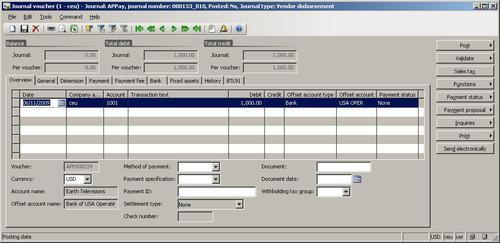
3. Click the Lines button to view journal lines:

The code in this section has only slight differences compared to the previous example:
We changed the journal type to be vendor disbursement, that is, LedgerJournalType::Payment.
We set a different journal name, which matches payment journal configuration.
We changed the journal line account type to vendor and account to vendor number.
And finally, we set Offset account type to be bank and Offset account to bank account ID.