2. Perform a Windows Server 2008 R2 Server Core Installation
Installing Windows Server
2008 R2 Server Core follows a similar process as the previous steps. The
only difference comes in step 3 where you would select Server Core
Installation instead of Full Installation for your edition of Windows.
2.1. Use Sconfig to Configure Your Windows Server 2008 R2 Server Core
After you install Windows
Server 2008 R2 Server Core, you need to configure the basics of the
server, such as the network settings, computer name, domain membership,
and so on. In prior versions of Windows Server, you had to be familiar
with the netsh commands in configuring these aspects of Server Core.
Although you can still configure the Server Core installation with netsh
commands as you may have done in the past, in Windows Server 2008 R2
Server Core there is a new tool you can leverage called Server
Configuration. Server Configuration is a DOS-style menu configuration
system providing simple commands to configure your server. This tool
allows you to complete these common tasks easily. After you log on to
Server Core, type sconfig. You will see a screen similar to Figure 11.

As you can see, this new tool is very easy to follow. For example, after you have launched sconfig,
if you want to change the address, you would press the 8 key to
configure the settings. Then you just need to follow the menu screens to
finish the configuration.
|
When you install Windows
Server 2008 R2 in either a full installation or Server Core, you still
have to activate the operating system to ensure you have a valid
product. Activating will also enable your copy of Windows Server 2008 R2
to function properly. On a full server installation, there is a simple
activation wizard located in the Control Panel, named Activate Windows,
to take you step-by-step through the process. However, in the Server
Core installation of Windows Server 2008 R2, there is no wizard, so you
will have to run one of the following two commands to activate it.
If you entered the product key for your Server Core installation during the install process, then run this script:
cscript C:\windows\system32\slmgr.vbs -ato
If you did not enter the key during the install process, run the following command:
cscript C:\windows\system32\slmgr.vbs -ipk <product key>
After this command executes successfully, run this to activate Windows:
cscript C:\windows\system32\slmgr.vbs -ato
|
3. Upgrade to Windows Server 2008 R2
Upgrading to
Windows Server 2008 R2 can cause you some additional planning and
consideration because Windows Server 2008 R2 is released only in 64-bit
versions. You cannot upgrade an x86-based system to Windows Server 2008
R2. You can only perform a migration, which I will cover in the next
section. Your current operating system and edition will determine the
proper path for your upgrade. It is also important to mention when you
perform an upgrade, under the covers the process is really an in-place
migration. Table 1 shows the paths you can take. If your current operating system is not listed, then it is not supported.
Table 1. Upgrade Paths
| Existing Windows Operating System | Windows Server 2008 R2 Upgrade Options |
|---|
| Windows Server 2003 Standard Edition with Service Pack 2 (SP2) or Windows Server 2003 R2 Standard Edition | Windows Server 2008 R2 Standard, Windows Server 2008 R2 Enterprise |
| Windows Server 2003 Enterprise Edition with SP2 or Windows Server 2003 R2 Enterprise Edition | Windows Server 2008 R2 Enterprise, Windows Server 2008 R2 Datacenter |
| Windows Server 2003 Datacenter Edition with SP2 or Windows Server 2003 R2 Datacenter Edition | Windows Server 2008 R2 Datacenter |
| Server Core installation of Windows Server 2008 Standard with or without SP2 | Server Core installation of either Windows Server 2008 R2 Standard or Windows Server 2008 R2 Enterprise |
| Server Core installation of Windows Server 2008 Enterprise with or without SP2 | Server Core installation of either Windows Server 2008 R2 Enterprise or Windows Server 2008 R2 Datacenter |
| Server Core installation of Windows Server 2008 Datacenter | Server Core installation of Windows Server 2008 R2 Datacenter |
| Server Core installation of Windows Web Server 2008 with or without SP2 | Server Core installation of either Windows Server 2008 R2 Standard or Windows Web Server 2008 R2 |
| Full installation of Windows Server 2008 Standard with or without SP2 | Full installation of either Windows Server 2008 R2 Standard or Windows Server 2008 R2 Enterprise |
| Full installation of Windows Server 2008 Enterprise with or without SP2 | Full installation of either Windows Server 2008 R2 Enterprise or Windows Server 2008 R2 Datacenter |
| Full installation of Windows Server 2008 Datacenter with or without SP2 | Full installation of Windows Server 2008 R2 Datacenter |
| Full installation of Windows Web Server 2008 with or without SP2 | Full installation of either Windows Server 2008 R2 Standard or Windows Web Server 2008 R2 |
| Server Core installation of Windows Server 2008 R2 Standard | Server Core installation of either Windows Server 2008 R2 Standard (repair in place) or Windows Server 2008 R2 Enterprise |
| Server Core installation of Windows Server 2008 R2 Enterprise | Server Core installation of either Windows Server 2008 R2 Enterprise (repair in place) or Windows Server 2008 R2 Datacenter |
| Server Core installation of Windows Server 2008 R2 Datacenter | Server Core installation of Windows Server 2008 R2 Datacenter (repair in place) |
| Server Core installation of Windows Web Server 2008 R2 | Server Core installation of either Windows Web Server 2008 R2 (repair in place) or Windows Server 2008 R2 Standard |
| Full installation of Windows Server 2008 R2 Standard | Full installation of either Windows Server 2008 R2 Standard (repair in place) or Windows Server 2008 R2 Enterprise |
| Full installation of Windows Server 2008 R2 Enterprise | Full installation of either Windows Server 2008 R2 Enterprise (repair in place) or Windows Server 2008 R2 Datacenter |
| Full installation of Windows Server 2008 R2 Datacenter | Full installation of Windows Server 2008 R2 Datacenter (repair in place) |
| Full installation of Windows Web Server 2008 R2 | Full installation of either Windows Web Server 2008 R2 (repair in place) or Windows Server 2008 R2 Standard |
Performing an in-place
upgrade is a destructive process in a sense. You are replacing the
existing server operating system with the new one, and this is a one-way
street, meaning that if the upgrade process goes awry, then you will
incur downtime until you resolve the issue and restore your system.
Before you perform any upgrade or migration, back up your existing
server operating system and data.
Insert the DVD media into the drive, which will present you with the screen shown earlier in Figure 1.
When you click Install Now, you will be presented with a couple of choices on this screen, as shown in Figure 12.
You can choose to participate in the Microsoft Customer Experience
program by selecting I Want To Help Make Windows Installation Better.
This program helps Microsoft identify trends for successful and
unsuccessful installations and determine which updates are needed.
Choosing to participate is strictly optional. You can learn more about
the program by clicking What Information Will Be Sent To Microsoft?
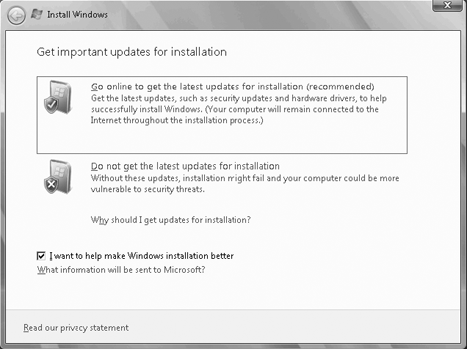
You are also
presented with a choice to upgrade your installation files. You should
always choose to update installation files; the following are the
updates included in this choice:
If you choose to go online and update your installation, you will see a screen similar to Figure 13
while downloading the updates. After you're done downloading updates,
or if you choose not to update the installation, you will proceed to the
next step.

The
next step provides you with the choice to install the edition of
Windows Server 2008 R2. You can choose to install the full edition of
Windows Server 2008 R2 or the Server Core version. Select your version,
and click Next.
Clicking
the Next button will take you to the license agreement screen. This
screen allows you to read, print, and agree to the license terms. Select
the check box on the bottom left of the dialog box to agree to the
license terms, and click Next to continue.
The
next step provides you the choice between performing an upgrade or
custom installation of Windows Server 2008 R2. To proceed to the next
step of the upgrade, you need to choose the upgrade option.
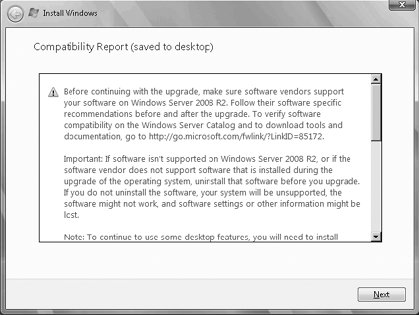
The Windows Server 2008 R2 installation will perform a compatibility check, and you will see a screen similar to Figure 14.
The report will be saved to your desktop, and you will see what devices
will be affected by the Windows Server 2008 R2 upgrade. Click Next to
continue.
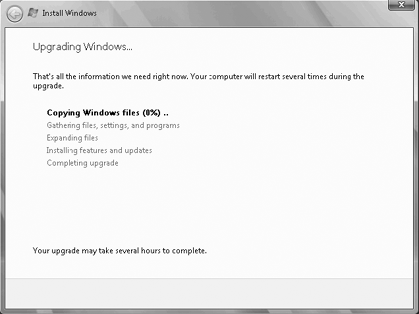
The Windows Server 2008 R2 upgrade will continue to the next step, and you will see a screen similar to Figure 15.
During this phase of installation, all the necessary files, settings,
and programs needed for the upgrade will be collected and analyzed. The
system may also reboot several times during this phase of installation.
After
the final system reboot, the upgrade is complete, and you will be
presented with a login screen. Log in, and you will finish the upgrade.
You can also review the compatibility report again; it is located on the
desktop. The file will be called Windows Compatibility Report.htm.
