You can install both Outlook and Windows Live Mail as clients on a user's computer. The following sections look at these topics:
Understanding Offline Address Books and Autodiscover
Configuring Outlook and Windows Live Mail for the first time
Adding Internet mail accounts to Outlook and Windows Live Mail
Reconfiguring Outlook mail support
1. Understanding Offline Address Books and Autodiscover
Although Exchange Server
2010 continues to support public folders, public folders are no longer
required for access to the global address list or the offline address
book (OAB). Exchange now provides these features through a Web-based
distribution point. Microsoft Office Outlook 2007 and later clients use
the Web-based distribution point for the global address list and the
offline address book automatically.
Every Exchange organization has a
default OAB and one or more additional custom OABs. Each OAB has a
designated Mailbox server, referred to as the generation server,
responsible for creating and updating that particular OAB. The
Microsoft Exchange File Distribution service running on a Client Access
server is responsible for gathering the OAB data and keeping the content
synchronized with the content on the Mailbox server.
The OAB virtual directory
is the Web-based distribution point for the OAB. By default, when you
install a Client Access server, this directory is created on the default
Web site in Internet Information Services (IIS) and configured for
internal access. You can specify an external URL as well.
Outlook 2007, Outlook
2010, and some mobile devices use the Autodiscover service to
automatically configure themselves for access to Exchange. The
Autodiscover service runs on a Client Access server as well and returns
the correct OAB URL for a particular client connection.
When you install a
Client Access server, an Autodiscover virtual directory is created on
the default Web site in Internet Information Services (IIS) and an
internal URL is set up for automatic discovery and other features, such
as the OAB (which can be automatically discovered as well).
For external users who are
running Outlook 2007 or later clients, for Outlook Anywhere to be
automatically configured by using the Autodiscover service you must
install a valid Secure Sockets Layer (SSL) certificate on your
Internet-facing Client Access server that includes both the common name,
such as mail.cpandl.com, and a Subject Alternative name for the
Autodiscover service, such as autodiscover.cpandl.com. You also need to
configure the external URLs for the offline address book, Exchange Web
Services, and Outlook Anywhere.
To configure the external URL for the OAB, you can use the –ExternalUrl parameter of the Set-OABVirtualDirectory cmdlet. In the following example, you set the OAB external URL and configure it for use with SSL:
Set-OABVirtualDirectory -identity "CASServer01\OAB (Default Web Site)"
-externalurl https://mail.cpandl.com/OAB -RequireSSL:$true
To configure the external URL for Exchange Web Services, you can use the –ExternalUrl parameter of the Set-WebServicesVirtualDirectory
cmdlet. In the following example, you set the Exchange Web Services
external URL and configure it for use with basic authentication:
Set-WebServicesVirtualDirectory -identity "CASServer01\EWS (Default Web
Site)" -externalurl https://mail.cpandl.com/EWS/Exchange.asmx
-BasicAuthentication:$True
To configure the external host name for Outlook Anywhere, you can use the –ExternalHostname parameter of Enable-OutlookAnywhere.
In the following example, you set the external host name and configure
Outlook Anywhere for basic authentication:
Enable-OutlookAnywhere -Server CASServer01 –ExternalHostname
"mail.cpandl.com" -ExternalAuthenticationMethod "Basic"
-SSLOffloading:$False
Once you've configured the Autodiscover service and the required URLs, you can test Autodiscover by using Test-OutlookWebServices. Here is an example:
Test-OutlookWebServices -ClientAccessServer "CASServer01"
2. Configuring Outlook for the First Time
You can install Outlook as a
standalone product or as part of Microsoft Office. Outlook can be used
to connect to the following types of e-mail servers:
Microsoft Exchange Server
Connects directly to Exchange Server; best for users who are connected
to the organization's network. Users will have full access to Exchange
Server. If users plan to connect to Exchange Server using Outlook
Anywhere, this is the option to choose as well. With Exchange Server,
users can check mail on an e-mail server and access any private or
public folders to which they have been granted permissions. If you
define a personal folder and specify that new e-mail messages should be
delivered to the personal folder, e-mail messages can be delivered to a
personal folder on a user's computer.
POP3 Connects to Exchange or another POP3 e-mail server through the Internet; best for users who are connecting
from a remote location, such as a home or a remote office, using
dial-up or broadband Internet access. With POP3, users can check mail on
an e-mail server and download it to their inboxes. Users can't,
however, synchronize mailbox folders or access private or public folders
on the server. By using advanced configuration settings, the user can
elect to download the mail and leave it on the server for future use. By
leaving the mail on the server, the user can check mail on a home
computer and still download it to an office computer later.
IMAP4 Connects to Exchange or another IMAP4 e-mail server through the Internet; best for users who are connecting
from a remote location, such as a home or a remote office, using
dial-up or broadband Internet access. Also well suited for users who
have a single computer, such as a laptop, that they use to check mail
both at the office and away from it. With IMAP4, users can check mail on
an e-mail server and synchronize mailbox folders. Users can also
download only message headers and then access each e-mail individually
to download it. Unlike POP3, IMAP4 has no option to leave mail on the
server. IMAP4 also lets users access public and private folders on an
Exchange server.
HTTP
Connects to an HTTP e-mail server, such as MSN Hotmail, through the
Internet; best as an additional e-mail configuration option. Here, users
can have an external e-mail account with a Web-based e-mail service
that they can check in addition to corporate e-mail.
Additional Server Types Connects to a third-party mail server or other services, such as Outlook
Mobile Text Messaging. If your organization has multiple types of mail
servers, including Exchange Server, you'll probably want to configure a
connection to Exchange Server first and then add more e-mail account
configurations later.
To begin, log on to the
computer as the user whose e-mail you are configuring or have the user
log on themselves. If the computer is part of a domain, you should log
on using the user's domain account. If you are configuring e-mail for
use with a direct Exchange Server connection rather than a POP3, IMAP4,
or HTTP connection, you should ensure that the user's mailbox has been
created. If the user's mailbox has not been created, auto-setup will
fail, as will the rest of the account configuration.
Note:
You can configure both Outlook
and Windows Live Mail on the same computer. If you configure Windows
Live Mail after configuring Outlook, Windows Live Mail assumes you might
be migrating from Outlook to Windows
Live Mail and offers to import Outlook mail after you complete the
initial e-mail setup. If you configure Outlook after configuring Windows
Live Mail, Outlook assumes you might be migrating from Windows Live
Mail and offers to import mail after you complete the initial e-mail
setup.
Unlike Outlook 2003 and
earlier releases, Outlook 2007 and later releases are easy to configure,
especially with Autodiscover. The first time you start Outlook, the application runs the Outlook Startup Wizard. You can use the Startup Wizard to configure e-mail for Exchange Server, POP3, IMAP4, and HTTP mail servers, as discussed in the sections that follow.
2.1. First-Time Configuration: Connecting to Exchange Server
You can use the Startup Wizard to configure e-mail for Exchange Server in Outlook by completing the following steps:
Start Outlook and click Next on the Welcome page.
Note:
If you've previously configured
Outlook Express or Windows Live Mail, you'll see the E-Mail Upgrade
Options page. You can then elect to upgrade from or not upgrade from
Outlook Express or Windows Live Mail. If you elect to upgrade, Outlook
attempts to import e-mail messages, address books, and settings from the
e-mail programs detected during initial setup.
When prompted as to whether you would like to configure an e-mail account, verify that Yes is selected and then click Next.
The next page of the wizard varies depending on the computer's current configuration:
For
computers that are part of a domain and for users that have an existing
Exchange Server mailbox, the Startup Wizard uses the Autodiscover
feature to automatically discover the required account information, as
shown in Figure 1.
For
computers that are part of a domain and for users for which you have
not created an Exchange mailbox, leave the wizard open, create the
user's Exchange mailbox, and then proceed with the wizard once the
mailbox is automatically discovered.
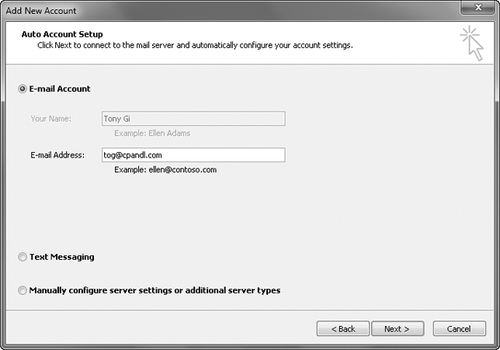
For
computers that are part of a workgroup or for which you are logged on
locally, Outlook assumes you want to configure the user to use an
Internet e-mail account. You must next enter the user's account name,
e-mail address, and password. Then type and confirm the user's password.
When
you click Next, the Startup Wizard, taking advantage of the new Auto
Account Setup feature, attempts to automatically discover the rest of
the information needed to configure the account and then uses the
settings to log on to the server. If the auto-configuration and server
logon are successful, click Finish and skip the remaining steps in this
procedure. The wizard then sets up the user's Exchange mailbox on the
computer as appropriate.
If
auto-configuration is not successful, click Next so that the wizard can
attempt to establish an unencrypted connection to the server. If the
auto-configuration and server logon are successful this time, click
Finish and then skip the remaining steps in this procedure.
If
auto-configuration fails twice, you'll see a prompt to confirm the
user's e-mail address. If the e-mail address is incorrect, change it to
the correct one and then click Retry. If the auto-configuration and
server logon are successful this time, click Finish and then skip the
remaining steps in this procedure.
If
all attempts at auto-configuration fail, you can try to configure
settings manually. The wizard automatically selects the Manually
Configure Server Settings check box. Click Next. On the Choose E-Mail
Service page, select Internet E-Mail or, Microsoft Exchange.
Click Next. On the next wizard page, complete the necessary information
for the type of e-mail service you selected. If necessary, click More
Settings, and then use the Properties dialog box provided to configure
the additional required settings. When you are finished, click OK to
close the Properties dialog box. Click Next and then click Finish to
complete the mail configuration.
2.2. First-Time Configuration: Connecting to Internet E-Mail Servers
When a user is logged on to a
domain, Outlook automatically attempts to configure itself for use with
the user's Exchange mailbox as part of its initial configuration. This
configuration works for internal users but not for remote users who need
to or prefer to access Exchange using POP3 or IMAP4 (rather than
Outlook Anywhere). For these users, you can complete the first-time
configuration of Outlook by following these steps:
In
the Startup Wizard, when you are prompted as to whether you would like
to configure an e-mail account, verify that Yes is selected and then
click Next.
Select the Manually Configure Server Settings Or Additional Server Types check box, and then click Next.
On the Choose E-Mail Service page, select Internet E-Mail and then click Next.
In the Your Name text box, type the name that will appear in the From field of outgoing messages for this user, such as William Stanek.
In
the E-Mail Address text box, type the e-mail address of the user. Be
sure to type the e-mail user name as well as the domain name, such as [email protected].
From
the Account Type list, select the type of protocol to use for the
incoming mail server as POP3 or IMAP4. The advantages and disadvantages
of these protocols are as follows:
POP3
is used to check mail on an e-mail server and download it to the user's
inbox. The user can't access private or public folders on the server.
By using advanced configuration settings, the user can elect to download
the mail and leave it on the server for future use. By leaving the mail
on the server, the user can check mail on a home computer and still
download it to an office computer later.
IMAP4
is used to check mail on an e-mail server and download message headers.
The user can then access each e-mail individually and download it.
Unlike POP3, IMAP4 has no option to leave mail on the server. IMAP4 also
lets users access public and private folders on an Exchange server. It
is best suited for users who have a single computer, such as a laptop,
that they use to check mail both at the office and away from it.
Enter
the fully qualified domain name (FQDN) for the incoming and outgoing
mail servers. Although these entries are often the same, some
organizations have different incoming and outgoing mail servers. If you
are not certain of your mail servers' fully qualified domain names,
contact your network administrator.
Note:
If you're connecting to
Exchange with POP3 or IMAP4, you should enter the fully qualified domain
name for the Exchange server rather than just the host name. For
example, you would use MailServer.cpandl.com instead of MailServer. This
ensures Outlook will be able to find the Exchange server.
Under
Logon Information, type the user's logon name and password. If the mail
server requires secure logon, select the Require Logon Using Security
Password Authentication check box.
To
verify the settings, click Test Account Settings. Outlook then sends a
test message to the specified mail server. If the test fails, note the
errors and make corrections as necessary.
If
necessary, click More Settings, and then use the Properties dialog box
provided to configure the additional required settings and then click
OK. When you are ready to continue, click Next, and then click Finish to
complete the configuration.
