Updating Source Code Casing
You can set the Source
Code Titlecase Update tool, available on the Add-Ins submenu, to
automatically execute before elements are checked in to ensure uniform
casing in variable and parameter declarations and references. You can
specify this parameter when setting up the version control system by
selecting the Run Title Case Update check box.
Creating New Elements
When using version
control, you create new elements just as you normally would in the
MorphX environment without a version control system. These elements are
not part of your check-in until you click Add To Version Control on the
context menu.
You can also create all
element types except those listed in System Settings (from the
Microsoft Dynamics AX drop-down menu: Tools\Development Tools\Version
Control\Setup\ System Settings). By default, jobs and private projects
are not accepted.
New elements
should follow Dynamics AX naming conventions. The best practice naming
conventions are enforced by default, so you can’t check in elements with
names such as aaaElement, Del_Element, element1, or element2. (The only Del elements allowed are those required for version upgrade purposes.) You can change naming requirements in System Settings.
Renaming Elements
An element must be in the
checked-in state to be renamed. Because all references in .xpo files are
strictly name based (not ID based), all references to renamed elements
must be updated. For example, when you rename a table field, you must
also update any form or report that uses that field. Most references in
metadata in the AOT are ID based, thus not affected when an element is
renamed; in most cases, it is enough to simply check out the form or
report and include it in the check-in to update the .xpo file. You can
leverage the cross-reference functionality to identify references.
References in X++ code are name based. You can use the compiler to find
affected references.
An element’s revision
history is kept intact when elements are renamed. No tracking
information in the version control system is lost because of a rename.
Deleting Elements
You
delete an element as you normally would in Dynamics AX. The delete
operation must be checked in before the deletion is visible to other
users of the version control system. You can see pending deletions in
the Pending Objects dialog box.
Labels
Working with labels is
very similar to working with elements. To change, delete, or add a
label, you must check out the label file containing the label. You can
check out the label file from the Label Editor dialog box.
The main difference
between checking out elements and checking out label files is that
simultaneous check-outs are allowed for label files. This means that
others can change labels while you have a label file checked out.
When you check in a
label file, your changes are automatically merged into the latest
version of the file. If you modify or delete a label that another person
has also modified or deleted, your changes are lost. Lost changes are
shown in the Infolog.
The ID server guarantees that label IDs are unique; adding labels won’t generate conflicts.
Get Latest
If someone else has
checked in a new version of an element, the Get Latest option on the
context menu allows you to get the version of the element that was most
recently checked in. This option isn’t available when you have the
element checked out yourself.
Get Latest is not applicable to MorphX VCS.
Synchronization
Synchronization allows you
to get the latest version of all elements. This step is required before
you can check in any elements. You can initiate synchronization from
the Microsoft Dynamics AX drop-down menu: Tools\Development
Tools\Version Control\Periodic\Synchronize.
Synchronization is divided into three operations that happen automatically in the following sequence:
Copy the latest files from the version control server to the local disk.
Import the files into the AOT.
Compile the imported files.
You
should use synchronization to make sure your system is up to date.
Synchronization won’t affect any new elements that you have created or
any elements that you have checked out.
Figure 4 shows the Synchronization dialog box.
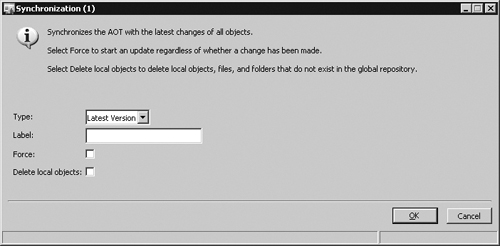
Selecting the Force check
box gets the latest version of all files, whether or not they have
changed, and then imports every file.
When using Visual SourceSafe,
you can also synchronize to a label defined in Visual SourceSafe. This
way you can easily synchronize to a specific build or version number.
Synchronization is not applicable to MorphX VCS.
Synchronization Log
How you keep track of
versions on the client depends on the version control system being used.
Visual SourceSafe requires that Dynamics AX keep track of itself. When
you synchronize the latest version, it is copied to the local repository
folder from the version control system. Each file must be imported into
Dynamics AX to be reflected in the AOT. To minimize the risk of partial
synchronization, a log entry is created for each file. When all files
are copied locally, the log is processed, and the files are
automatically imported into Dynamics AX.
When
synchronization fails, the import operation is usually the cause of any
problems. Synchronization failure leaves your system in a partially
synchronized state. To complete the synchronization, you must restart
Dynamics AX and restart the import. You use the synchronization log to
restart the import, and you access it from the Microsoft Dynamics AX
dropdown menu at Tools\Development Tools\Version
Control\Inquiries\Synchronization Log.
The Synchronization Log dialog box, shown in Figure 5,
displays each batch of files, and you can restart the import by
clicking Process. If the Processed check box is not selected, the import
has failed and should be restarted.

The Synchronization Log is not available in MorphX VCS.
Show History
One of the biggest
advantages of version control is the ability to track changes to
elements. Selecting History on an element’s context menu displays a list
of all changes to an element, as shown in Figure 6.
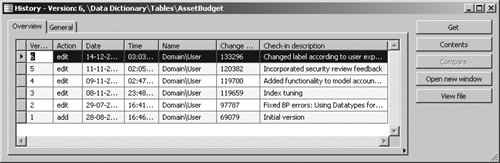
This dialog box shows
the version number, the action performed, the time the action was
performed, and who performed the action. You can also see the change
number and the change description.
A set of buttons in the
revision history dialog box allows further investigation of each
version. Clicking Contents opens a form that shows other elements
included in the same change. Clicking Compare opens the Compare dialog
box, which allows you to do a line-by-line comparison of two versions of
the element. The Open New Window button opens an AOT window that shows
the selected version of the element, which is useful for investigating
properties because it allows you to use the standard MorphX toolbox.
Clicking View File opens the .xpo file for the selected version in
Notepad.
Revision Comparison
Comparison
is the key to harvesting the benefits of a version control system. You
can start a comparison from several places, including the Compare option
on the Add-Ins submenu. Figure 7 shows the Comparison dialog box where two revisions of the form CustTable are selected.
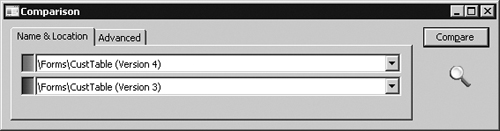
The Compare dialog
box contains a list of all checked-in versions, in addition to the layer
element versions, when a version control system is used.
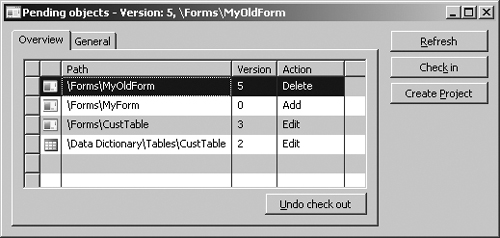
Pending Elements
When you’re working on a
project, it’s easy to lose track of which elements you’ve opened for
editing. The Pending Objects dialog box, shown in Figure 8,
lists the elements that are currently checked out in the version
control system. Notice the column containing the action performed on the
element. Deleted elements are available only in this dialog box; they
are no longer shown in the AOT.
You can access the
Pending Objects dialog box from the Microsoft Dynamics AX drop-down
menu: Tools\Development Tools\Version Control\Pending Objects.
Build
Because
the version control system contains .xpo files, and not an .aod file, a
build process is required to generate an .aod file from the .xpo files.
The following procedure is a high-level overview of the build process.
1. | Use
the CombineXPOs command-line utility to create one .xpo file by
combining all .xpo files. The purpose of this step is to make the .xpo
file consumable by Dynamics AX. Dynamics AX requires all referenced
elements to be present in the .xpo file or to already exist in the AOT
to maintain the references during import.
|
2. | Import the new .xpo file by using the command-line parameter -AOTIMPORTFILE=<FileName.xpo>
to Ax32.exe. This step imports the .xpo file and compiles everything.
After it is complete, the new .aod file is ready.
|
You must follow these
steps for each layer you build. The steps are described in more detail
in the Microsoft Dynamics AX 2009 SDK.
The build process doesn’t apply to MorphX VCS.
Integration with Other Version Control Systems
The implementation of
the version control system in Dynamics AX is fully pluggable. This means
that any version control system can be integrated with Dynamics AX.
Integrating with another version control system requires a new class implementing the SysVersionControlFileBasedBackEnd
interface. It is the implementation’s responsibility to provide the
communication with the version control system server being used.
