One of the main benefits of any customer relationship
management system is that the software allows you to create
relationships between records in your database. These relationships
allow you to understand the different types of data about your
customers, vendors, and partners, and how they interact with one
another. The Microsoft Dynamics CRM user interface displays the link
between two records by using a lookup. The default contact form includes
two lookups: one for the Parent Customer and one for the default
currency.
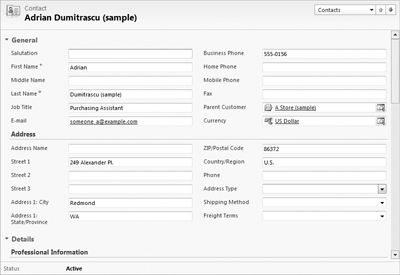
You can visually determine that a field is a lookup because:
The text in the field is hyperlinked (blue and underlined).
There is an icon to the left of the text that indicates the entity of the linked record.
 The field includes an icon with a window and a magnifying glass.
Clicking the hyperlinked text
in the field will launch a new window displaying the linked record.
Unlike the other fields on the form, in which you simply enter data into
the field, lookup fields require you to select a record to link to. You
can link records in the lookup field by using one of three techniques:
Use the Look Up Records dialog box To use this technique, click the lookup icon. Microsoft Dynamics CRM will then launch the Look Up Records dialog box, which you can use to search for and select a specific record.
Use automatic resolution To use this technique, simply start typing the name of the linked
record in the lookup field. After you enter all (or a portion) of the
linked record’s name, click a different form field or press the Tab key.
Microsoft Dynamics CRM will then try to automatically resolve your
entry to an existing record.
Select recently used
As you start typing in a lookup field, you might notice that a list of
records automatically appears under the lookup field. This list of
records is known as the most recently used list. To choose one of these
records, simply click the one you want.
Tip:
The automatic resolution feature in lookups can provide a significant time savings when you work with many different records.
Microsoft Dynamics CRM will try to match records in the lookup by using the find
fields of the entity. The record name is typically included as a find
field, but your administrator might configure additional find
fields that you can use with automatic resolution. If Microsoft
Dynamics CRM finds just one matching record during the automatic
resolution, it will populate the lookup field with a link to that
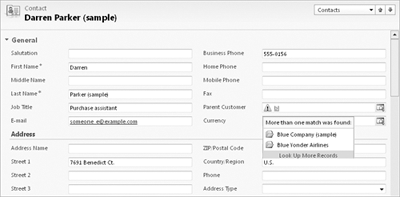
record. If more than one match is found, the lookup field will display a
yellow match icon and color the text you entered as red. Click the
yellow match icon to view the potential matches, and then select the
record you want. Microsoft Dynamics CRM will then use that value for the
lookup field.
 If Microsoft Dynamics CRM does not find any potential matches, it will
color the text red and display a red circle with a white X.
If Microsoft Dynamics CRM does not find any potential matches, it will
color the text red and display a red circle with a white X.
If you want to remove a value from a lookup
field, you can select the white portion of the field (without clicking
the hyperlinked text) and then press the Backspace key or Delete key.
In this exercise, you will use the most recently used list to populate a lookup value.
Note:
SET UP
Log on to the Microsoft Dynamics CRM website through the web client
before beginning this exercise. Make sure that you have the Microsoft
Dynamics CRM sample data loaded.
Navigate to a contact view and open any contact record.
In the Parent Customer field, click the white space and start typing an account name. For this exercise, type good
and press the Tab key. You will see that Microsoft Dynamics CRM did not
find any matching records, and therefore it displays the red circle
with the white X.
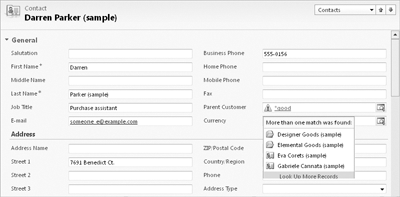
In the same Parent Customer field, click the white space and type *good. This time you added the asterisk wildcard
in front of your entry. The asterisk wildcard expands the search to
include anything that has the text good in it. In our first example (without the wildcard), Microsoft Dynamics CRM only searches for matching records that begin with the text good, and it didn’t find any matches.
With
the wildcard included in the search, Microsoft Dynamics CRM will
display the yellow match icon. Click this icon to see the list of
records that matched your *good
entry. You will see that four possible matches are listed: two accounts
and two contacts. Even though the contact records don’t appear to have
the text good in their name, they appear as a possible match because these contacts are linked to the accounts that do have the text *good in their name.
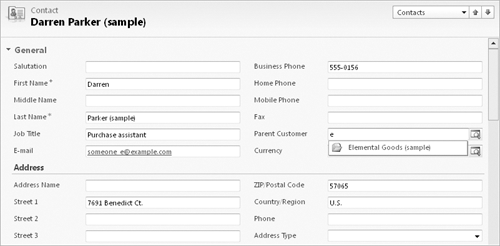
Select Elemental Goods (sample).
When you do so, Microsoft Dynamics CRM automatically adds this record
to your most recently used list. Now you will access that list from a
lookup field, but first you will need to clear out the existing value.
In the Parent Customer field, click the white space and press the Delete key. This will blank out the Parent Customer field.
Now click in the Parent Customer field and type e. Microsoft Dynamics CRM will display the most recently used list directly beneath the lookup field.
To
select a record from this list, click it with your mouse.
Alternatively, you can use the down arrow on your keyboard to select the
record you want and then press Tab.
Tip:
 If you want to manually remove a record from the most recently used list, point to it with your mouse and click the Delete button.
