The Extended Sales Forecasting accelerator is composed of the following components:
Custom goal and goal audit entities
A script function to retrieve Fiscal Period Reporting settings
A set of reports for viewing goal and attainment information
A new role to support the new goal entity
The addition of the Goal Lookup field on the opportunity form
Four workflow definitions to handle notifications and approvals of goals
Documentation of the goal-creation process, reports, and custom entity and installation instructions
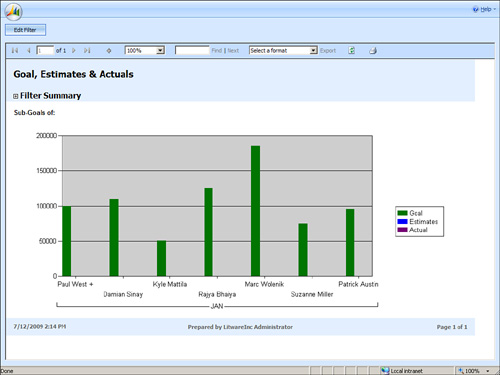
The Extended Sales Forecasting accelerator (shown in Figure 1)
provides an easy-to-use process to monitor revenue goals and track
sales performance against the goals, using a hierarchical approach if
desired (VP Sales, then Sales Managers, and then Salespeople). This
approach is frequently referred to as goal-based forecasting.
Prerequisites and Modifications
The following prerequisites exist for the Extended Sales Forecasting accelerator:
This accelerator modifies the following CRM entities:
For a detailed breakdown
of modifications, review the documents within the \Documentation folder
included with the download files. All files can be downloaded from the
Codeplex website at http://crmaccelerators.codeplex.com.
Once the eService accelerator is downloaded and unzipped, you’ll find the following materials in the Source folder:
Documentation for licensing, solutions, and installation (and a user guide)
All required customization files
Custom reports
Extended Sales Forecasting Accelerator Installation
1. | Run
the installation executable that you downloaded from Codeplex. At the
time of this writing, this is ExtendedSalesForecasting_V1.0_RTW.exe.
|
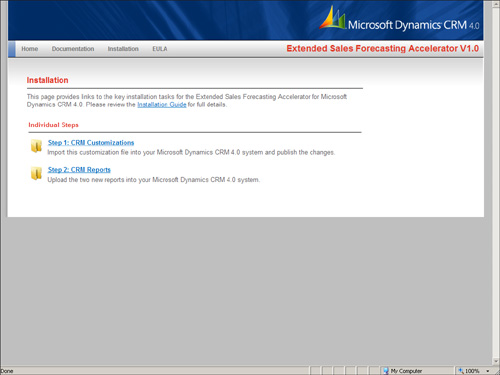
2. | After you’ve extracted the files, a wizard is displayed that you can use to configure the accelerator, as shown in Figure 2.
|
Wizard Step 1: CRM Customizations
1. | Before
you can use this accelerator, you must configure your organization’s
fiscal year settings within CRM, Settings, Business Management, Fiscal
Year Settings. Be sure to review the \Documentation\ Microsoft Dynamics
CRM Extended Sales Forecasting Installation_Guide.doc before attempting
to configure the fiscal year settings.
Note
Once
the fiscal year settings are set within CRM, they cannot be changed
unless a support ticket is opened with Microsoft. You may want to
perform testing within a test environment (such as the CRM 4 virtual PC
image from Microsoft or test server) before implementing fiscal year
settings within a production environment.
|
2. | Within
the Extended Sales Forecasting accelerator Installation Wizard, click
Step 1: CRM Customizations. The \Installation\Step 1 - CRM
Customizations\ folder displays. Copy the extended_sales_forecasting.xml
file to your desktop. You’ll perform this step because the default
installation directory of the accelerators contains too many characters
for the CRM Import Customizations entity.
|
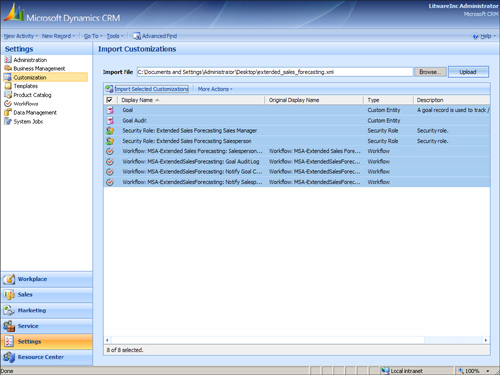
3. | Within
CRM, navigate to Settings, Customization, Import Customizations and
browse to the extended_sales_forecasting.xml file on your desktop.
Upload the customizations, and then import (see Figure 3). You may receive an alert about localization while importing; it’s safe to ignore.
|
4. | Within
CRM, update the Goal entity so that it is displayed in CRM’s navigation
panes. Navigate to Settings, Customization, Customize Entities, Goal
and add check boxes to Areas That Display This Entity (for example,
Sales or Workplace).
|
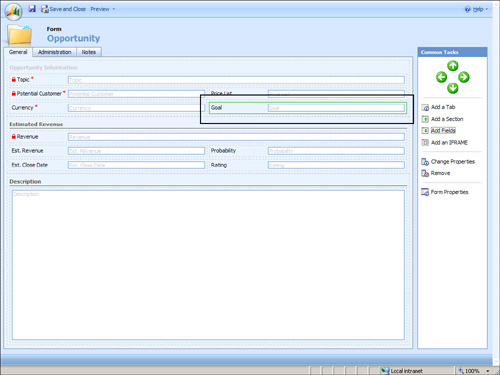
5. | Edit
the Opportunity entity so that the new Goal field is displayed. Edit
the main Opportunity entity form and add the Goal field (msa_goalid), as
shown in Figure 4.
|
6. | Within
the Customize Entities window, select More Actions and then Publish All
Entities to publish the new Goal entities and opportunity modification.
|
7. | Within Settings, Workflow, publish the four newly imported workflows beginning with MSA-Extended Sales Forecasting.
|
8. | After
adding the Goal entity, only the system administrator has access to the
entity. Grant access to the security roles of users who need to view
the Goal entity. A detailed explanation of how to administer the proper
security roles is provided within the \Documentation\ Microsoft Dynamics
CRM Extended Sales Forecasting Installation_Guide.doc file.
|
