Wizard Step 2: CRM Reports
1. | Before adding these two reports to CRM, make sure you do not modify the original filenames.
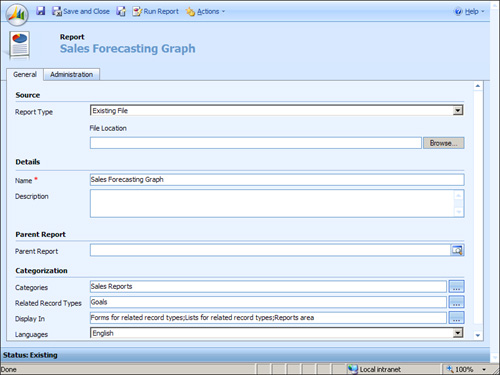
| 2. | Within CRM, navigate to Workplace, Reports, New. You’ll be prompted with a New Report screen. Configure each field as follows:
- Report Type: Existing File
- File Location: \Installation\Step 2 – CRM Reports\MSA Goals – Graph.rdl (making sure the full path to your extracted files exists)
- Name: Sales Forecasting Graph
- Description: Optional text describing the report
- Categories: Sales Reports
- Related Record Types: Goals
- Display In: Reports Area, Forms for related record types, Lists for related record types
- Administration Tab, Viewable By: Organization
After you’ve completed the configurations, your New Report screen should match Figure 5.
| 3. | Click Save and Close to create the new CRM report.
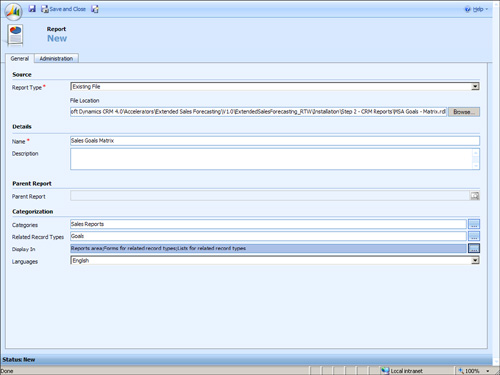
| 4. | Within CRM, navigate to Workplace, Reports, New. You’ll be prompted with a New Report screen. Configure each field as follows:
- Report Type: Existing File
- File Location: \Installation\Step 2 - CRM Reports\MSA Goals - Matrix.rdl (making sure the full path to your extracted files exists)
- Name: Sales Goals Matrix
- Description: Optional text describing the report
- Categories: Sales Reports
- Related Record Types: Goals
- Display In: Reports Area, Forms for related record types, Lists for related record types
- Administration Tab, Viewable By: Organization
After you’ve completed the configurations, your New Report screen should match Figure 6
| 5. | Click Save and Close to create the new CRM report.
| 6. | Optionally,
you can configure the default filters for these reports. Highlight
either report within the Reports window and select More Actions, Edit
Default Filter. This can prove helpful if you’re reporting against time
periods or other criteria that requires filtering.
|
Testing the Extended Sales Forecasting Accelerator
Note
An extensive
explanation of hierarchical goals exists within the \Documentation\
Microsoft Dynamics CRM Extended Sales Forecasting Accelerator
User_Guide.doc of this accelerator’s folder.
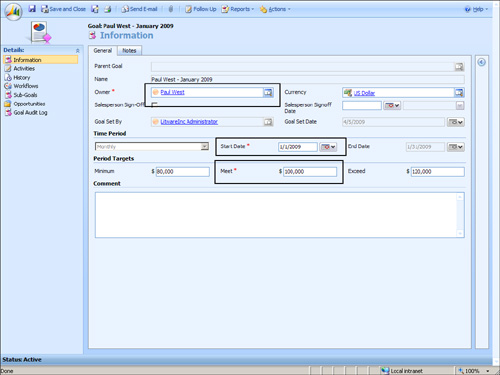
1. | Within CRM, we will create a new parent goal. Navigate to Sales, Goals and click the New button.
Note
Note that the Name field is autopopulated once you select the Owner and the Start Date.
| 2. | Select the Owner, Start Date, and Meet fields, and then click Save (see Figure 7).
| 3. | Now create a subgoal using the following settings:
- Owner: Select an appropriate owner, making sure that their security role allows that owner to access the Goal entity.
- Start Date: Set an appropriate start date.
- Meet: Set a sales goal.
Creating a subgoal allows for sales managers to compare their
sales goals against the salespeople they manage. It also provides
drill-down capabilities within the Goal reports.
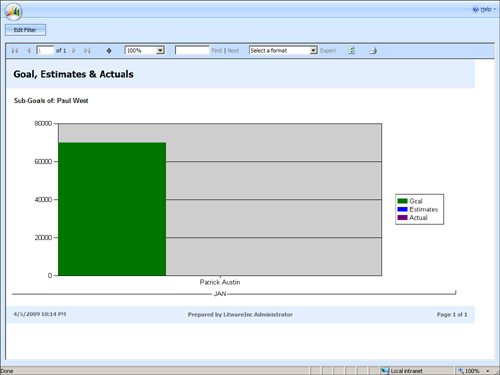
| 4. | Within
Workplace, Reports, run the Sales Forecasting Graph report. Once you
run the report, the parent goal is displayed (for example, the Sales
Manager). Then click the Goal section of the report to open the
subgoals; the salesperson’s goals will display (see Figure 8).
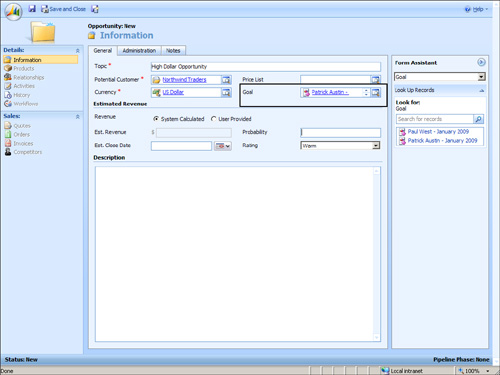
| 5. | To
view metrics against sales goals, we can assign a goal within an
opportunity. Create a new opportunity, and then set a goal with a goal
you’ve previously created (see Figure 9).
Workflow. When a new sales goal is created, a task is assigned to the owner, and the owner can review the goal. If
you mark the task as Completed, a workflow will send an email to the
user who assigned the goal. The goal will be marked as Signed Off. If you mark the task as Canceled, the user who assigned the goal will be notified that the goal has been rejected.
|
|
