Administration of the Edge sever features is done
either through the Lync Server Control Panel or Lync Server Management
Shell. Much of the administration is configuring various external access
and conferencing policies for the users.
Editing the Global External Access Policy
Even though the remote
access services have been enabled on the Access Edge configuration,
users must have their account enabled to use these features. This can be
done at a global level so that it applies to all users or it can be
configured on a per-site or per-user basis. The following steps show how
to enable the features for all users in the organization.
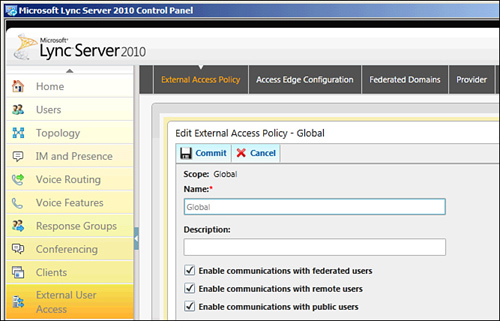
1. | Open the Lync Server Control Panel.
|
2. | Select External User Access in the navigation pane.
|
3. | Click External Access Policy.
|
4. | Highlight the Global policy, click Edit, and click Modify.
|
5. | Check the Enable communications with remote users box.
|
6. | Check the Enable communications with federated users box.
|
7. | Check the Enable communications with public users box.
|
8. | Click Commit when complete. A sample configuration is shown in Figure 1.
|
Alternatively, the Lync Server Management Shell can also be used to configure the following setting:
Set-CSExternalAccessPolicy Global –EnableOutsideAccess $true
–EnableFederationAccess $true
–EnablePublicCloudAccess $true –EnablePublicCloudAudioVideoAccess $true
Tip
The
EnablePublicCloudAudioVideoAccess parameter in the previous example
enables audio and video communication to the public IM providers. The
only support provided for A/V at the time of this writing is the Windows
Live and MSN network.
Creating a New External Access Policy
In some scenarios, it is
best to enable these features only for a select group of users or sites.
Instead of enabling remote access on the global policy, a new policy
must be created and then assigned to a site or user accounts.
1. | Open the Lync Server Control Panel.
|
2. | Select External User Access in the navigation pane.
|
3. | Click Access Edge Policy.
|
4. | Click New and then select Site policy or User policy depending on what should be targeted.
Note
If
a site policy is defined, all users associated with Front End pools in
the site will automatically inherit the policy. This is used to
automatically provision remote access features to some sites while not
allowing it to others.
|
5. | Select the Enable communications with remote users check box.
|
6. | Select the Enable communications with federated users check box.
|
7. | Select the Enable communications with public users check box.
|
8. | Click Commit when complete.
|
Alternatively, the Lync Server Management Shell can be used to create the new policy:
New-CSExternalAccessPolicy "Allow all features" –EnableOutsideAccess $true
–EnableFederationAccess $true –EnablePublicCloudAccess $true
–EnablePublicCloudAudioVideoAccess $true
Tip
To create a policy with site
scope using the Lync Server Management Shell, name the policy with a
“site:” prefix followed by the site name. For instance, if a site called
SF existed, the previous example policy should be named “Site:SF” to
apply only to that site.
Assigning External Access Policies
After creating the new user
policy, it must be assigned to a user account. If the external policy
is created with a site scope, this step is not required.
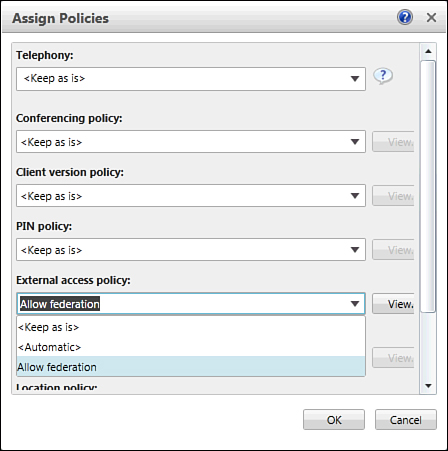
1. | Select Users in the navigation pane.
|
2. | Search for a user, highlight the account, click Modify, and click Assign polices.
|
3. | In the Access Edge policies section, select the new Remote Access policy, and click OK. An example of this configuration is shown in Figure 2.
|
The Lync Server Management Shell can also be used to assign a policy to a user:
Grant-CSExternalAccessPolicy <User's SIP Address> -PolicyName "Allow all features"
Managing Federation
After enabling user
accounts for federation, administrators can manage the organizations
they want to federate with through Lync Server. If partner discovery
lookups are allowed on the Access Edge configuration, all domains are
automatically allowed. Adding allowed domains can still be done to grant
a higher level of trust to partners, but is not required. If partner
discovery is not allowed, administrators must manually add all federated
partners to the allow list.
Blocking a federated domain can
be used to prevent internal users from communicating with specific
partners. This is used in situations where federation should be allowed
globally, but blocked only to a few specific domain names. To allow or
block a federated domain, use the following steps:
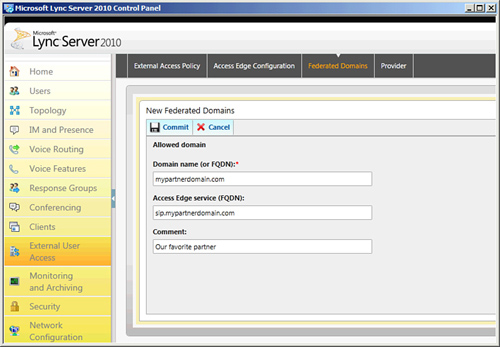
1. | Open the Lync Server Control Panel.
|
2. | Select External User Access in the navigation pane.
|
3. | Click Federated Domains.
|
4. | Click New and then select either Allowed Domain or Blocked Domain.
|
5. | Enter the SIP domain name of the federated domain allowed or blocked as shown in Figure 3 and click OK.
|
Caution
When adding an allowed domain,
the option exists to add the FQDN of the partner’s Access Edge Server.
This field is not required, but when done grants a higher level of trust
to the domain by allowing more requests per second from the domain. Be
careful when using this field because if a partner changes its FQDN
later, the name will no longer be valid.
The Lync Server Management
Shell can also be used to perform these tasks. To allow a new domain,
use the following command. The only required parameter is the domain
name, but a comment and partner’s Access Edge Server FQDN can also be
specified. In addition, the MarkForMonitoring parameter can be set to enable quality monitoring to this domain by a Monitoring Server role.
New-CSAllowedDomain –Domain <SIP Domain Name> -Comment <Comment string> -ProxyFQDN
<Partner Access Edge FQDN> -MarkForMonitoring <True|False>
To block a domain from sending or receiving messages, use the following command:
New-CSBlockedDomain –Domain <SIP Domain Name>
