Logo
programming4us
programming4us
programming4us
programming4us
Home
programming4us
XP
programming4us
Windows Vista
programming4us
Windows 7
programming4us
Windows Azure
programming4us
Windows Server
programming4us
Windows Phone
 
Windows Server

Microsoft Systems Management Server 2003 : Queries (part 2) - Creating a Query

- Free product key for windows 10
- Free Product Key for Microsoft office 365
- Malwarebytes Premium 3.7.1 Serial Keys (LifeTime) 2019
2/15/2013 6:05:24 PM

2. Creating a Query

Now that you’ve gotten your feet wet, let’s put some of these SMS query elements to use by creating a query. Our test query will search for all computers running Windows 2000 that have at least 2 GB of free disk space (perhaps so that we can install Microsoft Office 2003 or upgrade to a newer version of Windows).

You can create a query from a number of locations—for example, you can create or reference a query when you define the membership of a collection, or you can create a status message query in the Status Message Queries folder in the SMS Administrator Console. The process is essentially the same wherever the query is created. For this example, we’ll create a query from the Queries folder in the SMS Administrator Console. To do so, follow these steps:

1.
In the SMS Administrator Console, navigate to the Queries folder and expand it to view the existing queries.

2.
Right-click the Queries folder, choose New from the context menu, and then choose Query to display the Query Properties dialog box.

3.
In the General tab, enter a name for your query. This name can be up to 127 characters, so it can be quite descriptive (as shown in Figure 3). You can also select an existing query to copy and modify by clicking Import Query Statement.
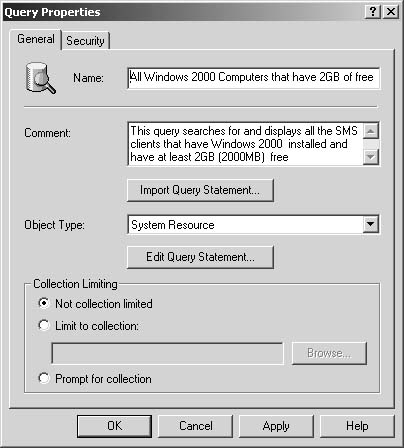
Figure 3. The Query Properties dialog box, showing a descriptive query name.


4.
Enter a more detailed description of the query in the Comment text box if desired.

5.
In the Collection Limiting section, you can narrow the query’s scope by selecting Limit To Collection and then typing in or browsing for the collection name. You can also make the query more interactive and therefore more useful by selecting Prompt For Collection, in which case you’ll need to supply the collection name whenever the query is run. If you leave the default Not Collection Limited option selected, the query will be run against the entire database, assuming that the administrator executing the query has access to the entire database.

6.
Select the object type you want to run the query on, and then click Edit Query Statement to display the Query Statement Properties dialog box, shown in Figure 4.
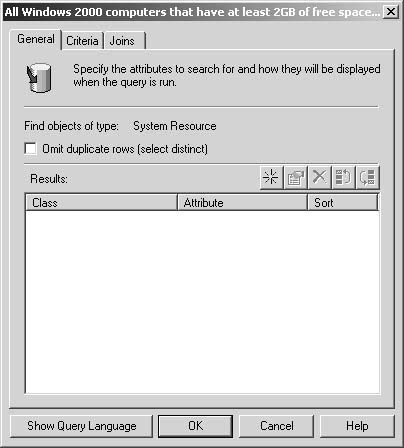
Figure 4. The Query Statement Properties dialog box.


7.
In the General tab, you’ll define the query results window—that is, the data (the attributes) displayed in the SMS Administrator Console when the query is run. To add a class and an attribute, click the New button (the yellow star) to display the Result Properties dialog box, shown in Figure 5.
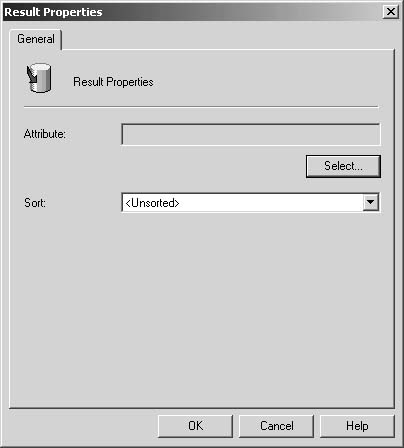
Figure 5. The Result Properties dialog box.


8.
Click Select to display the Select Attribute dialog box, shown in Figure 6, where you define an attribute class and an attribute.
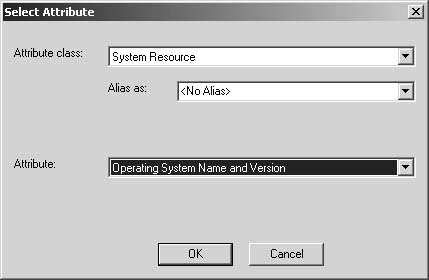
Figure 6. The Select Attribute dialog box.


9.
Enter or select an alias if desired. This must be a valid SQL alias. (Refer to your SQL documentation for more information about aliases.) Click OK to save your selections and return to the Result Properties dialog box.

10.
Select a sort order if desired, and then click OK to return to the Query Statement Properties dialog box.

11.
Repeat steps 7 through 10 to add as many attributes as you want displayed when the query is run. Remember, the query results displayed are based on your query criteria.

12.
Select the Criteria tab. In this tab you will actually define your query statement. Click the New button to display the Criterion Properties dialog box, shown in Figure 7. Here you will define the specific query elements.
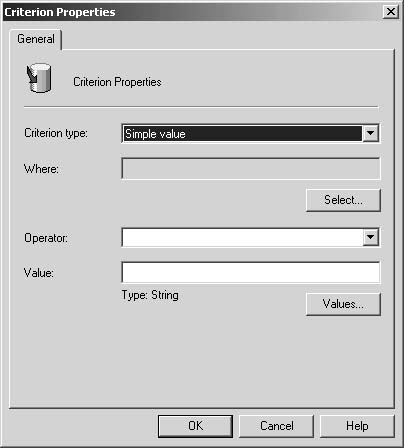
Figure 7. The Criterion Properties dialog box.


13.
Select a criterion type from the drop-down list. To select an attribute class and an attribute to fill the Where text box, click Select to display the Select Attribute dialog box and choose the appropriate entries from the drop-down lists. In this example, because we’re looking for computers with at least 2 GB of free space (2000 MB), our Attribute Class setting will be Logical Disk and the Attribute setting will be Free Space (MBytes).

14.
Click OK to return to the Criterion Properties dialog box and then select an appropriate operator from the drop-down list.

15.
Enter a value. If you click Values, SMS will display the Values dialog box, shown in Figure 8, which lists all the Free Space values currently recorded in the SMS database. You can select one of these values or enter the appropriate value (2000, in this case) in the Value text box and then click OK. Notice that the value will then be added automatically to the Value text box in the Criterion Properties dialog box.
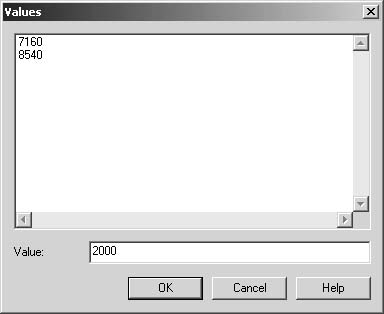
Figure 8. The Values dialog box.


16.
The completed Criterion Properties dialog box is shown in Figure 9. Click OK to save your settings and return to the Criteria tab.
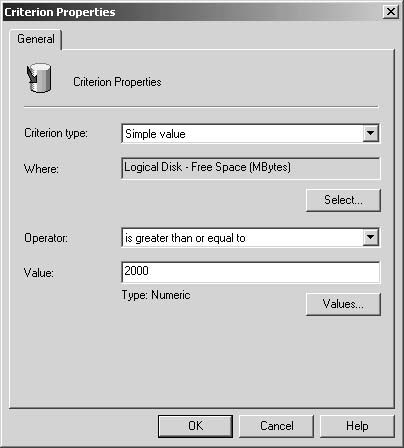
Figure 9. The completed Criterion Properties dialog box.


17.
Repeat steps 12 through 16 to add query statements and use the logical operator buttons listed in the Criteria tab to connect these query statements. The New button, used to add a query statement, creates an AND connection by default. Selecting the AND operator and clicking the & button will change the AND to an OR, and clicking the ! button will change the AND to a NOT. The two Parentheses buttons are for grouping (or ungrouping) two or more selected statements.

18.
Group your statements together using parentheses to define the order of evaluation. For example, Figure 10 shows what the query statement would look like if we had not restricted the query to the All Windows 2000 Server Computers collection.
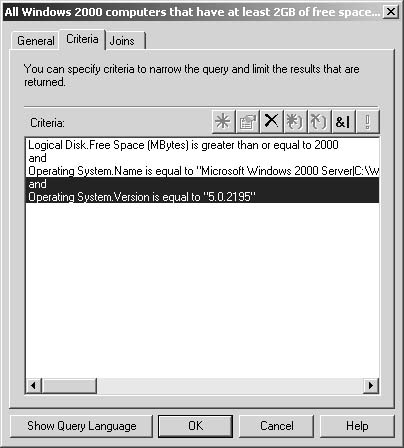
Figure 10. A sample query statement using logical operators and parentheses.


Notice that this example also specifies more precisely the version number of computers running Windows 2000 Server and that the collection is more generic. Notice too that the operating system name and version are grouped together to ensure that we evaluate clients as those running Windows 2000 Server version 5.0.2195 instead of clients that are running Windows 2000 Server and clients that have any operating system whose version is 5.0.2195 (however likely or unlikely that might be).

Other -----------------
- Microsoft Systems Management Server 2003 : Custom SMS Administrator Consoles
- System Center Configuration Manager 2007 : Operating System Install Packages and Image Packages (part 2) - Manual Image Creation, Image Deployment
- System Center Configuration Manager 2007 : Operating System Install Packages and Image Packages (part 1) - Automated Image Creation and Capture
- System Center Configuration Manager 2007 : Operating System Deployment - Computer Associations
- Microsoft Exchange Server 2007 : Load Balancing in Exchange Server 2007
- Microsoft Exchange Server 2007 : Managing a Windows Server 2003 Cluster
- BizTalk Server 2009 : Editing and Resubmitting Suspended Messages (part 2) - Pseudo-Walkthrough to Perform Edits and Resubmits
- BizTalk Server 2009 : Editing and Resubmitting Suspended Messages (part 1) - Sample Flows for Edit and Resubmit
- BizTalk Server 2009 : Building a Resequencing Aggregator
- Windows Server 2003 on HP ProLiant Servers : Security Planning and Design (part 3) - Microsoft Software Update Service and Windows Update Service
 
 
Top 10
- Microsoft Visio 2013 : Adding Structure to Your Diagrams - Finding containers and lists in Visio (part 2) - Wireframes,Legends
- Microsoft Visio 2013 : Adding Structure to Your Diagrams - Finding containers and lists in Visio (part 1) - Swimlanes
- Microsoft Visio 2013 : Adding Structure to Your Diagrams - Formatting and sizing lists
- Microsoft Visio 2013 : Adding Structure to Your Diagrams - Adding shapes to lists
- Microsoft Visio 2013 : Adding Structure to Your Diagrams - Sizing containers
- Microsoft Access 2010 : Control Properties and Why to Use Them (part 3) - The Other Properties of a Control
- Microsoft Access 2010 : Control Properties and Why to Use Them (part 2) - The Data Properties of a Control
- Microsoft Access 2010 : Control Properties and Why to Use Them (part 1) - The Format Properties of a Control
- Microsoft Access 2010 : Form Properties and Why Should You Use Them - Working with the Properties Window
- Microsoft Visio 2013 : Using the Organization Chart Wizard with new data
 
programming4us
Windows Vista
programming4us
Windows 7
programming4us
Windows Azure
programming4us
Windows Server