Combining Attributes
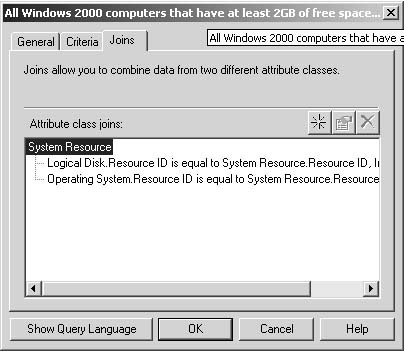
The Joins tab of the Query Statement Properties dialog box, shown in Figure 11,
displays the links made between the attribute classes. This linking is
done for the most part automatically by SMS as you select attributes
from different attribute classes.
Sometimes, however, because of the nature of the query, you might need
to create joins between different attribute classes manually.
To create your own joins to different attribute classes, follow these steps:
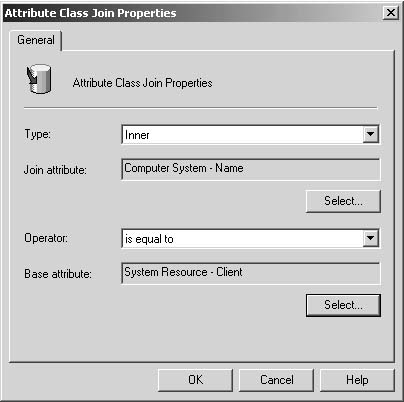
1. | Select the Joins tab and click the New button to display the Attribute Class Join Properties dialog box, shown in Figure 12.
|
2. | In the Type drop-down list, select the join type. Four types of attribute class joins exist in SMS:
- Inner —Displays only matching results
- Left —Displays all results for the base attribute and matching results for the join attribute
- Right —Displays all results for the join attribute and matching results for the base attribute
- Full —Displays all results for both the base and the join attributes
|
3. | To
select an attribute class and attribute for the Join Attribute text
box, click Select to display the Select Attribute dialog box, where you
can select appropriate entries from the drop-down lists. The attribute
you specified will be connected to the base attribute and becomes a
child of the base attribute.
|
4. | Choose an appropriate relational operator from the Operator dropdown list.
|
5. | To
fill in the Base Attribute text box, click Select to display the Select
Attribute dialog box and choose the appropriate base attribute. The
base attribute class is an existing attribute class on which you based
the query. Notice that you can’t change the base attribute class; you
can change only the base attribute.
|
6. | Click OK to close and save your query configuration.
|
7. | Click OK again to save the query.
|
Viewing the Query Language
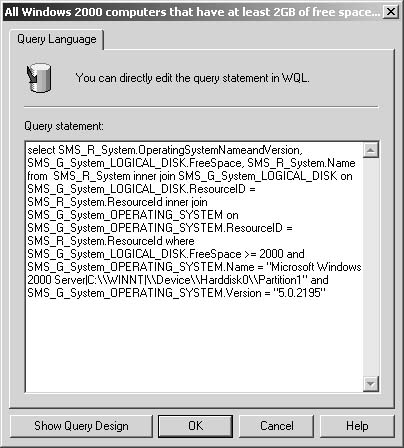
Figure 13
shows our sample query using WQL. You can display the WQL version of
any query by clicking Show Query Language in the General, Criteria, or
Join tab of the Query Statement Properties dialog box. As you can see,
writing an SMS 2003 query using WQL is not trivial.
Prompted Queries
The
query we just created will satisfy our immediate quest for information
from the SMS database. However, it’s static in the sense that it will
always check the database for the same information—that is, all
computers running Windows 2000 Server that have at least 2 GB of free
disk space.
A more useful query would be one that prompts
us for value information as the query is being evaluated. For example,
instead of hard-coding the value 2000, it might be more useful to have the query prompt us for the Size
value. This way, we can use the query repeatedly to find computers with
different amounts of free space for different packages and purposes.
To change our query to a prompted query, we
need to open it and modify it. You can modify any query by
right-clicking it in the SMS Administrator Console and choosing
Properties from the context menu to display the Query Properties dialog
box. Click Edit Query Statement to return to the Query Statement
Properties dialog box, select the Criteria tab, and then double-click
the element you want to modify to display the Criterion Properties
dialog box. In the example shown in Figure 14, we’re modifying the Size value. The criterion type has been changed from Simple Value to Prompted Value.
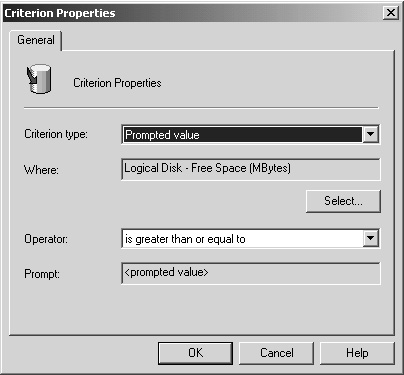
Compare this figure with Figure 16-9,
and you’ll see that the Value field has changed to indicate a prompted
value. When this query is executed, it will first ask us to provide the
value for Logical Disk-Free Space (MBytes).
3. Executing Queries
Now that we’ve seen how to create a query, it’s
time to explore how to run a query. All SMS queries are run through the
SMS Administrator Console. The results of the queries will also be
displayed in the SMS Administrator Console.
To execute our sample query, follow these steps:
1. | In the SMS Administrator Console, navigate to the Queries folder.
|
2. | Right-click the query you want to run and choose Run Query from the context menu.
|
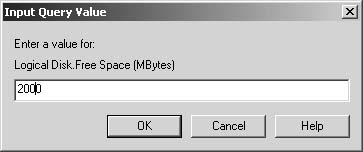
3. | If the query contains any prompts, the Input Query Value dialog box appears, as shown in Figure 15. Enter the appropriate value and click OK.
|
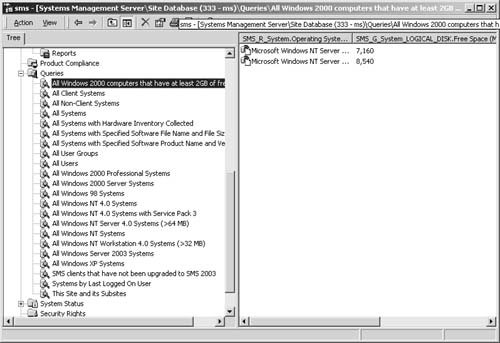
4. | You can view the results of the query in the result pane of the SMS Administrator Console interface, shown in Figure 16. You’ll need to scroll to the right to see all the result fields you chose to display.
|
As with other
SMS-managed objects, such as collections, packages, and advertisements,
only users who have access to the database objects will be able to run
the query. The user must have rights to execute the SMS Administrator
Console, rights to access the Queries folder, and rights to access data
in the SMS database. This permission is assigned by applying object
security through the SMS Administrator Console or sometimes through the
WMI itself.
