.8. Using Exchange Server ActiveSync
Exchange Server ActiveSync is the messaging component
of Exchange Server 2010 that relays messages to mobile devices. Windows
Server 2008 and Windows Server 2008 R2 use Windows Mobile Device Center
version 6.1, which is a version of ActiveSync.
You can use the EMS to create a Microsoft Exchange ActiveSync virtual
directory in Microsoft Exchange Server 2010. When Exchange server 2010 is
installed, a new ActiveSync virtual directory named
Microsoft-Server-ActiveSync is created in the default Internet Information
Services (IIS) website. You can optionally create additional Exchange Server
2010 ActiveSync virtual directories in websites other than the default
website. All the ActiveSync virtual directories you create have the name
Microsoft-Server-ActiveSync.
For example, the following EMS command creates a new ActiveSync virtual
directory in the adatum.com website:
New-ActiveSyncVirtualDirectory -WebSiteName "Adatum.com"
When you install the Client Access server role on Exchange Server 2010,
ActiveSync is enabled by default, and an ActiveSync virtual directory is
created on the Client Access server. You can then configure the virtual
directory using either the EMC or the EMS.
To use the EMC
to configure ActiveSync virtual directory properties, open the EMC, expand
the Console tree, and carry out the following procedure:
In the console tree under Server Configuration, click Client
Access.
In the Work pane, click the Exchange ActiveSync tab. Right-click
Microsoft-Server-ActiveSync and click Properties.
In the General tab, you can view display-only information about
the ActiveSync virtual directory and set internal and external
URLs.
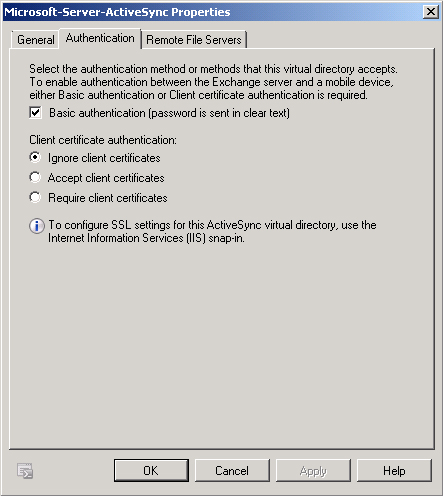
On the Authentication tab, shown in Figure 7, you can
control the authentication methods for the Exchange ActiveSync
virtual directory.

On the Remote File Servers tab, you specify allowed and blocked
host names for ActiveSync clients. This tab also allows you to
configure which domains are treated as internal. You can use the
Block List to configure a list of host names of servers to which
clients are denied access and the Allow List to configure a list of
host names of servers on which clients are allowed to access files.
The Block list takes precedence over the Allow list. You can use the
Unknown Servers list to specify how to access files from host names
not listed in either the Block list or the Allow list. The default
value is Allow. Use the Enter The Domain Suffixes That Should Be
Treated As Internal control to configure specific host names as
internal host names.
You can also use the EMS to configure the Exchange ActiveSync virtual
directory properties. For example, the following command configures the
Exchange ActiveSync virtual directory
with Basic authentication and an External URL of
http://adatum.com/Microsoft-Server-ActiveSync:
Set-ActiveSyncVirtualDirectory -Identity "http://adatum/microsoft-server-activesync"
-BasicAuthEnabled:$true -ExternalURL http://adatum.com/Microsoft-Server-ActiveSync
The following example configures the Exchange ActiveSync virtual directory
with Basic authentication:
Set-ActiveSyncVirtualDirectory -Identity "adatum\microsoft-server-activesync"
-BasicAuthEnabled:$true
By default, users are enabled for ActiveSync in Exchange Server 2010. You
can disable Exchange ActiveSync for a user by using the EMC or the
EMS.
To use the EMC to disable Exchange ActiveSync for a user, open the EMC and
expand the Console tree, then carry out the following procedure:
Click Mailbox under Recipient Configuration in the Console
tree.
Right-click the user’s mailbox and then click
Properties.
Click the Mailbox Features tab.
Click Exchange ActiveSync and then click Disable.
To enable Exchange ActiveSync for a user for whom it has previously been
disabled, you carry out the same procedure except that you click Enable
after you have clicked Exchange ActiveSync.
You can also use the EMS to disable Exchange ActiveSync for a user. The
following command disables Exchange ActiveSync for the mailbox user Don Hall
in the Adatum.com domain:
Set-CASMailbox -Identity [email protected] -ActiveSyncEnabled $false
To use the EMS to enable Exchange ActiveSync for a user for whom it has
previously been disabled, you would enter a command similar to the
following:
Set-CASMailbox -Identity [email protected] -ActiveSyncEnabled $true
You can restrict access to ActiveSync by using the device ID. This feature
prevents users from synchronizing, for example, unauthorized mobile phones
with Exchange Server 2010. By default, if ActiveSync is enabled for a user,
that user can synchronize the Exchange mailbox with any mobile phone. To
restrict a user to a specific mobile phone, you use the
ActiveSyncAllowedDeviceIDs parameter of the
Set-CASMailbox cmdlet. For example, the following
command permits Don Hall to synchronize two mobile phones identified by
their device IDs, where these IDs are specified by the variables
<DeviceID_01> and <DeviceID_02>”:
Set-CASMailbox -Identity: -Identity [email protected] -ActiveSyncAllowedDeviceIDs:
"<DeviceID_01>","<DeviceID_02>"