Now that the basic layout of a document library and
the process of adding documents to a document library have been covered
in the previous section, the additional tools available from the
Documents Ribbon and the drop-down menu will be reviewed. A number of
tools are available, and the tools differ between SharePoint Foundation
2010 and SharePoint Server 2010 Standard and Enterprise, so the version
of SharePoint being used in each case will be clarified. Be aware that
the features enabled in the document library and privileges of the user
accessing the tools will also affect which tools will and won’t display
on the Ribbon and the drop-down menu, as well as which will be grayed
out or available for use. What you see in your environment may differ
from in these examples.
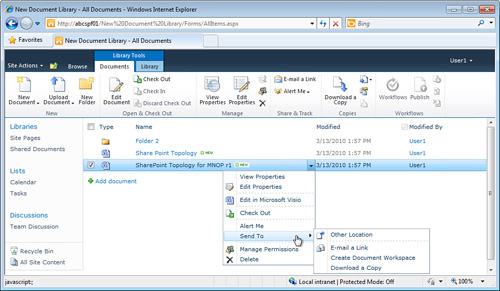
Figure 1
shows a SharePoint Foundation 2010 document library with several items
in it. For one of these documents, the user has accessed the drop-down
menu, which results in a checkmark being added to the left of the
document signifying that the document is selected. Note that the
Documents tab under Library tools on the Ribbon interface becomes active
when the document is selected. The user could also check the box to
access the Documents tab and the tools in it rather than accessing the
drop-down menu.
The Documents tab is a new
feature in SharePoint 2010 that brings the Ribbon interface introduced
in Office 2007 products to the SharePoint environment. Note in Figure 19.8
that there is not a direct mirror of tools provided in the Documents
tab to what is available in the drop-down menu. The order of the tools
in the drop-down menu has stayed similar to the drop-down menu from
SharePoint 2007, so users familiar with SharePoint 2007 drop-down menus
will immediately be at home with the SharePoint 2010 drop-down menus,
even though they might need some time to get familiar with the layout of
the tools on the Ribbon.
The tools in the Documents tab
are covered in the following sections, from left to right, and will
include both the tools from SharePoint Foundation 2010 and SharePoint
Server 2010 with comments made on when tools are specific to SharePoint
Server 2010.
Working with the New Document and Upload Document Tools
Located
to the far left of the Documents tab on the Ribbon, the New Document
and Upload Documents tools are frequently used tools that allow a user
with sufficient permissions to create a new document using the template
assigned to the document library or upload documents.
Follow these steps to use the New Document tool:
1. | From within a document library, using an account with contributor or greater permissions, click the New Document icon.
|
2. | A warning message may appear when the template.dotx or other template file (if defined by the administrator) loads; click OK.
|
3. | Word
2010 loads and displays the template. Customize the template in
whatever fashion desired, and click the Save icon. SharePoint remembers
that the template was stored in the document library, so will prompt for
a document name to save to the library. Provide a document name and
click Save.
|
4. | Click
Exit from the File Menu in Word 2010 and Word will close, and the new
document will appear in the document library. It will be tagged with a
NEW label.
|
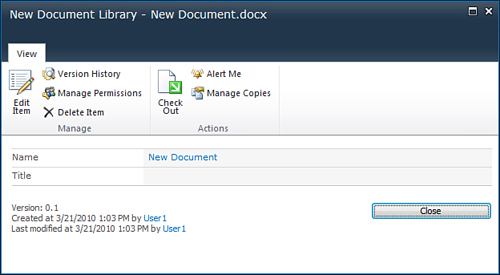
5. | Hover
over the document in the document library and select View Properties
for the new document, and a window will open that shows the properties
of the document, including several tools, the Created date and time and
user as well as the Last Modified date, time, and user, as shown in Figure 2.
|
The document library
administrator can edit the template from the Document Library Settings
page, Advanced Settings link. Also, if the document library has been
configured to allow
management of content types by the library administrator (also
available from the Document Library Settings page, Advanced Settings
link), the content types available in the document library will appear
in this menu.
Note
Users will only be able to use
tools that their permission levels allow them to use. For example, if a
user with reader permissions is visiting a document library, he will not
be able to click the Edit Document icon. It will be grayed out because
he only has the ability to read documents in the library. However, he
can still access some other tools, such as E-mail a Link, Alert Me, and
Download a Copy.
Pros and Cons of the New Folder Tool
An icon for the New Folder
tool will be available for use to the right of the Upload Document icon,
if the library administrator allows the creation of new folders in the
document library (accessible from the Document Library Settings page,
Advanced Settings link). If the New Folder icon is clicked, the folder
can then be named and used to store documents or other folders. Folders
can have unique permissions assigned to them, users can create alerts
based on the contents of folders, and they can be connected to Outlook,
but they are not as manageable as standard items in a document library.
For example, metadata columns added to a document library will not be
editable for a folder in that document library.
There are various stances
about the usefulness of folders in SharePoint that have been argued for
years. One point of view is that folders should not be used in
SharePoint because they can be seen as keeping alive old and possibly
bad habits from file shares. Extending this train of thought, folders in
SharePoint are familiar to users, and comforting to less-sophisticated
users, and so can have value in their familiarity. Savvy SharePoint
document library administrators know that views can be created in
document libraries that completely ignore folders and display all
contents in a flat hierarchy. Savvy administrators also know that
folders can have unique permissions applied to them but also have lived
through the difficulties involved in managing document libraries with
folder-based and item-based permissions.
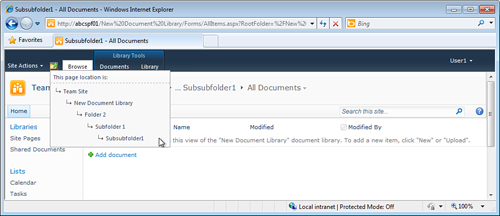
Another “minus” of using
folders in SharePoint document libraries in SharePoint 2007 was that
they made navigation difficult, and it was difficult to see “where you
are” in the folder hierarchy. However, SharePoint 2010 now provides an
elegant navigation tool, as shown in Figure 3, available from the Navigate Up tab to the left of the Browse tab, which clearly shows the folder structure and makes it easy to navigate up the chain to a higher-level folder.
A plus of using
folders in SharePoint 2010 becomes apparent if a user accesses the
drop-down menu of a folder and then clicks the Connect to Outlook icon.
By following the prompts that then appear, assuming the user has a
current version of Outlook client installed, he can link the folder or
subfolder to Outlook and have the contents of this folder available when
offline. This is a handy way to synchronize a portion of the contents
of a document library with the Outlook client, rather than synchronizing
the entire document library, which could be many megabytes or gigabytes
in size.
Finally, the use of folders in
SharePoint document libraries that contain many thousands of documents
can speed up the performance of the library. For example, a document
library with 20,000 documents that doesn’t use folders may perform more
slowly when a user is using filters to try and find the document she
wants, whereas if these documents were split up among 20 folders of
roughly 1,000 documents each, the performance within each folder should
be faster.
Using the Edit Document Tool, Check Out, Check In, and Discard Check Out Tools
The Edit Document, Check Out,
Check In, and Discard Check Out tools are typically the most often-used
tools in a collaborative document library, and so time and effort should
be dedicated to providing training to end users and administrator on
these tools, even if they seem intuitive and “everyone” should know how
to use them instinctively.
Note
It is important to note that
desktop configurations can affect the end-user experience with these
tools. For example, a user with Office 2003 will have a different
experience interacting with documents stored in a SharePoint 2010
document library than a user with Office 2010. The organization should
make support materials, FAQs, and training available to users with
differing desktop configurations. And don’t forget Mac users!
Clicking the Edit Document
icon when a document is selected will open the Microsoft Office
application and allow the user to edit the document, assuming she has
permissions to modify the document in that library. The user may be
shown the Open Document window with a warning that “some files can harm
your computer” but then can open the file in the appropriate
application
This is widely
considered one of the more important features of a document management
system and differentiates SharePoint from a file share and puts it on
par with other ECM (enterprise content management) products or document
management products.
Note
If non-Microsoft file types
are going to be stored in document libraries (for example, Adobe
Photoshop, Autodesk AutoCAD files), IT should carefully test the
behaviors of these files in SharePoint 2010 document libraries. In many
cases, users may need to copy the file to their desktop, and then open
the file for editing and then save to the desktop, and finally upload
back to the SharePoint 2010 document library.
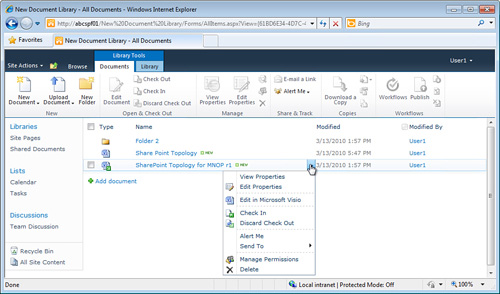
The recommended best
practice is for every user to check out a document before he or she is
going to work on it. The user will then be asked whether to use the
local drafts folder. After the user clicks OK, the document will be
checked out, and the Type icon for the document changes to include a
small green arrow, as shown in Figure 4.
If the user elected to use her local drafts folder, a copy of the
document will be placed in the SharePoint Drafts folder in the user’s
Documents folder (which will be created if it doesn’t already exist).
The options in the drop-down menu now include the tools Check In and
Discard Check Out, as shown in Figure 4.
Note
Checking out a document
can be made mandatory by a document library administrator from the
Document Library Settings page, Versioning Settings link, and in the
Require Check Out section, click Yes under Require Documents to be
Checked Out Before They Can Be Edited.
Now
that the user has the document checked out, she can elect to then edit
the document or wait until later. Other users will see that the document
is checked out by the changed icon, and if the library administrator
has elected to include the Checked Out To column in the view of the
documents, it will be even more clear not only that the document is
checked out, but to whom.
