How to Use the Publish, Unpublish, and Cancel Approval Tools
To begin with, the Publish,
Unpublish, and Cancel Approval tools are active only when a document
library has versioning enabled and configured to allow the creation of
major and minor (draft) versions. A major version is considered the
published version. Versioning is a key component of SharePoint 2010 and
other document management applications because it not only keeps track
of previous versions of a document but also hides them from end users in
the standard views, to make errors less likely when working with the
document.
With versioning enabled,
there is no question which version is the latest version because the
version that appears in the document library is the latest and greatest.
The only case where a previous version will show up as the current
version in the document library is if a user purposefully looks for an
older version of the document, by accessing the Version History tool and selects an older version and
clicks Restore. This will make that older version the “latest” version,
with the highest version number, that will appear in the document
library. But it is a safe assumption that a user would only do this if
he realizes that this older version contains the most valid version of
content for one reason or another.
Note
Be aware that when
versioning is enabled, each version of the document adds the full
document size to the SQL content database. Versioning in SharePoint 2010
does not just track differences between the documents, but keeps a full
copy. Administrators should keep this in mind when determining the
policy for enabling versioning for lists and libraries.
The process of turning a draft
version (for example, 0.1) into a major (for example, 1.0) version is
called publishing in SharePoint parlance, and the Publish button is used
to either start a workflow or instantly publish the document. It is up
to the document library administrator whether to use a workflow for this
process, which is more complex and time-consuming, or to enable instant
publishing. The following example walks through the process of
uploading a document to a document library with major and minor
versioning enabled, scheduling enabled, and workflows enabled.
The scheduling feature can be
turned off or on for a document library by the library administrator.
Scheduling determines when a document will be published and available
for general viewing by users of the site. Before the scheduled start
date is reached, the item will remain in draft status, and once that
date is reached, but before the end date is reached, the document will
be promoted to major version published status. After the end date is
reached, if there is one set, the document will return to draft status.
The Draft Item Security
settings, which are set by the document library administrator and
accessible from the Document Library Settings page via the Versioning
Settings page, determine who can see draft (unpublished) versions of
documents. The options are Any User Who Can Read Items, Only Users Who
Can Edit Items, and Only User Who Can Approve Items (and the author of
the item).
Some document libraries that
are created during the creation of a publishing site or site collection
will have major and minor versioning enabled, and will also have Content
Approval turned on, which means that a user with approver privileges
needs to approve a document before it is published as a major version.
And scheduling may also be enabled for the library, which determines
when the item, once approved, will be available for the general public.
The following example will help clarify the process, as outlined in the
following steps:
1. | A
user of a site collection documents library in a publishing site in
SharePoint Server 2010 Enterprise uploads a document to the library.
This library has major and minor versioning enabled, requires content
approval for submitted items, has a Page Approval workflow configured,
as well as scheduling enabled, and so requires a number of steps to take
place before an uploaded document is available to the general public.
|
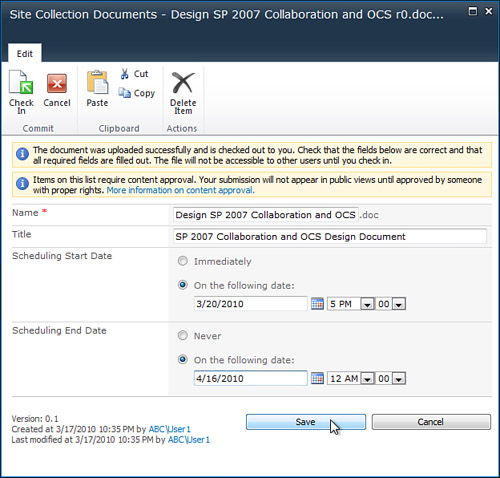
2. | As shown in Figure 13,
the user is prompted to verify the name and title of the document, and
decide whether the scheduling start date should be immediately or a
fixed date, and whether the end date should be never or a fixed date. In
this example, the user wants the document to not be published to a
major version until a given date, and wants it to stay published for
only a few weeks. After he likes the setting, he clicks Save.
|
3. | The
document is now saved in the document library, but is in draft status,
with a version number of 0.1. Based on the settings of the document
library, only users who can edit items in this document library can now
see the document, which includes the user himself.
|
4. | The
user, having decided that the document is ready to be published, then
accesses the drop-down menu for the item in the All Items view, and
clicks the Publish button on the Documents tab of the Ribbon.
|
5. | Because
the Page Approval workflow was automatically configured as active on
this document library, the Workflow.aspx page opens, and provides the
Page Approval workflow as the only option in the Start a New Workflow
section. The user clicks the Page Approval icon to start the workflow.
|
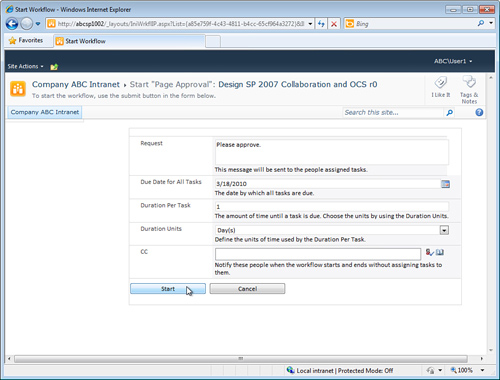
6. | As shown in Figure 14,
the user enters additional information to complete the
workflow—including request text, a due date, duration for the task—and
clicks Start.
|
7. | The approval status of the document is now set to pending, and will remain that way until an approver approves the document.
|
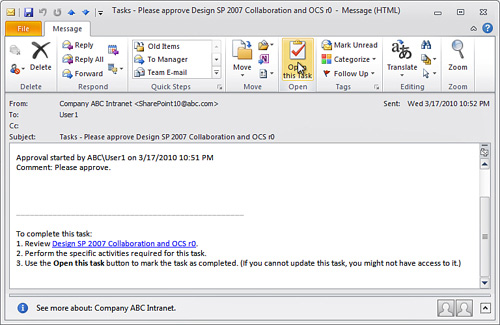
8. | At this point, members of the approvers group on the site will receive emails that a document needs approval, as shown in Figure 15.
The approver clicks the Open This Task button in the Outlook 2010
Ribbon for the email, and a form opens up with the options to Approve,
Reject, Cancel, Request Change, or Reassign Task. The approver clicks
Approve.
|
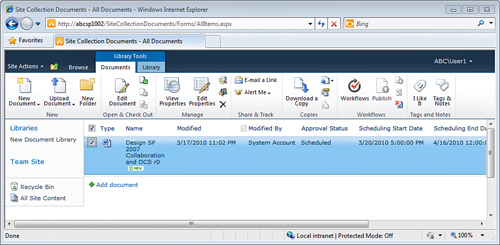
9. | Now the document is approved to be published on the scheduled start date. As shown in Figure 19.23, the Approval Status in set to Scheduled with the start and end dates shown in the two columns to the right. Note also in Figure 16
that the Cancel Approval icon is active, so a user can choose to cancel
the approval if needed and start the process once again.
|
This example shows the
management possibilities of enabling major and minor versioning in a
document library, requiring content approval for documents, using a Page
Approval workflow, as well as using Scheduling Start and End dates.
Enabling the full combination of features does add overhead and
complexity to the process, but helps ensure that content is reviewed by
one or more members of the approvers group for that site before the
“general public” can see the document in a major, published version.
This complexity does require testing and training for administrators,
approvers, and end users to avoid frustration during the process.
Using the I Like It and Tags & Notes Tools
The
I Like It icon and the Tabs & Notes icon are not available from
SharePoint Foundation 2010, but are available in both SharePoint Server
2010 Standard and Enterprise, and are shown on the Documents toolbar in Figure 19.23
on the far-right side. These features are also referred to as social
tags and the note board and provide a great set of tools to promote
users’ adding tags to content in SharePoint.
These tools are easy to use,
and engaging enough to end users that they will soon find themselves
experimenting with them to understand the full breadth of their
potential. For example, if the Tags & Notes icon is surrounded by a
colored band, this indicates that there are tags or notes on the page.
For a specific item, such as shown in Figure 17,
if Tags & Notes is clicked, the window for Tags and Note Board will
open. In this example, several tags were added by the user to this
document, and other recent activities are listed at the bottom of the
window, which show tagging activities by other users. This allows users
to quickly create and apply their own tags and to see how others are
tagging this item. Users can also set tags as Private if they don’t want
other users to see how they are tagging items. Users can also visit
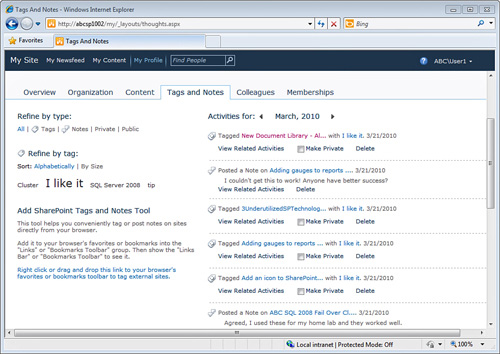
their My Site to see histories of tags they have applied. Figure 18
shows a sample My Site for a user (User1) who has been creating tags
and posts recently, and they are displayed on the right side of the
page. A tag cloud on the left side of the screen shows the frequency
that tags have been used, as indicated by the size of the fonts.

As with any other tool that
makes it easy to post comments, there is the possibility for abuse, but
the user community should be informed of any policies surrounding
inappropriate use of the tools and the repercussions of inappropriate
language or use.
Note
The social tags and note board
Ribbon controls can be disabled by a farm administrator from the Central
Administration site by accessing the System Settings page, and then
clicking Manage Farm Features. Scroll down to the Social Tags and Note
Board Ribbon Controls and click Deactivate.
