Reviewing the E-mail a Link and Alert Me Tools
The next two tools on the
Documents tab are E-mail a Link and Alert Me. The E-mail a Link opens an
email and pastes the link to the document that has been checked. Only a
single document can be selected. This is a great time saver when a user
wants to share a document with another user because it requires just
one click to open the email and paste in the link. This also helps IT
reduce the number of files attached to emails that end up bloating
inboxes.
The Alert Me tool allows the
user to create an alert on a specific document, if one is checked, or to
Manage My Alerts, which opens the My Alerts on this Site page. Then the
user can create an alert for a list or library. Alerts are another
powerful tool that sets SharePoint document libraries apart from
traditional file storage solutions, because they allow SharePoint to
communicate directly to end users via email alerts when existing
documents change or new documents are added to a specific document
library. The following example shows show additional benefits of the
toolset.
The following steps can
be taken to create an alert for a document library, which is a common
task that a user or a site or document library administrator will
perform:
1. | From
within a document library, access the Documents tab from the Ribbon and
then click the drop-down arrow next to the Alert Me icon.
|
2. | Click Manage My Alerts.
|
3. | Click Add Alert.
|
4. | Select a document library or list that you want to keep track of. Click the Next button.
|
5. | Provide
a title for the alert. It is a best practice to include the name of the
list or library in the title, and then an abbreviation for the type of
alert, such as New Document Library All Changes.
|
6. | Add
the users/groups the alerts will be sent to, separated by semicolons.
Note that you can add whomever you like in this field, which is a power
that shouldn’t be abused! Typically, you will be creating the alert for
your own use, but administrators and managers may put in a group name.
|
7. | Leave the delivery method set to E-mail, unless the farm is configured to send text messages (SMS).
|
8. | Select
the Change Type to trigger the alert. This can be All Changes, New
Items Are Added, Existing Items Are Modified, or Items Are Deleted.
|
9. | Select
additional criteria in the Send Alerts for These Changes section. These
options are Anything Changes, Someone Else Changes a Document, Someone
Else Changes a Document Created by Me, and Someone Else Changes a
Document Last Modified by Me.
|
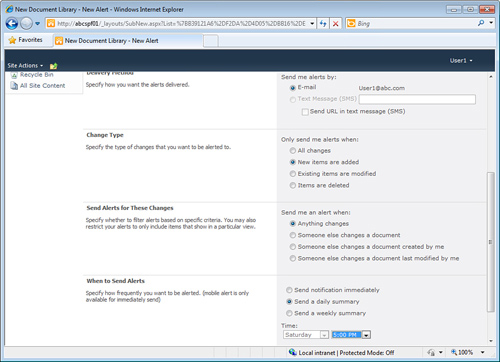
10. | Select
an option for the When to Send Alerts section. The options are Send
Notification Immediately, Send a Daily Summary, or Send a Weekly
Summary. For the daily summary and weekly summary options, a time or day
and time need to be selected. Figure 9 shows the Change Type, Send Alerts for These Changes, and When to Send Alerts settings for a sample alert.
|
11. | Click OK to complete the alert.
|
12. | If
the SharePoint 2010 environment is configured properly, the people
listed in the Send Alerts To field will receive emails letting them know
the alert was successfully created.
|
Understanding the Download a Copy, Send To, Manage Copies, and Go To Source Tools
Next
on the Documents Ribbon are the grouping of tools that include Download
a Copy, with a large icon, and then to the right, the tools Send To,
Manage Copies and Go To Source.
Note
The tools in this section
(Download a Copy, Send To, Manage Copies, and Go To Source) should be
considered advanced tools, and end users should be educated about the
complexities and limitations of these tools. A criticism of these tools
is that they go against one of the purposes of SharePoint, which is to
centralize and consolidate documents rather than have multiple copies in
different places, which these tools make possible. That said, sometimes
these tools can be very useful, or even essential, but should still be
used with caution.
The Download a Copy is
self-explanatory and, if clicked, allows the user to save a copy of the
document to another location. Ideally, this option rarely needs to be
used, since there are a variety of ways to take content offline,
including syncing a folder with Outlook or using SharePoint Workspace or
third-party tools, but there are occasions where downloading a copy is
useful. The primary situation is when a user has the document checked
out and another user really needs to use the document for reference or
possibly to edit it as well. Although a primary purpose for the
check-out process is exactly so other people don’t edit the document,
people sometimes forget they have the document checked out, and the user
who needs it is in a rush and doesn’t want to bother an administrator
or file a help desk ticket. It is important to note that downloading a
copy, editing it, and then saving back to the library once the version
stored by the library has been checked in is a bad practice because the
changes made in the previous version will be “buried” in the previous
versions.
For example, User 1 checks
out a Visio, and makes changes, such as adding a server icon, and then
forgets to check it in. User 2 downloads a copy because he needs to make
an edit and adds a printer icon to the Visio. User 2 now can’t save
back to the document library as the same name, so saves to the document
library with a slightly different name (rev1). User 1 later checks in
his version. Now there are two different primary documents, which is a
classic problem from a file share, and this is confusing to users. A
better practice is for User 2 to email User 1 and request he check the
document back in, and if that fails after a reasonable amount of time,
have the administrator force a check in. This way, the versioning system
will keep all the versions together, and there won’t be multiple
primary documents in the library.
The Send To tool
provides two options: Other Location and Create Document Workspace. The
Other Location can be defined on-the-fly by the user and must be a
SharePoint 2010 document library that the currently logged-in user has
contribute privileges in, or it can be defined by the farm administrator
in the Central Administration site, via the Configure Send to
Connections tool under General Application Settings, or by the document
library administrator in document library settings, Advanced Settings
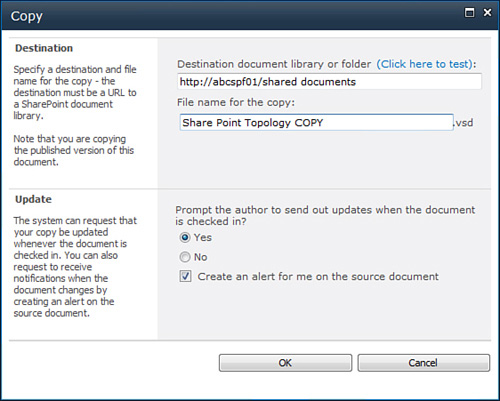
page. Figure 10
shows the Copy window that opens when a user chooses the Send to Other
Location option. The user then types in the name of the destination
document library and can edit the name of the document if desired. The
user has the option to ask that the author send out updates when the
document is checked in and to create an alert on the source document.
Although not perfect, these are both good methods of helping to ensure
that the person who made the copy is aware if the source document has
changed. When the process completes, a copy of the document will be
created in the destination library.
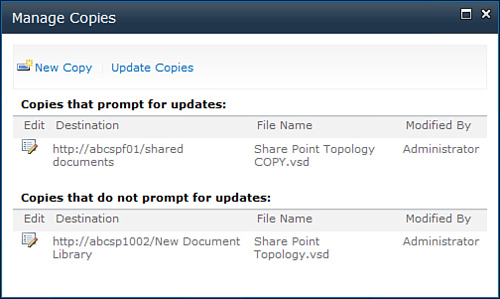
An interesting feature of the
Send To tool and process is that SharePoint is aware that there is
another copy of the document, or even that there are multiple copies of
the document. Figure 11
shows the Manage Copies window for the document that was just copied
using the Send To command. This window allows the user to create a new
copy if needed, or to update copies of the document. The user can remove
links to documents if desired by clicking the Edit button next to the
destination URL. Note, however (and this relates to the note on the
topic of document workspaces), that the document library is not aware of
the copy of the document placed in the document workspace, which can
cause administrative challenges.
A document workspace is actually a site that can be created by a user with sufficient
privileges that will contain a copy of the document as well as other
lists designed for collaboration purposes. Note, however, that unlike
when the Send To command is used, a document workspace copy of a
document does not maintain a connection to the original, which can lead
to confusion on the part of users about which is the latest and greatest
version of the document (the one in the document library on the parent
site, or the one in the document library in the workspace). The document
workspace does provide the tool Publish to Source Location, under the
drop-down menu for the document in the Send To section, which the
administrator of the document workspace needs to remember to use once
the usefulness of the workspace is fulfilled and the document is
complete.
Note
Although a good idea, and a
tool that has been around for years and several versions of SharePoint,
creating document workspaces can be overly complex to administer, so
many organizations decide to discourage their use and lock down which
users have the permissions to create workspaces. For example, when a new
workspace is created, the creator needs to perform the role of a site
administrator and give permissions to users, to allow them to access the
workspace, and then make sure the right version of the document is
being edited, and finally publish the document back to the source
document library when the collaboration is complete.
The final tool in this
section, Go to Source, will be active if the document selected is
connected to a source document. If clicked, it will then show the
property information of the source document.
A High-Level Overview of Workflows
Note
The three-state workflow is
the only workflow template provided in SharePoint Foundation 2010,
while others are available in SharePoint Server 2010. SharePoint Server
2010 Standard and Enterprise provides the following workflow templates:
Disposition Approval, Publishing Approval, Collection Signatures,
Approval, and Collection Feedback.
A workflow must have been
created by a document library administrator for it to be available to
users of the document library. The document library administrator
decides whether the workflow starts automatically or if it can be
started manually by users with Edit Item permissions or if users must
have manage list permissions to start the workflow. Once started, the
workflow communicates to participants via email, which gives
instructions of what they need to do. At the same time, tasks are
created in a SharePoint tasks list, which the participants interact with
and update as they perform their tasks.
If more complex workflows
are required, developers and administrators can use tools such as
SharePoint Designer 2010, Visio 2010, Visual Studio 2010, and other
tools to create more complex workflows. InfoPath 2010 could be used to
create advanced forms that are used within the workflow, emails can be
customized, and complex business logic can be created if needed.
Procedurally, to start a workflow, a user with sufficient rights follows these steps:
1. | The
user either selects Workflows from the drop-down menu or clicks the
Workflow button in the Documents Ribbon after selecting the document.
|
2. | The
Workflow.aspx opens, and shows the user any workflows associated with
the document library. The user clicks the desired workflow. If no
workflows are available, the document library administrator will need to
be contacted to create one.
|
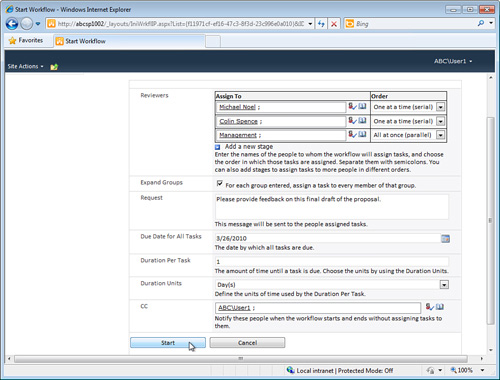
3. | The
user then modifies the settings for the workflow entered by the
document library or site administrator, which can include who is
involved in the workflow, a text message, due dates for all tasks,
duration per task, and other fields depending on the workflow. Figure 12 shows a sample workflow based on the out-of-the-box Collect Feedback workflow.
|
4. | The
user then clicks Start to kick off the workflow, and emails will be
sent to the participants with instructions on the steps to take.
|
The next section provides an
example of a Page Approval workflow, to provide a context for how an
out-of-the-box workflow can be useful in an approval process.
